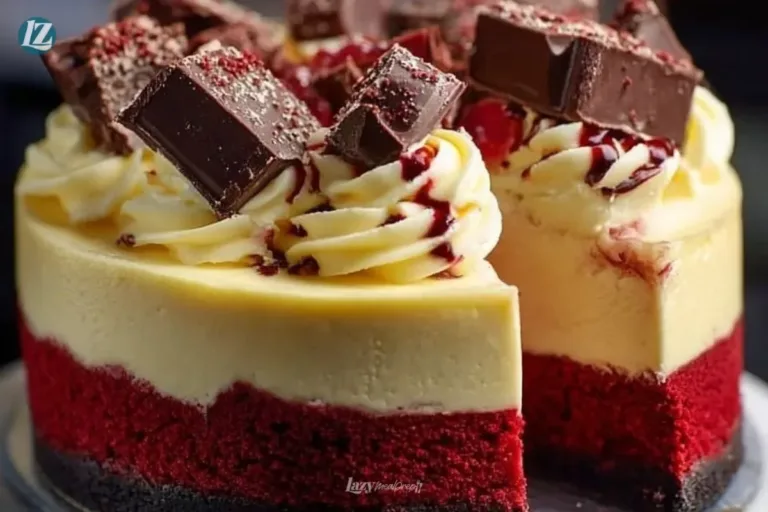
The warm scent of butter and vanilla wraps around the kitchen like a soft blanket as I slide a glossy, ruby-red cake from the oven. The edges are golden, the top still slightly springy, and I can already imagine a silky cream cheese layer melting into the crumb. The Red Velvet Cheesecake is the kind of dessert that makes everyday moments feel a little more special, whether it’s a quiet cup of coffee at dawn or a small birthday shared with a friend. For me, it is the recipe I turn to when I want something buttery-soft, melt-in-your-mouth, and truly worth savoring. light-as-air cloud cake
Why You’ll Love This Red Velvet Cheesecake
This cake brings together two beloved comforts: the tender, cocoa-tinged crumb of red velvet and the lush, tangy creaminess of a cheesecake layer. It is nostalgia and celebration in one slice. I remember making a version of this for my sister’s graduation. We cut into it under soft kitchen light, and everyone paused, almost reverent, before taking the first bite.
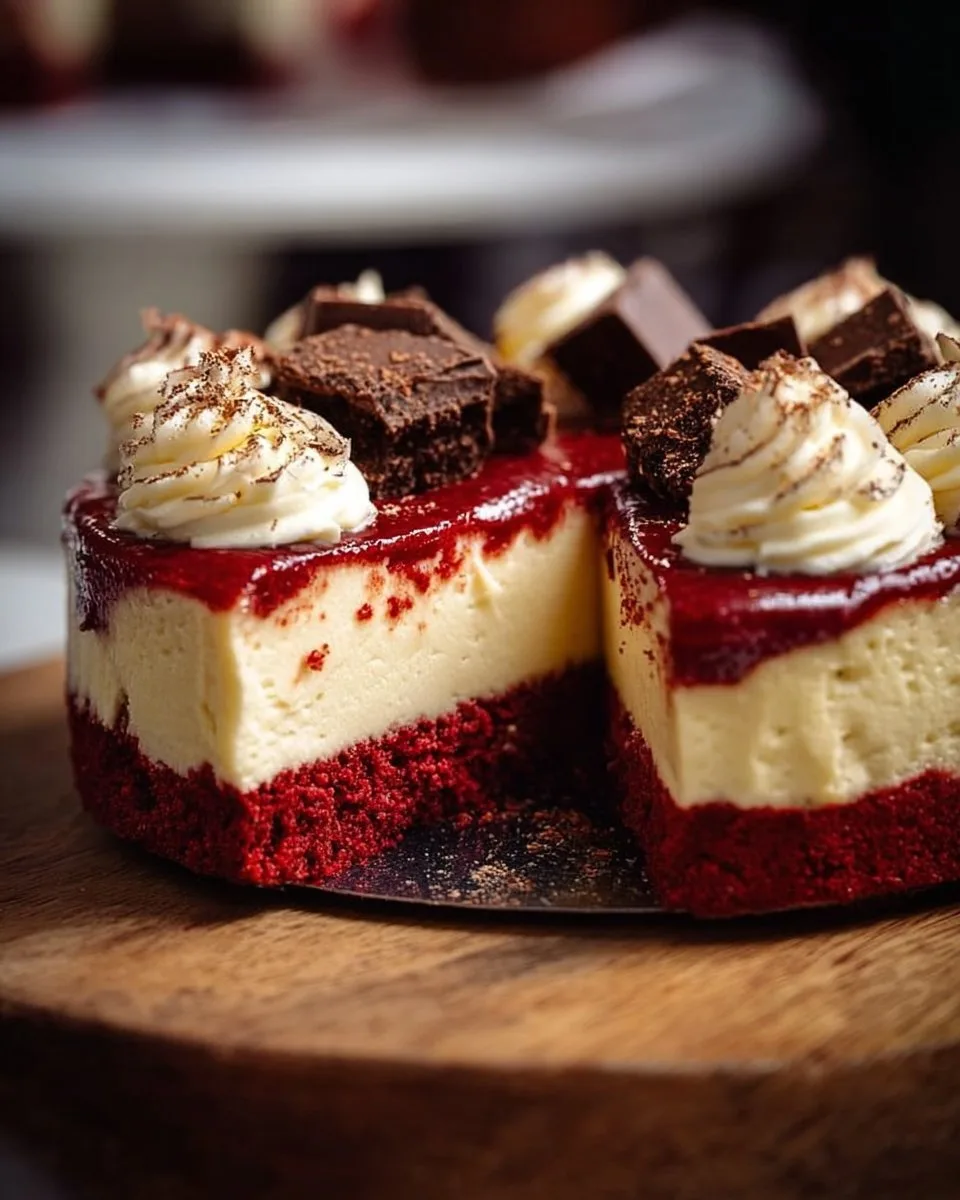
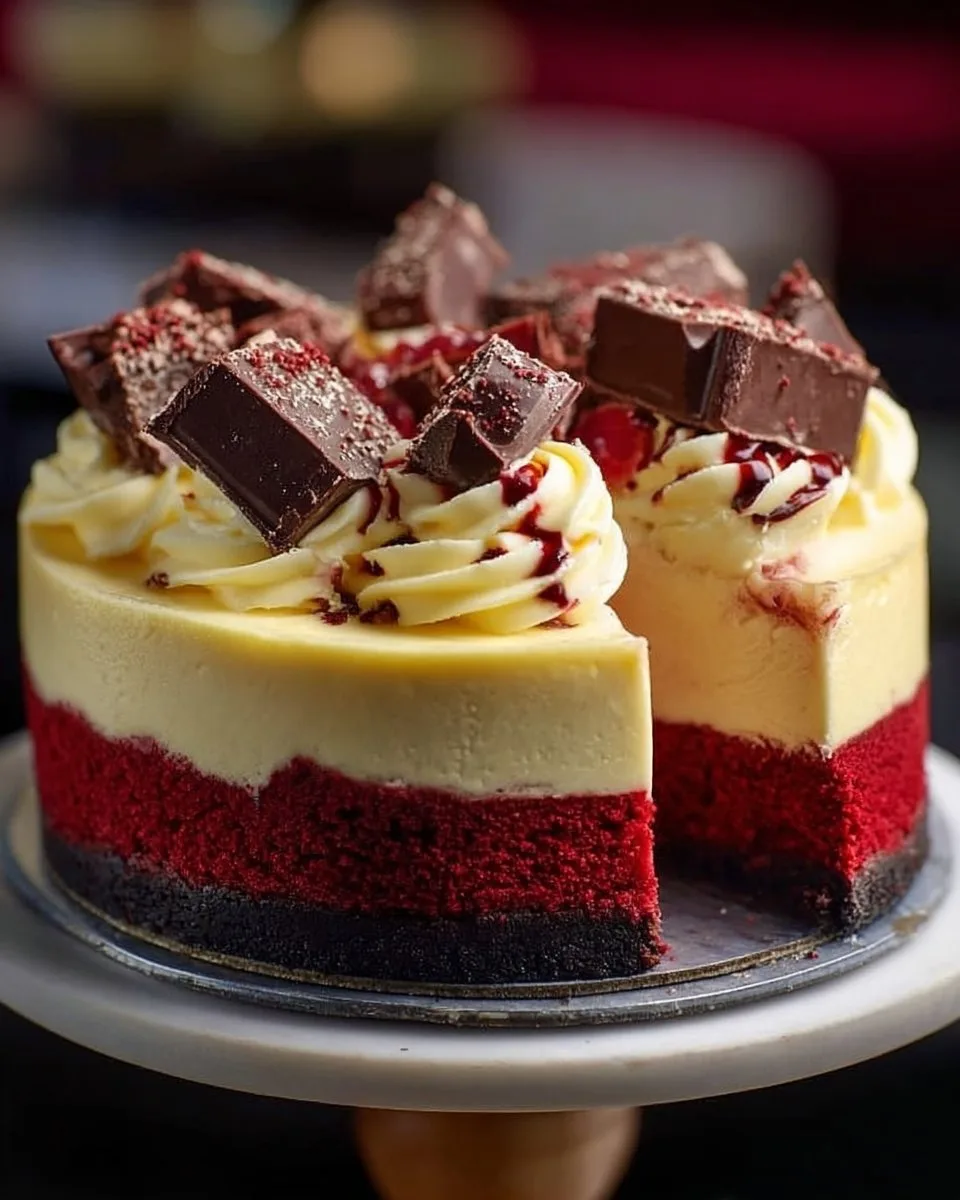
The emotional pull comes from the texture contrasts. You get a delicate red cake that gives way to a denser, velvety cream cheese center. The colors are festive, and the flavor is balanced: a hint of cocoa, a whisper of buttermilk tang, and the familiar richness of cream cheese. It dresses up any occasion, yet it feels right for a quiet Tuesday with a warm mug.
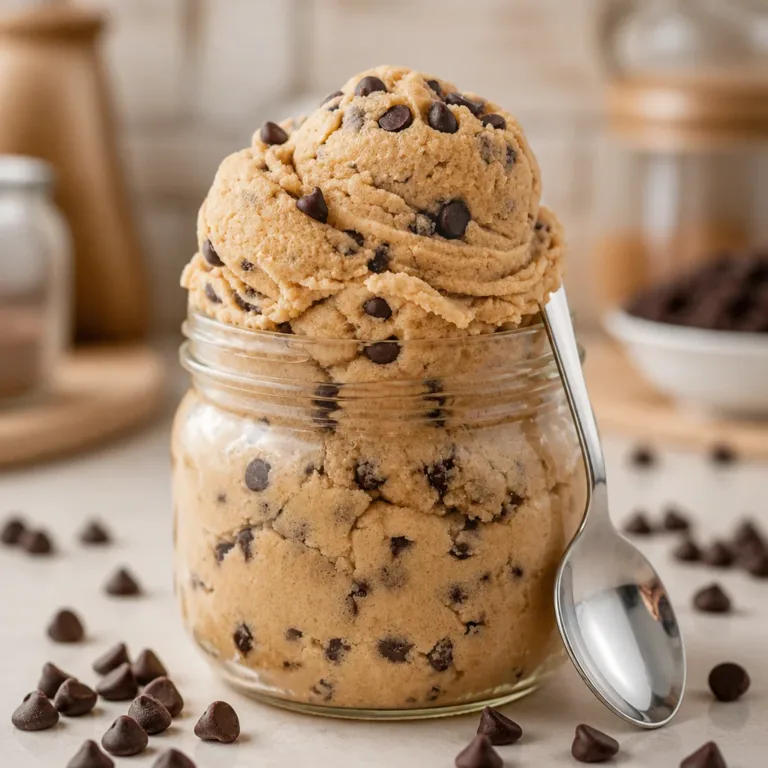
This is also a practical dessert. The bake times and cooling steps are forgiving if you follow the method. You will notice visual and aroma cues as you go: a glossy top on the cheesecake, a faint cocoa perfume, and cake edges that are just set. Those signs tell you the dessert is ready to rest and gather its flavors. If you ever want something similar but light and airy, try these red treats with a different twist like these red velvet crinkle cookies for a quick companion to your coffee.
How to Make Red Velvet Cheesecake
“When the kitchen smells like vanilla and butter, you know something special’s baking.”
Before we list ingredients, here is a short overview of the process. You will bake a tender red velvet cake layer first, allow it to cool, then pour a smooth cheesecake filling over it and bake again at a lower temperature. The cheesecake should set with a gentle jiggle in the center. After that, you cool slowly to prevent cracks and then chill for a few hours so the textures marry.
Watch for a few simple cues. The cake layer will turn deep red with golden edges and will spring back lightly when pressed. The cheesecake top will look matte and set, though the center keeps a slight wobble. Once cooled and chilled, the slices should hold clean edges and reveal a beautiful red and ivory contrast. If you are warming your kitchen with a hearty soup while the cheesecake chills, you might enjoy the same comfort from a pot of homemade broth like this guide I follow for cool evenings: homemade chicken noodle soup guide.
Ingredients You’ll Need
All-purpose flour: 1 1/2 cups
Granulated sugar: 1 1/2 cups
Unsweetened cocoa powder: 2 tablespoons
Baking soda: 1 teaspoon
Salt: 1/2 teaspoon
Buttermilk: 1 cup
Vegetable oil: 1/2 cup
Red food coloring: 1 ounce (2 tablespoons)
Distilled white vinegar: 1 tablespoon
Vanilla extract: 2 teaspoons
Cream cheese, softened: 32 ounces
Eggs: 4 large
Sour cream: 1/2 cup
Powdered sugar: 1/4 cup
Fresh heavy cream (for serving, optional): 1/2 cup
Unsalted butter, melted: 2 tablespoons
Use real butter if you can; it makes every bite worth it. If you want to tweak textures slightly, a note on one ingredient is useful: gelatin can change the way fillings set when used in other desserts, so if you are curious about adding gelatin in other recipes, read up on its properties here: gelatin ingredient notes. For this cheesecake, the eggs and the cream cheese are enough to create that classic, silky set.
Step-by-Step Directions
Step 1: Preheat oven to 350°F (175°C). Grease and flour a 9-inch springform pan. In a large bowl, whisk together flour, sugar, cocoa powder, baking soda, and salt.
Mix until everything looks evenly combined and there are no lumps of cocoa. The dry mix should smell faintly toasty and chocolatey.
Step 2: In a separate bowl, combine buttermilk, oil, red food coloring, vinegar, and vanilla extract. Add the wet ingredients to the dry ingredients and mix until just combined. Do not overmix.
Stir until the batter is smooth and glossy. You want a pourable batter with no streaks of flour.
Step 3: Pour batter into the prepared pan and bake for 30-35 minutes, or until a wooden skewer inserted into the center comes out with moist crumbs attached. Let cool completely in the pan.
The top will feel springy and the edges will pull slightly from the pan. Let it cool on a wire rack so the cake settles evenly.
Step 4: While the cake cools, prepare the cheesecake filling. Beat the softened cream cheese until smooth and creamy. Gradually add sugar, beating until well combined. Mix in eggs one at a time, then stir in vanilla extract.
Beat until the mixture is glossy and holds gentle peaks. Avoid overbeating once the eggs are added to keep the filling silky, not airy.
Step 5: Pour the cheesecake filling over the cooled red velvet cake layer in the springform pan. Bake at 325°F (160°C) for 55-65 minutes, or until the cheesecake is set but still slightly jiggly in the center.
The top should look matte and not too browned. If the edges brown too quickly, tent with parchment or foil.
Step 6: Turn off the oven and let the cheesecake cool completely in the oven with the door slightly ajar. This will prevent cracking. Once cooled, refrigerate for at least 4 hours before serving.
Cooling slowly in the warm oven reduces temperature shock. Chilling overnight yields the best slicing results and clean layers.
Texture and timing tips: watch the edges and the center separately. The edges will set before the middle, so rely on that gentle jiggle in the center rather than a full wobble. If the top develops tiny cracks, a quick patch of whipped cream will hide them and add another layer of silkiness.
Serving Red Velvet Cheesecake With Love
This cheesecake shines with simple, thoughtful accompaniments. A spoonful of lightly whipped cream adds creaminess without stealing the show. Fresh berries add a bright pop and balance the richness with their slight acidity. For a cozy afternoon, serve a slice with a small scoop of vanilla ice cream and a steaming cup of coffee.
Presentation tips: use a clean, hot knife to slice for neat pieces. Wipe the blade between cuts with a warm towel. For a special touch, dust the plate with a little cocoa or sprinkle fine chopped toasted pecans around the slice. If you want an easy savory pairing for a casual gathering, I sometimes keep a hot snack in the oven so guests can nibble before dessert, much like a quick bake-up similar to this handy air fryer note: easy oven-to-table pizza idea.
Think of serving this cheesecake at small birthdays, coffee chats, or quiet nights in. A single slice feels like a small, private celebration. If you cut smaller portions, the dessert stretches farther and lets everyone enjoy a taste without feeling too rich.
Storage & Reheat Tips
Store the cheesecake covered in the refrigerator for up to 5 days. Wrap the top with plastic wrap, or place the pan inside a large resealable container to prevent the cake from picking up other flavors. For longer storage, freeze slices individually on a tray, then transfer them into a sealed container. They keep well for up to 2 months.
To serve from frozen, thaw slices in the refrigerator overnight. For a quick uplift, let a slice sit at room temperature for 20 minutes before serving so the cream cheese softens slightly and the flavors open. Avoid microwaving slices; the texture can become grainy. If you want a warm contrast, offer a small scoop of warmed fruit compote or a hot espresso alongside the chilled cake.
If your cheesecake develops a little condensation after refrigeration, dry it gently with a paper towel before serving. I also recommend labeling frozen slices with the date so you can enjoy them at their best.
Sweet Tips & Tricks
- Room temperature ingredients matter. Let your cream cheese and eggs sit out for 30-60 minutes before mixing. They blend into a silkier filling and reduce lumps.
- Don’t rush the cool-down. Cooling the cheesecake slowly in the oven helps prevent cracks. Once you turn the oven off, crack the door and leave it for an hour before chilling.
- Use plain full-fat cream cheese for the best texture. Low-fat versions can release water and make the filling less smooth.
- If your top shows tiny cracks, cover them with a layer of chocolate ganache or a ribbon of whipped cream. It looks polished and tastes luxurious.
- Clean slices come from a hot, wiped knife. Heat the knife under hot water, dry it, and slice. Wipe between cuts.
These small steps may seem time-consuming, but each one keeps the cheesecake silky and the cake layer tender. They are the kind of careful habits that come from many afternoons in the kitchen.
Flavor Twists & Variations
You can play gently with the flavors without losing the essence of this dessert. Try adding a teaspoon of espresso powder to the red velvet batter to deepen the cocoa notes. Swap regular vanilla for a splash of almond extract to add a subtle nutty aroma. For a seasonal touch, top with roasted, spiced pears in the fall.
If you want a little crunch, add a thin layer of crushed chocolate wafer cookie crumbs between the cake and the cheesecake filling. For a lighter finish, replace half the sour cream with Greek yogurt to add tang while keeping the filling smooth. For a chocolate ribbon, drizzle good-quality melted chocolate over the chilled cake and let it set.
If you prefer individual portions, bake the red velvet cake layer in a sheet pan and the cheesecake filling in ramekins set in a water bath. The water bath helps the small cheesecakes set evenly and gives you portable, personal desserts to share.
The Ultimate Red Velvet Cheesecake
Ingredients
For the red velvet cake
- 1.5 cups all-purpose flour
- 1.5 cups granulated sugar
- 2 tablespoons unsweetened cocoa powder
- 1 teaspoon baking soda
- 0.5 teaspoon salt
- 1 cup buttermilk
- 0.5 cups vegetable oil
- 1 ounce red food coloring (2 tablespoons)
- 1 tablespoon distilled white vinegar
- 2 teaspoons vanilla extract
For the cheesecake filling
- 32 ounces cream cheese, softened Use full-fat for best texture.
- 4 large eggs Should be at room temperature.
- 0.5 cups sour cream
- 0.25 cups powdered sugar
- 0.5 cups fresh heavy cream (for serving, optional)
For the assembly
- 2 tablespoons unsalted butter, melted Use real butter for best results.
Instructions
Preparation
- Preheat oven to 350°F (175°C). Grease and flour a 9-inch springform pan.
- In a large bowl, whisk together flour, sugar, cocoa powder, baking soda, and salt until no lumps remain.
- In a separate bowl, combine buttermilk, oil, red food coloring, vinegar, and vanilla extract.
- Add wet ingredients to the dry ingredients and mix until just combined to avoid overmixing.
Baking the Red Velvet Cake
- Pour the batter into the prepared pan and bake for 30-35 minutes, or until a skewer comes out with moist crumbs.
- Let cool completely in the pan, then on a wire rack.
Preparing the Cheesecake Filling
- Beat softened cream cheese until smooth. Gradually add powdered sugar and beat until combined.
- Add eggs one at a time, and stir in vanilla extract. Beat until glossy and holds gentle peaks.
- Pour the cheesecake filling over the cooled red velvet cake layer in the springform pan.
Baking the Cheesecake
- Bake at 325°F (160°C) for 55-65 minutes, until set but still jiggly in the center.
- Turn off the oven and let the cheesecake cool inside for an hour with the door slightly ajar.
- Refrigerate for at least 4 hours before serving, preferably overnight.
Notes
Nutrition
FAQs About Red Velvet Cheesecake
Can I make this ahead?
Yes. This cheesecake benefits from resting overnight in the refrigerator. The flavors meld and the texture firms up for cleaner slices the next day.
Why did my cheesecake crack on top?
Cracks usually come from rapid temperature changes or overbaking. Cool the cheesecake slowly in the oven with the door ajar and remove it when the center still has a slight jiggle. That prevents shrinkage and cracks.
Can I use low-fat cream cheese?
You can, but full-fat cream cheese gives a richer, silkier filling. Low-fat versions can be a bit watery and less stable when baked.
How long will leftovers stay fresh?
In the refrigerator, the cheesecake stays good for up to 5 days when well wrapped. In the freezer, slices last up to 2 months.
Is a water bath necessary?
For this recipe, a water bath is not required because the cake sits beneath the cheesecake layer, which helps insulate and regulate heat. If you find the oven heat is uneven, a water bath for the springform pan can help ensure an even bake.
A Final Sweet Note
I hope this Red Velvet Cheesecake brings your kitchen the same buttery joy it brings mine. Baking it is like setting aside a small, indulgent hour for yourself and anyone you choose to share the slice with. The mix of textures, the warm vanilla scent, and the rich, slightly tangy filling are a gentle reminder that simple ingredients, given a little care, can make a moment feel celebratory.
Every time I serve this cheesecake, I think of the quiet gratitude that fills the kitchen when someone takes that first bite. It is perfect for birthdays, for slow afternoons with friends, and for quiet nights by the window. Treat yourself to the experience of baking it, and then sit down with a cup of coffee and enjoy the slow, delicious payoff.
Conclusion
For a restaurant-style comparison, you might enjoy reading the classic presentation of the Ultimate Red Velvet Cake Cheesecake which inspired many home bakers to try their own layered versions. For another home cook’s take and helpful visuals, see this lovingly written recipe guide at Red Velvet Cheesecake | Life Love & Sugar.