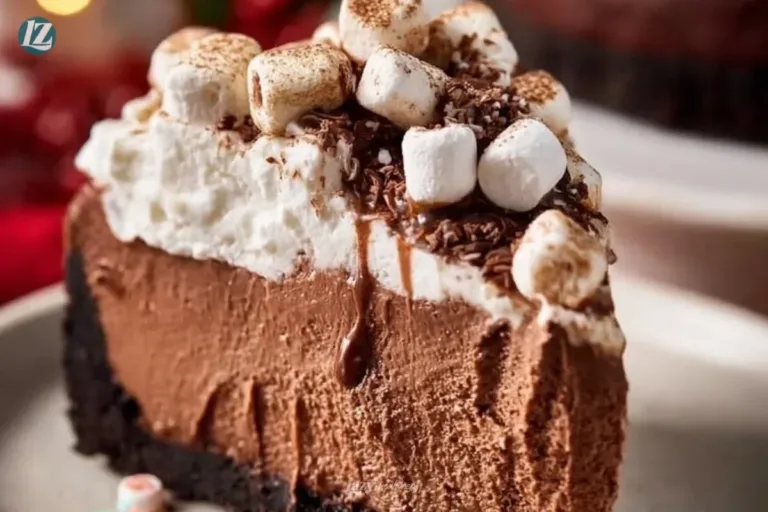
The warm steam from a mug of hot chocolate and the slow sweep of vanilla across a chilly kitchen can tell you something good is happening. This Hot Chocolate Cheesecake bakes into that feeling. It makes an ordinary afternoon feel like a small celebration, with a buttery-soft crust, a glossy chocolate filling, and a whipped cream crown that melts on the tongue. I picture it on a quiet night in, the oven door ajar and the house smelling like cocoa and home.
Why You’ll Love This Hot Chocolate Cheesecake
There is a cozy pull to desserts that remind us of simpler comforts. Hot Chocolate Cheesecake combines that childhood mug of cocoa with the grown-up pleasure of a rich, melt-in-your-mouth cheesecake. Each forkful settles warm and smooth, like a soft blanket on a cold evening.
This cake is worth making for birthdays, coffee chats, or a quiet night when you want to feel a little indulgent. It holds a memory for me: stirring hot cocoa into cream cheese while my children set the table for our small winter party. The kitchen smelled of vanilla and chocolate, and everyone paused to breathe it in.
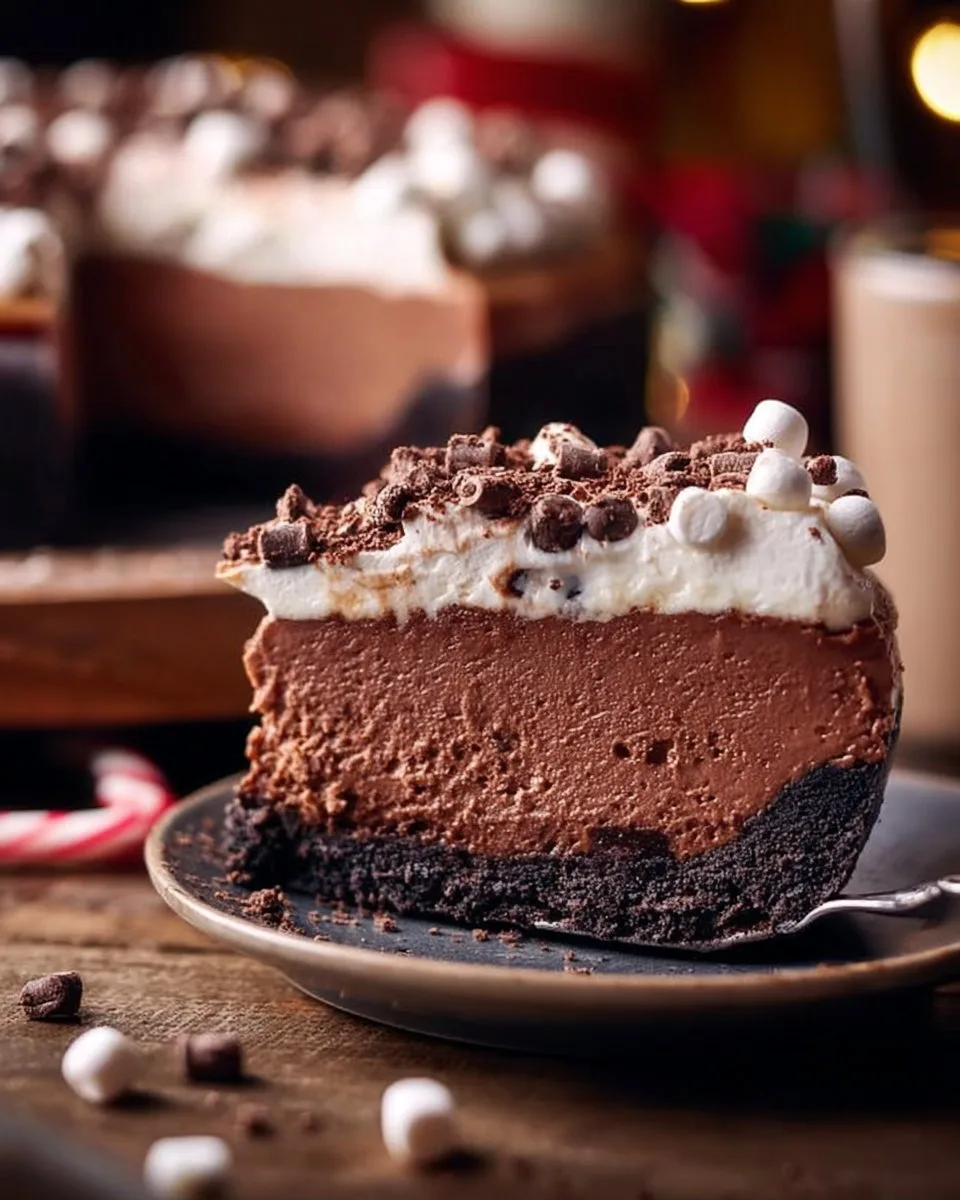
The cheesecake sits between two worlds. The crust gives a crisp, almost cookie-like counterpoint to the creamy filling. The filling, tinted deeply with hot cocoa mix, keeps a tender, slightly fudgy center and golden edges where it meets the pan. It is both familiar and new in the best way.
If you love desserts that look elegant on a plate and feel like a gentle gift to the table, this cake will become a favorite. For a playful pairing, try serving a slice with a small side of apple crisp mini cheesecakes at a family brunch so everyone can taste two kinds of warmth.
The Sweet Story Behind This Recipe
I have long treated cheesecake like a slow song. It asks for patience and gentle hands. Years ago I learned that a simple change, like folding in hot cocoa instead of melted chocolate, keeps the filling smooth and gives a light, airy cocoa note that does not overwhelm.
This recipe grew from that lesson. It keeps the texture satiny by using room temperature cream cheese and by adding eggs one at a time. It relies on a sturdy Oreo crust so the base stays crisp under the creamy filling. The top can take a glossy whipped cream finish and cocoa dusting for a picture-worthy look.
When guests come over, I like to tell the quick story: a little cocoa, a little patience, and a lot of comforting taste. That trust builds from reliable bake times, a return to slow cooling, and the reassurance that refrigerated cheesecake only gets better after a night of rest.
How to Make Hot Chocolate Cheesecake
“When the kitchen smells like vanilla and butter, you know something special’s baking.”
Before you measure, take a moment to feel ready. Gather your pans, your mixer, and a clean springform pan. Look for visual cues as you work: a crust that holds shape when pressed, a filling that is glossy and slightly jiggly at the center, and a top that has set without cracking.
As you prepare, notice the aroma shift. The crust gives off a toasty, cocoa-sweet scent after a short bake. The filling will smell of warm chocolate and rich cream. These cues tell you when you are on the right path.
For texture help, keep the cream cheese at room temperature so it beats smooth without lumps. Use a rubber spatula to scrape the bowl so the mixture is uniform and glossy. If you want a tighter, denser texture, reduce the whipping time slightly. For a lighter finish, beat just until smooth and silky.
I sometimes think of shortcuts like using a food processor for the crust crumbs. It saves time and makes a fine, even base. For other crust ideas, I often reach for recipes for brown butter chocolate chip cookies to serve alongside a slice, though for this cheesecake the Oreo crust remains the classic choice.
Ingredients You’ll Need
1 package Oreo cookies (for crust)
1/4 cup butter, melted
2 packages cream cheese (8 oz each)
3/4 cup sugar
1 teaspoon vanilla extract
3 large eggs
1 cup hot cocoa mix
1 cup heavy whipping cream (for topping)
Chocolate shavings or marshmallows (optional, for garnish)
Use real butter if you can; it makes every bite worth it. Fresh, full-fat cream cheese keeps the filling rich and stable. The hot cocoa mix brings a compact chocolate flavor with the easy comfort of cocoa. For the topping, whip the cream just until soft peaks form so it sits like a cloud on the cheesecake.
If you need a gluten-free or cookie alternative for the crust, you can swap the Oreos for a gluten-free cookie crumb. I sometimes pair this cheesecake with a batch of gluten-free chocolate chip cookies on the side when I have guests who avoid gluten.
Step-by-Step Directions
- Preheat the oven to 325°F (160°C).
- Place the rack in the center of the oven.
- Let the oven reach full temperature before baking for consistent results.
- Crush the Oreo cookies in a food processor and mix with melted butter. Press the mixture into the bottom of a springform pan to form the crust. Bake for 10 minutes and let cool.
- Press firmly so the crust holds together when sliced.
- Bake until the crumbs smell toasty and show golden edges.
- In a mixing bowl, beat the cream cheese, sugar, and vanilla until smooth.
- Use room temperature cream cheese to avoid lumps.
- Beat on medium speed until the mixture is glossy and free of streaks.
- Add the eggs one at a time, mixing well.
- Add each egg fully before the next to maintain a smooth texture.
- Mix just until incorporated; overbeating adds air and may cause cracks.
- Stir in the hot cocoa mix until well combined.
- Fold the cocoa in with a spatula for the most even color.
- The filling should look uniform, with a deep cocoa tone and glossy finish.
- Pour the cheesecake mixture over the cooled crust.
- Tap the pan gently on the counter to release air bubbles.
- Smooth the top with an offset spatula for a neat surface.
- Bake for 50-60 minutes or until the center is set.
- The center should still have a gentle wobble when you move the pan.
- Edges should be lightly golden and slightly puffed.
- Allow to cool and refrigerate for at least 4 hours or overnight.
- Let the pan come to room temperature first, then chill.
- Overnight resting helps flavors meld and the texture to firm.
- Before serving, whip the heavy cream until soft peaks form and top the cheesecake with whipped cream.
- Whip gently so the cream stays light and pillowy.
- Spread carefully, keeping the whipped cream airy for a cloud-like finish.
- Garnish with chocolate shavings or marshmallows if desired.
- Shavings add a crisp, bitter contrast to the sweet cream.
- Toasted marshmallows can add a nostalgic, toasty note.
Tip: If you see small cracks, they will often disappear under the whipped cream. For a perfectly smooth top, bake in a water bath or place a small pan of water in the oven to steady the temperature.
Bringing Hot Chocolate Cheesecake Together
This is where small choices matter. Press the crust evenly so slices release cleanly. When you pour the filling, go slowly to avoid trapping large air pockets. As it bakes, the edges will color first. That golden edge is a sign the center is setting and the sugars around the rim have caramelized slightly.
Once the cake cools on the counter for an hour or so, it is important to move it to the refrigerator. Cooling slowly helps prevent sudden temperature change that can make cracks. I prefer to chill it overnight; the flavors become more rounded and the texture shifts to silky perfection.
For a bit of show, you can gently warm slices in a low oven for a warm serving. A warm slice beside cold whipped cream creates a lovely contrast. For a sweeter, fluffier pairing, offer a small cup of strong coffee or a milky latte.
Serving Hot Chocolate Cheesecake With Love
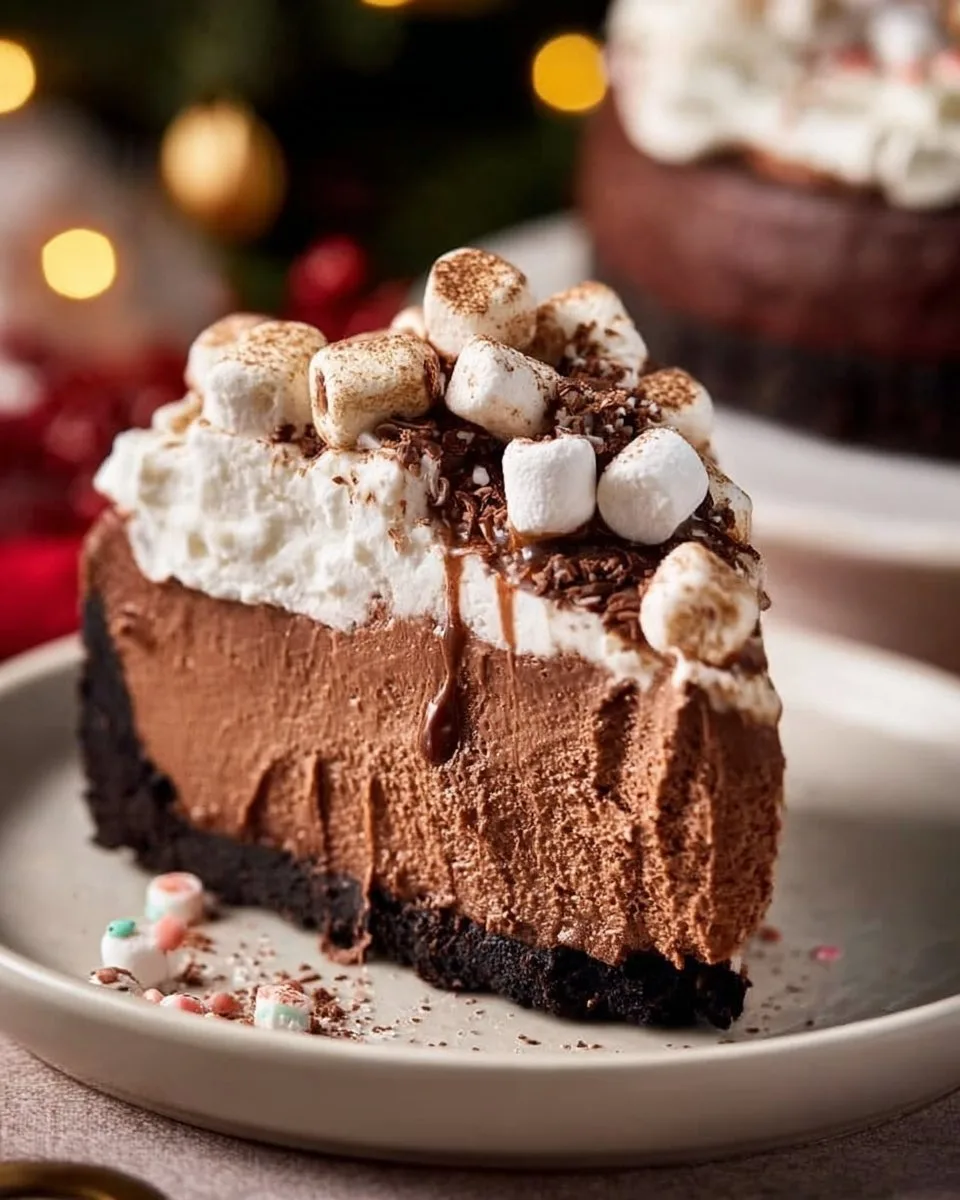
Serve this cheesecake as the centerpiece of a small gathering or as the grand finale of a cozy meal. A single slice sits beautifully on a plain white plate, with whipped cream domed like a soft pillow and a sprinkle of shavings on top. For a playful spread, add a bowl of mini marshmallows for guests to pile on.
I love pairing a slice with a simple espresso or a large mug of hot chocolate for a double cocoa moment. The coffee cuts through the sweetness and highlights the cheesecake’s creamy core. If you like texture contrasts, add a scoop of vanilla ice cream or a few fresh raspberries on the side.
Presentation touches:
- Use a hot knife for clean slices: run a knife under hot water, wipe dry, and slice with a single smooth motion.
- Add a dusting of cocoa for a gentle finish and a pop of color.
- Arrange a few toasted nuts or a sprig of mint to add height and a hint of green.
For more dessert ideas to pair with your coffee break, I often look to small treats like amazing gluten-free cookies that everyone can reach for as they sip.
Storage & Reheat Tips
Store the cheesecake in the refrigerator, covered lightly with plastic wrap or in an airtight container.
- Properly stored, it keeps well for up to 4-5 days and stays moist and creamy.
- If you add whipped cream, keep the whipped top separate until serving to maintain texture.
Freezing:
- Wrap individual slices tightly in plastic wrap, then in foil for up to 2 months.
- Thaw in the refrigerator overnight before serving.
- For best texture, add the whipped cream after thawing, not before freezing.
Reheating:
- For a slightly warm slice, place it in a 300°F oven for 6-8 minutes.
- Do not microwave large slices; they can become rubbery or break down the filling.
- Warm gently to keep the outer crust crisp without melting the center.
If you have guests with different dietary needs, consider serving alongside a small platter of cookies or bars. I sometimes offer a vegan option such as vegan chocolate chip cookies so everyone has something familiar to enjoy.
Susan’s Baking Notes
- Room Temperature Matters: Let cream cheese and eggs sit at room temperature for 30 minutes before mixing. This prevents lumps and gives a velvety filling.
- Measure Cocoa Mix Carefully: Scoop and level your hot cocoa mix for consistent flavor. Different mixes vary in sweetness.
- Avoid Overbeating: Mix until smooth. Overbeating adds air, which can cause the cake to rise and crack.
- Water Bath Option: For the smoothest top, place the springform pan in a water bath wrapped in foil. It helps regulate oven heat.
- Clean Up Tip: After pressing the crust, line the rim of the pan with a strip of parchment. It makes removing the springform cleaner and easier.
I keep my notes on a small card by the mixer. Those small habits add up to a better dessert every time.
Flavor Twists & Variations
- Mocha Cheesecake: Add 1 tablespoon of instant espresso to the cocoa mix for a subtle coffee note.
- Peppermint Swirl: Fold in crushed peppermint candies or add a peppermint extract drop to the whipped cream during the holidays.
- Salted Caramel Drizzle: Warm a bit of thick caramel and drizzle it across slices to add a salty-sweet contrast.
- Nutty Crunch: Fold in finely chopped toasted hazelnuts into the crust for a toasted flavor and bite.
- Mini Cheesecakes: Use a muffin tin and make individual hot chocolate cheesecakes for parties or boxed gifts.
Each change gives a new character while keeping the same buttery-soft, melt-in-your-mouth feel. Small additions like a pinch of cinnamon or a smear of jam under the whipped cream can make a big difference.
Hot Chocolate Cheesecake
Ingredients
For the crust
- 1 package Oreo cookies For crust
- 1/4 cup butter Melted
For the cheesecake filling
- 16 oz cream cheese Softened, 2 packages
- 3/4 cup sugar
- 1 teaspoon vanilla extract
- 3 large eggs
- 1 cup hot cocoa mix
For the topping
- 1 cup heavy whipping cream For topping
- Chocolate shavings or marshmallows Optional, for garnish
Instructions
Preparation
- Preheat the oven to 325°F (160°C). Place the rack in the center.
- Crush the Oreo cookies in a food processor and mix with melted butter. Press the mixture into the bottom of a springform pan to form the crust. Bake for 10 minutes and let cool.
- In a mixing bowl, beat the cream cheese, sugar, and vanilla until smooth.
- Add the eggs one at a time, mixing well after each addition.
- Stir in the hot cocoa mix until well combined.
- Pour the cheesecake mixture over the cooled crust.
Baking
- Bake for 50-60 minutes or until the center is set with a gentle wobble.
- Allow to cool and refrigerate for at least 4 hours or overnight.
Serving
- Before serving, whip the heavy cream until soft peaks form and top the cheesecake with whipped cream.
- Garnish with chocolate shavings or marshmallows if desired.
Notes
Nutrition
FAQs About Hot Chocolate Cheesecake
Can I make this ahead?
Yes. Cheesecakes benefit from resting. Make it the day before and keep it chilled. The flavors meld overnight and the texture firms to a creamier finish.
Will the cheesecake crack?
Small cracks can happen. To lower the chance, avoid overbeating and cool the cake slowly. If cracks appear, cover them with whipped cream or a thin ganache layer. A water bath also helps prevent cracks by keeping the oven temperature gentle.
Can I use a different cookie for the crust?
Absolutely. You can use chocolate graham crackers, gluten-free cookies, or even finely chopped brown butter cookies. Each choice shifts the base flavor. For guests with allergies, pick a gluten-free option and note it on the dessert table.
How do I get a crisp crust?
Press the crumb mixture firmly and bake the crust for 10 minutes before adding the filling. Cool it thoroughly on a rack before pouring the filling to prevent sogginess.
Can I skip the whipped cream?
Yes. The cheesecake is rich on its own. Whipped cream adds lightness and a fresh look, but the cake will be delicious without it. A dusting of cocoa or a scattering of chocolate shavings works well too.
Lessons From My Kitchen
I learned early that desserts are more than recipes. They are little gestures that say, “I took time for this.” The Hot Chocolate Cheesecake is a way to make a small moment feel important.
Keep the textures in mind. The contrast between the crisp crust and the buttery-soft filling is what makes each slice memorable. Think about timing. Bake with care, chill with purpose, and serve with warmth.
Invite help. Younger hands can press the crust, and an older friend can shave chocolate. Baking together turns a recipe into a memory.
A Final Sweet Note
I hope this Hot Chocolate Cheesecake brings your kitchen the same buttery joy it brings mine. Let it be a dessert for small celebrations, quiet nights, or an afternoon coffee with a friend. The flavors and the ritual of making it are gentle ways to create a little ritual, easily shared and warmly remembered.
Thank you for letting me share this recipe and a corner of my kitchen. May your oven warm the room, and may each slice offer a soft, melt-in-your-mouth pause in a busy day.
Conclusion
For more recipe inspiration and a slightly different take on warm chocolate desserts, see Hot Chocolate Cheesecake – Stephanie’s Sweet Treats. If you enjoy a warm, rich chocolate cheesecake served at the table, you might also appreciate the approach in Warm Chocolate Cheesecake | Sara Moulton.