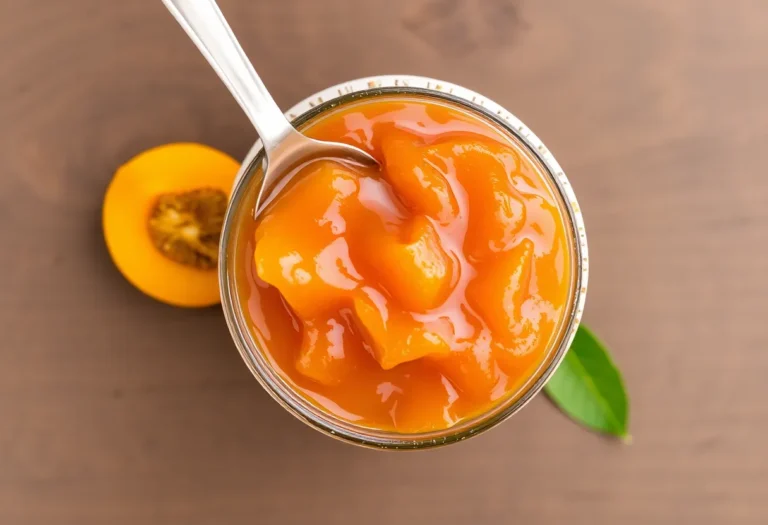
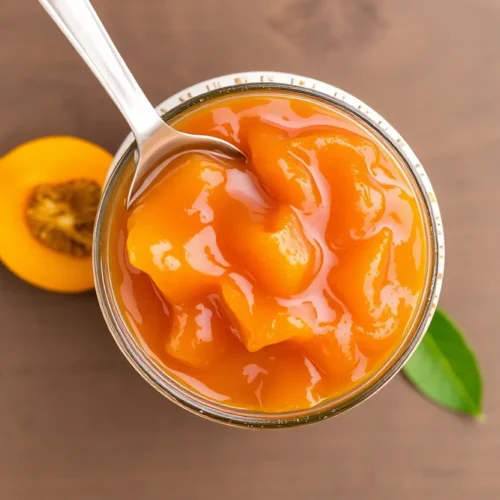
Homemade apricot jam is the pantry upgrade you didn’t know you needed. Sweet, tangy, and endlessly customizable—classic, sugar-free, or fermented.
Why Your Breakfast Needs This Homemade Apricot Jam

Store-bought jam is basically fruit-flavored sugar glue. Homemade apricot jam? That’s a game-changer.Imagine spreading golden, tangy-sweet perfection on toast, yogurt, or even stealing spoonfuls straight from the jar. No preservatives, no mystery ingredients—just pure, unapologetic flavor. Whether you’re a fermentation fanatic, a sugar-free rebel, or a classic jam traditionalist, this guide has your back. Ready to upgrade your pantry?
What Makes This Recipe So Good
This isn’t just jam. It’s flexible, offering three versions: fermented (gut-friendly goodness), sugar-free (sweetened naturally), or classic (because sometimes tradition wins). The fermented version adds probiotics, the sugar-free keeps things guilt-free, and the classic? Pure nostalgia in a jar. Plus, apricots pack vitamins A and C, so you can pretend this is health food. Spoiler: It kinda is.
Ingredients You’ll Need for Homemade Apricot Jam
- Fresh apricots (2 lbs, ripe but firm)
- Lemon juice (2 tbsp, for acidity and freshness)
- Sweetener of choice (1 cup honey/maple syrup for sugar-free, 1.5 cups sugar for classic, or none for fermented)
- Water (1/4 cup, adjust as needed)
- Optional: 1 tsp vanilla extract or a pinch of cinnamon for extra flair
- For fermented version: 1/4 tsp sea salt and 1 tbsp whey or starter culture
Step-by-Step Instructions
- Prep the apricots: Wash, pit, and chop them into small pieces. No one wants chunky jam—unless you do, in which case, live your truth.
- Cook the fruit: In a pot, combine apricots, lemon juice, and water. Simmer on medium heat until soft (10–15 minutes). Mash with a spoon or blend for smoother jam.
- Sweeten it up: Add your sweetener (or skip for fermented).
Stir until dissolved. For sugar-free, simmer another 5 minutes. For classic, cook until thickened (15–20 minutes).
- Fermented twist: Cool the mixture, add salt and starter culture, then transfer to a clean jar.
Leave at room temp for 2–3 days before refrigerating.
- Test the set: Drop a spoonful on a cold plate. If it wrinkles when pushed, it’s done. If not, keep cooking.
Patience is a virtue, but hurry up.
- Jar it: Pour hot jam into sterilized jars, seal, and let cool. Fermented version goes straight to the fridge after its room-time.
Storage Instructions for Homemade Apricot Jam
Classic/sugar-free: Store sealed jars in a cool, dark place for up to a year. Once opened, refrigerate and use within a month. Fermented: Always refrigerate; lasts 2–3 months. If you see mold, toss it—this isn’t a science experiment gone right.
Benefits of This Recipe
Beyond tasting like sunshine in a jar, this jam is customizable, healthier than store-bought, and lets you control the sugar. Fermented jam supports gut health, sugar-free keeps blood sugar steady, and classic is, well, classic. Plus, homemade gifts make you look like a domestic genius. Win-win.
Common Mistakes to Avoid
- Overcooking: Jam turns into candy. Stop when it coats the spoon.
- Under-sterilizing jars: Bacteria love jam as much as you do. Boil those jars.
- Using unripe apricots: They lack flavor and sweetness. Wait for ripe ones—your patience will be rewarded.
- Skipping the acidity: Lemon juice prevents spoilage and balances sweetness. Don’t forget it.
Alternatives to Mix Things Up
Not feeling apricots? Swap them for peaches or plums. For sweeteners, try coconut sugar or stevia (adjust amounts accordingly). Add ginger for spice or lavender for a floral twist. Fermentation not your thing? Skip it. This recipe is your playground—experiment.
Craving something quick and crave-worthy?
Dive into Lazy Bites your shortcut to cheesy snacks, sweet treats, and no-fuss sides that hit the spot fast. Perfect for snack attacks, lazy weekends, or last-minute party spreads. Grab a bite now no stress, just flavor.
Homemade Apricot Jam (3 Ways)
Ingredients
- 2 pounds fresh apricots ripe but firm
- 2 tablespoons lemon juice
- ¼ cup water adjust as needed
- 1.5 cups sugar for classic version
- 1 cup honey or maple syrup for sugar-free version
- ¼ teaspoon sea salt for fermented version
- 1 tablespoon whey or starter culture for fermented version
- 1 teaspoon vanilla extract optional
- pinch cinnamon optional
Instructions
- Wash, pit, and chop apricots into small pieces.
- In a pot, combine apricots, lemon juice, and water. Simmer over medium heat for 10–15 minutes until soft.
- Mash or blend the fruit to your desired consistency.
- Add sweetener of choice (sugar or honey/maple syrup). Stir to dissolve. For classic: cook 15–20 minutes until thick. For sugar-free: simmer an additional 5 minutes.
- For fermented version: let mixture cool, stir in sea salt and starter culture, and transfer to a clean jar. Let sit at room temp for 2–3 days, then refrigerate.
- Test the set with a cold plate—if jam wrinkles when pushed, it’s ready. If not, cook longer.
- Pour hot jam into sterilized jars, seal, and let cool. Fermented jam should be refrigerated after fermentation.
Notes
Nutrition
FAQ about Homemade Apricot Jam
Can I use frozen apricots?
Yes, but thaw and drain them first. Excess water = runny jam. No one wants soup.
Why isn’t my jam thickening?
You might’ve undercooked it or added too much water. Simmer longer, or add a chia seed slurry (1 tbsp chia + 2 tbsp water) as a quick fix.
Is fermented jam safe?
Yes, if done correctly. Use clean tools, and if it smells off, trust your nose. When in doubt, throw it out.
Can I reduce the sweetener?
Absolutely, but the jam won’t keep as long. Sugar acts as a preservative—IMO, it’s worth the trade-off for flavor.
How do I know if my jars are sealed?
Press the center of the lid. If it doesn’t pop, you’re good. If it does, refrigerate and use ASAP.
Final Thoughts
Homemade apricot jam is stupidly easy and infinitely better than anything from a store. Whether you ferment it, ditch the sugar, or go classic, you’re winning. Plus, you get bragging rights.So grab those apricots and start cooking—your future self (and your toast) will thank you.
Follow Lazy Meal Prep on your favorite platform and become part of our cozy kitchen crew:
- Instagram – for behind-the-scenes peeks and weekday inspiration
- Facebook – to swap ideas, tips, and share what you’re cooking
- Pinterest – to save and plan your week the lazy-smart way
Let’s make cooking easier, together one delicious bite at a time.