
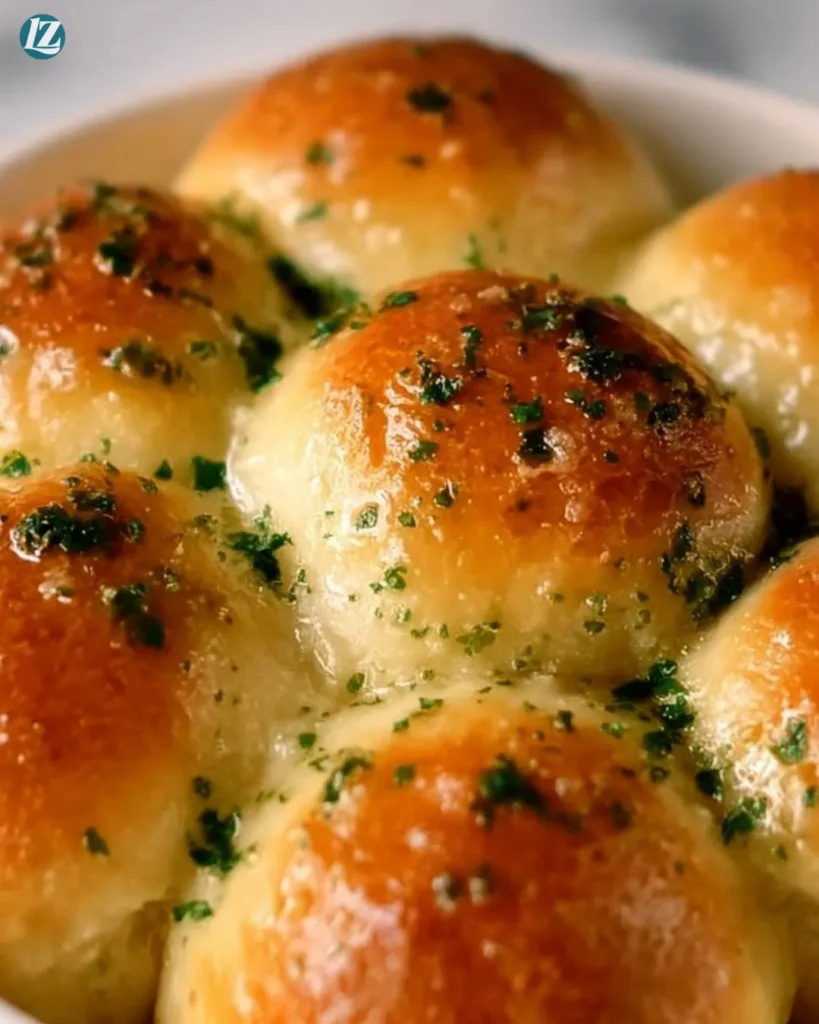
Garlic Bread Rolls are a cozy, delicious treat that everyone loves. They’re soft, flavorful, and perfect for a simple family dinner or a gathering with friends. These rolls make the night feel special, even when you want to keep things easy. Each bite bursts with buttery garlic goodness, making them irresistible.
Imagine pulling a warm, golden-brown bread roll from the oven, topped with melted butter and fragrant garlic. Garlic Bread Rolls are the comforting hug you need after a long day. They are perfect for easy weeknight dinners or weekend hangouts, adding a touch of warmth to your meal.
Why You’ll Love Making This Garlic Bread Rolls
Making Garlic Bread Rolls is not just about food; it’s about bringing joy into your home. This recipe is straightforward and gives you a mouthwatering outcome. You can enjoy them fresh from the oven or dunk them in your favorite soup or sauce.
These rolls fill the air with a lovely aroma that can make anyone feel welcome. The best part is that they come together in just a few simple steps. Plus, they freeze well, making them a perfect make-ahead option. You’ll love how easy they are to prepare and how amazing they taste.
Ingredients You Will Need:
To get started, here is all you need for these Garlic Bread Rolls:
- 4 1/2 tablespoons unsalted butter
- 2 tablespoons minced garlic
- 3 1/2 cups + 1 tablespoon all-purpose flour (See notes below for measuring)
- 3 tablespoons chopped fresh parsley
- 1 tablespoon granulated sugar
- 2 1/4 teaspoons instant yeast
- 1 teaspoon fine sea salt
- 1 cup whole or 2% milk (warmed to 110°F)
- 1 large egg (room temperature)
- 1 beaten egg, for brushing the tops
- 2 tablespoons unsalted butter
- 1 tablespoon minced garlic
- 1 tablespoon chopped fresh parsley
- flaky sea salt (for finishing)
Gather these ingredients before you start. Having everything ready saves time and makes the process smoother.
How to Make Garlic Bread Rolls (3 Steps & Timing)
Making these Garlic Bread Rolls is simple. Here’s how to do it in three main steps:
- Prepare the Pan and Dough
- Start by lightly buttering the bottom and sides of a 9×13 pan and set it aside. In a small pot, melt the butter. Add in the minced garlic and cook it for about 1-2 minutes or until the garlic is fragrant. Remove the pot from the heat and allow the mixture to cool slightly while you measure the other ingredients.
- In a stand mixer bowl, combine the flour, parsley, sugar, yeast, and salt. Once mixed, add in the warmed milk, egg, and the cooled garlic butter. Use the dough hook attachment and knead the mixture at low speed. Knead until the dough becomes smooth, soft, and tacky, which should take around 10-12 minutes. If the dough is too sticky, just add a tablespoon of flour at a time until it becomes workable.
- Shape and Let Rise
- After kneading, cut the dough into 12 equal pieces. A kitchen scale really helps here, aiming for 67 grams each. Roll each piece into a smooth ball using your hands. Pinch the bottom together to keep them tight. Place the shaped balls in the prepared baking pan. Cover the pan with plastic wrap or a clean kitchen towel and place it in a warm spot. Let the dough rise until it has doubled in size, which can take anywhere from 1 to 2 hours.
- Bake and Finish
- Preheat your oven to 350°F (180°C). Once the rolls have risen, brush the tops with the beaten egg wash. Bake the dinner rolls for about 20-30 minutes or until they are golden brown.
- While the rolls are baking, take that small pot again and melt the remaining butter. Add the minced garlic and let it cook for 1-2 minutes until fragrant. Take it off the heat and stir in the chopped parsley. When your rolls come out of the oven, brush them immediately with the garlic butter mixture. If you’d like, sprinkle flaky sea salt on top for an extra touch of flavor. Serve the rolls warm and enjoy!
Quick Sides & Serving Ideas
Garlic Bread Rolls are great on their own, but they shine even brighter with the right sides. Pair them with a hearty vegetable soup or a rich pasta dish such as spaghetti or fettuccine. They can also be enjoyed alongside a crisp salad or grilled meats.

Consider serving these rolls with marinara sauce or olive oil for dipping. The rolls are perfect for soaking up all the delicious flavors of your meal.
Storage & Reheat (No Soggy Leftovers)
If you find that you have leftover Garlic Bread Rolls (though it might be hard to resist eating them all), you can store them easily. Let the rolls cool completely. Then, put them in an airtight container or wrap them tightly in plastic wrap. They can be kept at room temperature for up to 2 days.
For longer storage, you can freeze them. Just place them in a freezer-safe bag. When you’re ready to enjoy them again, let them thaw in the refrigerator overnight. To reheat, pop them in a preheated oven at 350°F for about 10 minutes. This will bring back their warmth and softness without turning them soggy.
Got Leftovers? Make Them Work for You
Leftovers aren’t a punishment they’re tomorrow’s head start. Chop last night’s roasted veg into a quick omelet, tuck shredded chicken into warm tortillas, or stash a soup portion in the freezer for a lazy-night rescue. Store smart, reheat gently, and keep the add-ins simple so flavors stay bright. Want more no-stress ideas? See more easy tips here.
10-Minute Prep & Time-Saving Shortcuts
While making garlic bread rolls is simple, you might want to save time in the kitchen. Here are some helpful tips:
- Measure Ingredients Ahead: Before you start, take a few minutes to gather and measure all your ingredients. This can streamline the process and make it less messy.
- Use Pre-Made Garlic Butter: If you’re short on time, you can use store-bought garlic butter. Just melt it and mix in the parsley when you are ready to coat the rolls after baking.
- Double the Batch: If you’re already in the kitchen, consider making a double batch. The extra rolls can be frozen for future meals.
- Use a Food Processor: If you have one, you can use a food processor to mix your dough. This can save you a little time on the mixing and kneading process.
Craving Something Quick and Crave-Worthy?
Lazy Bites is my go-to spot for those snack cravings that hit out of nowhere. Cheesy pulls, sweet bites, and sides that come together fast no fuss, no fancy prep. Whether it’s a lazy Saturday, a game night spread, or just a quick fix before dinner, these recipes are made to hit the spot without stealing your time. Grab a bite now and keep it easy.
Smart Swaps & Variations
Feel free to get creative with these Garlic Bread Rolls. Here are some ideas for swaps and variations:
- Herbs: Instead of parsley, use other herbs like thyme, rosemary, or basil for a different flavor.
- Cheese: Incorporate shredded cheese into the dough for cheesy garlic rolls. Mozzarella or cheddar work well.
- Whole Wheat Flour: Swap half of the all-purpose flour for whole wheat flour to add more fiber.
- Add-Ins: Consider adding chopped olives, sun-dried tomatoes, or even cooked bacon pieces for more flavor bursts in your rolls.

Garlic Bread Rolls
Ingredients
For the Dough
- 3.5 cups 3 1/2 cups all-purpose flour Plus 1 tablespoon for measuring.
- 1 tablespoon 1 tablespoon granulated sugar
- 2.25 teaspoons 2 1/4 teaspoons instant yeast
- 1 teaspoon 1 teaspoon fine sea salt
- 1 cup 1 cup whole or 2% milk (warmed to 110°F)
- 1 large 1 large egg (room temperature)
- 12 pieces 12 pieces for shaping
For the Garlic Topping
- 4.5 tablespoons 4 1/2 tablespoons unsalted butter Divided into 2 tablespoons for the dough and 2.5 tablespoons for the topping.
- 2 tablespoons 2 tablespoons minced garlic 1 tablespoon for dough and 1 tablespoon for topping.
- 3 tablespoons 3 tablespoons chopped fresh parsley 1 tablespoon for dough and 2 tablespoons for topping.
- to taste flaky sea salt For finishing.
Instructions
Prepare the Pan and Dough
- Lightly butter the bottom and sides of a 9×13 pan and set aside.
- In a small pot, melt the butter. Add the minced garlic and cook for about 1-2 minutes or until fragrant. Remove from heat and let cool slightly.
- In a stand mixer, combine flour, parsley, sugar, yeast, and salt. Add warmed milk, egg, and cooled garlic butter. Knead with the dough hook on low speed for 10-12 minutes until smooth and tacky.
Shape and Let Rise
- Cut the dough into 12 equal pieces, aiming for about 67 grams each. Roll each piece into a smooth ball.
- Place shaped balls in the prepared pan, cover with plastic wrap or a towel, and let rise until doubled in size (1-2 hours).
Bake and Finish
- Preheat oven to 350°F (180°C). Brush tops of rolls with beaten egg wash.
- Bake for 20-30 minutes until golden brown.
- Melt remaining butter in the pot, add minced garlic, and cook 1-2 minutes until fragrant. Stir in chopped parsley.
- Brush rolls with garlic butter right when they come out of the oven and sprinkle with flaky sea salt before serving.
Notes
Nutrition
Lazy Cook’s Pro Tips
Smart tweaks make all the difference. Line sheet pans with parchment to skip the scrub, stash minced garlic in the fridge for instant flavor, and double-batch sauces so you’ve always got a quick fix ready for busy nights. These small habits keep weeknight cooking simple without losing an ounce of taste. See more time-saving tips here and make dinner feel easy again.
FAQs About Garlic Bread Rolls
Can I make these rolls ahead of time?
Yep. Mix and let the dough rise once, then shape the rolls and tuck the pan into the fridge overnight, covered. On baking day, pull them out while the oven heats so they can take the chill off and puff a bit. Bake as directed. This plan is clutch for holidays or weeknights when you want warm bread without the mess on the day of.
What kind of flour should I use?
All-purpose flour keeps the crumb soft and fluffy, which is what most folks want in a dinner roll. If you like a little nutty bite, swap up to 30–40% whole wheat and add a teaspoon or two more liquid if the dough feels tight. Bread flour works too, just expect a chewier texture and slightly more rise.
Can I use fresh garlic instead of minced?
Fresh garlic is my go-to. Finely mince or microplane it so the flavor spreads evenly and you don’t get spicy little garlic bombs. If your garlic runs hot, mellow it by sautéing in butter for 30–60 seconds before brushing it over the rolls. Garlic powder works in a pinch—start with 1/2 teaspoon and adjust to taste.
How can I make the rolls more flavorful?
Season the dough and the topping. Stir in dried Italian herbs, a pinch of red pepper flakes, or chopped fresh parsley. Brush the rolls with garlic butter right out of the oven and finish with flaky salt. Feeling cozy? Grate Parmesan into the butter or sprinkle mozzarella on top for the last few minutes of baking.
What can I serve with Garlic Bread Rolls?
These rolls play nice with just about everything. They’re perfect next to pasta, soup, or a big salad night. Use them as sliders with meatballs or shredded chicken, or split and toast leftovers for mini garlic bread breakfasts with eggs. For dipping, set out marinara, warm tomato soup, or a simple olive oil and balsamic bowl.
Creating Garlic Bread Rolls is a fun and easy way to bring comfort food into your kitchen. You’ll enjoy the process and love the results. Don’t hesitate to add your favorite twists. Happy baking!
What’s Cooking in Your Kitchen?
Tried this recipe your own way? I want to see it. Snap a quick pic and tag us, or drop a comment with what you tweaked. Lazy cooking works best when we swap ideas and your spin might be the next Lazy Meal Prep favorite.
Post your photo and tag @lazy_mealprep I’ll share my favorites in stories.