
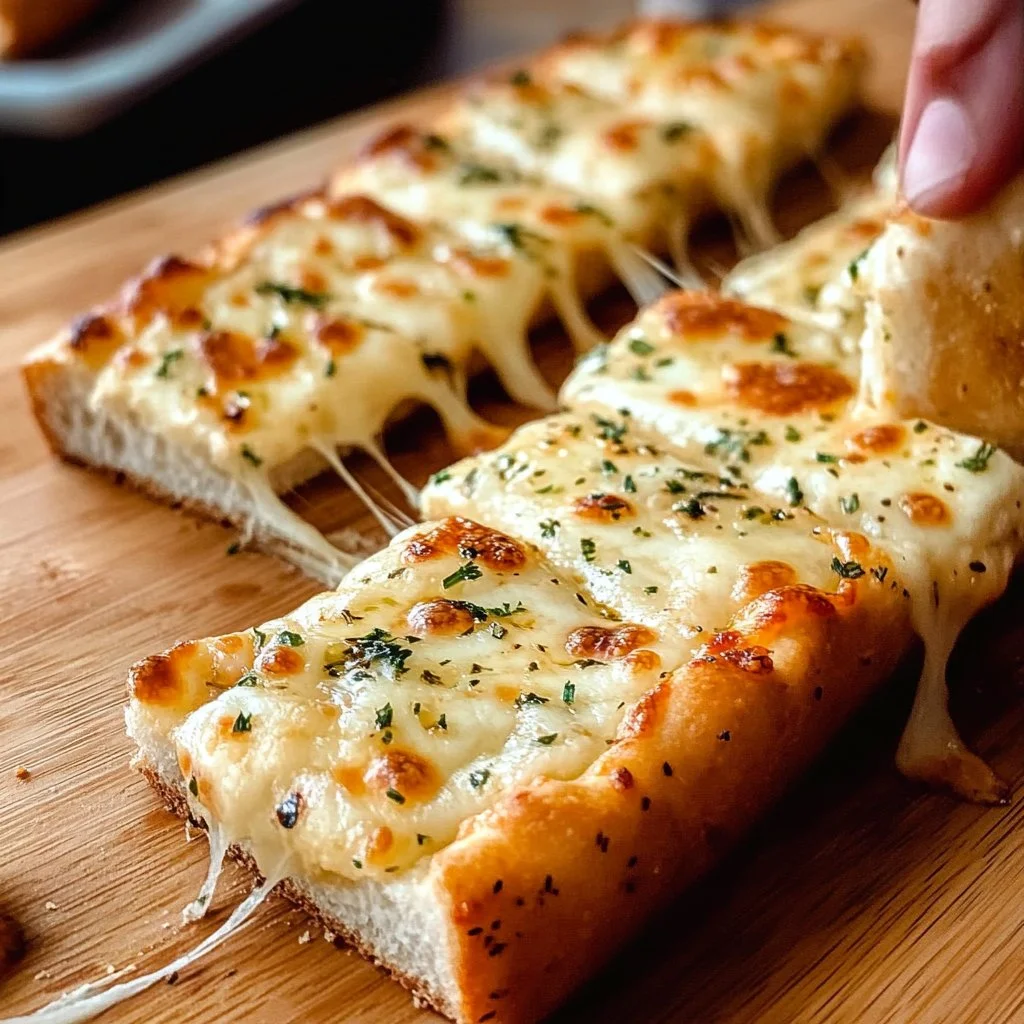
The smell of butter, roasted garlic, and melting cheese curling through the house can stop a room full of people in their tracks. I remember pulling a pan from the oven, tiny hands reaching for the warm bread, and the hush that comes just before everyone takes that first, delighted bite. That hush tells you everything you need to know about Easy Cheesy Garlic Bread.
Why This Easy Cheesy Garlic Bread Means So Much
There is a small, steady kind of comfort in this recipe that has followed my family to picnics, late-week dinners, and quiet Sunday lunches. It is the kind of dish that shows up when someone has had a long day and needs an instant act of kindness. I first made this on a rainy evening when my kids were small, and the warm, cheesy slices seemed to knit our tiredness into laughter again.
The heart of this dish is simple: bread, butter, garlic, and melting cheese. Those are the flavors that knit our busiest days into something soft and kind. The recipe feels slow-hearted and fast at once. It gives you the same easy joy whether you serve it to a crowd or slice one roll for yourself after a long day.
This bread also carries small rituals. I rub my hands over the warm rolls before I slice them. I listen for the crisping edges in the oven. I watch the cheese bubble and note the little gold spots that mean it is time. These small acts remind me that cooking is as much about presence as it is about ingredients.
How to Make Easy Cheesy Garlic Bread
“Every time I stir this pot, it smells just like Sunday at home.”
Before we list the ingredients, let me give you a short overview. This is a forgiving, quick recipe. You mix a creamy, garlicky spread, slather it on soft rolls, and bake until everything is warm and gooey. Look for the bright green of parsley and the shiny sheen of the butter-cream mix. Listen for the gentle pop and hiss as the cheese browns. These are the little signals that say the bread is nearly ready.
If you enjoy dishes with similar cozy flavors, I sometimes make a full skillet meal and set the garlic bread alongside it; the same simple flavors pair well with a pasta or a hearty chicken dish and even with a playful weeknight skillet like my Cheesy Cajun Garlic Chicken Rotini Skillet when the family wants something heartier.
Ingredients You’ll Need
- Hawaiian rolls
- Garlic (minced)
- Butter (softened)
- Cream cheese
- Shredded cheese (e.g., mozzarella or cheddar)
- Parsley (chopped)
- Salt
- Pepper
A few warm notes while you gather these: use fresh garlic if you can for the brightest flavor. If your butter is good, it will lift the whole mix; a small upgrade here makes a big difference. A dash more of black pepper gives a gentle lift, and if you love a cozy spice, a whisper of smoked paprika can feel like home.
You can keep things classic with mozzarella, or mix mozzarella and cheddar for a little tang. Cream cheese helps the spread cling to the bread and creates that soft, soulful texture under the melted top. Chopped parsley adds a fresh, peppery lift that brightens each bite and keeps the bread from feeling too heavy.
Step-by-Step Directions
- Preheat the oven to 375°F (190°C).
Preheat early so the oven is steady and warm when the bread goes in. A steady oven helps the cheese melt evenly and the edges to brown gently. - Cut the Hawaiian rolls in half and place them on a baking sheet.
Work with soft rolls and slice cleanly so the spread sits smoothly. Arrange them cut-side up so the cheese can melt down to every edge. - In a bowl, mix softened butter, minced garlic, cream cheese, shredded cheese, chopped parsley, salt, and pepper.
Stir until the mixture is glossy and smooth, with no lumps from the cream cheese. Taste a tiny bit; it should sing of garlic and butter without overwhelming salt. - Spread the cheese mixture evenly over the cut sides of the rolls.
Spread to the edges but leave the tops neat so they brown with a pretty sheen. If you like a slightly crisper top, leave a couple of millimeters of roll exposed. - Bake in the preheated oven for 15-20 minutes until the cheese is melted and bubbly.
Watch for golden edges and tiny browned spots on the cheese. The scent will lift the whole house; that is your cue that it is time. - Serve warm as a side dish or appetizer.
Pull the pan from the oven and let it sit for a minute so the cheese settles slightly. Offer it on a big plate for passing around and watch the little smiles grow.
Serving Easy Cheesy Garlic Bread With Family Warmth

This bread works at every table. For a casual family meal, I set it in the middle of the table on a long wooden board and let everyone take a piece. When friends drop by with tired smiles, I slide a pan out and hand them a warm slice, and somehow conversation comes easier.
Little extras make a big difference. A scattering of extra chopped parsley over the top brightens flavor and color. A tiny bowl of marinara nearby invites dunking that children and adults both adore. For a Sunday supper, pair this bread with a bowl of tomato soup and watch the room slow down. For weeknight dinners, it sits beside a simple salad and a roasted chicken without stealing the show.
Sometimes we top the warm bread with a pinch of crunchy sea salt or a few red pepper flakes when guests want a little heat. Other nights, I keep it plain and let the pure, melty cheese and butter tell the story. Either way, the bread is a small act of showing up. It says, without words, that you wanted to make something that would make someone’s day better.
Storing Easy Cheesy Garlic Bread for Tomorrow
If there are leftovers, let the bread cool to room temperature first. Then wrap gently in foil or place in an airtight container. The flavors settle and deepen overnight, and the garlic and cheese join in a good, quiet way.
To reheat, preheat the oven to 350°F (175°C) and warm for 8 to 12 minutes, covered in foil for a softer bite, or uncovered for crispier edges. You can also reheat individual slices in a toaster oven for a quick fix. Microwave reheating works in a pinch; do it short bursts and follow with a quick oven crisp if you can.
If you want to store longer, wrap tightly and freeze for up to one month. Thaw in the fridge overnight before reheating. I keep a small loaf in the freezer for the times when I want a little comfort without the work.
Little Kitchen Notes
- Substitutions that work: Swap cream cheese for ricotta if you want a lighter, slightly tangy texture. Use provolone in place of mozzarella for a deeper, creamier flavor.
- Prep shortcut: Mix the spread the night before and keep it covered in the fridge. The flavors soften and blend overnight, saving you time when company arrives.
- Texture cues: If the spread feels too runny, chill it briefly and it will set up, making it easier to spread without sliding off. If it feels too stiff, stir in a teaspoon of milk.
- Tools: A small offset spatula helps spread evenly to the edges. A rimmed baking sheet catches any bubbled cheese and makes cleanup easier.
- Clean up: Line your baking sheet with foil or parchment to catch the drips. That way you can hand your pan back to the sink with a quick rinse and not a big scrub.
I sometimes think of little habits of mine when I make this bread. I always test one piece first. I press lightly to see that the cheese gives but the bread still has a soft, warm bounce. Those small checks help me know it will be right for the whole table.
For another family favorite that shares the same kind of quick, cheesy magic, try my simple Cheesy Chicken Quesadillas for a weeknight pairing that the kids always ask for.
Family Variations on Easy Cheesy Garlic Bread
Every family I know has a twist that makes the recipe feel like theirs. My sister likes to fold in a spoonful of pesto for an herb-kissed version that us kids used to fight over. My neighbor sprinkles a little grated Parmesan on top for a sharper finish.
You can dress it up seasonally, too. In the fall, add a touch of chopped roasted butternut squash on the side and a sprinkle of sage. In the summer, add thin slices of sun-dried tomato into the spread for a sweet, tangy lift. For a winter party, fold in a small amount of roasted red pepper for a smoky warmth.
If your family likes a deeper, savory hit, mix in a little caramelized onion or cooked, crumbled bacon. For the kids, a simple extra sprinkle of cheddar on top before baking makes everything feel special. If you want to make it a fuller snack, lay slices of leftover chicken across a few pieces and pop it back into the oven until warm.
Sometimes we end a meal with cookies and a cup of tea. For an unexpected pairing, a plate of Gingerbread Cheesecake Cookies later in the evening keeps the same warm, homey thread going.
FAQs About Easy Cheesy Garlic Bread
Can I bake this a day ahead?
Yes, and honestly, it tastes even better the next day when the flavors settle together. Keep it wrapped and reheat gently.
Can I make this gluten free?
Absolutely. Use your favorite gluten-free rolls and follow the same steps. Watch the baking time carefully because some gluten-free breads brown faster.
How do I make it less rich?
Use part-skim cheese and a light cream cheese or ricotta. You can also reduce the butter slightly and add a touch of olive oil for a lighter mouthfeel.
What if I want a crispier crust?
Slide the bread under the broiler for a minute or two at the end of baking. Watch it closely so it does not burn. That quick flash gives instant crispness.
Can I add herbs other than parsley?
Yes. Chives, basil, or a little thyme are all great. Add delicate herbs after baking for the freshest flavor.
A Final Thought
I keep this recipe in the corner of my mind for the small emergencies of life: a child home sick, a friend who needs company, a weeknight that got away. It is quick, forgiving, and full-hearted. There is something about warm bread and melting cheese that says we are cared for, even in the small hours.
Before you go, a couple more practical notes. If you want to make this for a crowd, double the spread and use two baking sheets. If you are taking it to a picnic, warm it just before you leave and wrap it in foil to keep it soft and warm for the ride.
May this bread bring you the same quiet joy it brings my kitchen. May it be the small thing that smooths a rough day and offers a simple welcome at your table.
Conclusion
If you want more ideas for cheesy, comforting sides to pair with this bread, the classic Easy Cheesy Garlic Bread – The Recipe Critic has a lovely, approachable take that pairs well with many meals. For another riff on rich, melty garlic bread that families love, see the World’s Best Cheesy Garlic Bread Recipe – Easy Peasy Meals.

Easy Cheesy Garlic Bread
Ingredients
For the spread
- 1 pack Cream cheese Helps the spread cling to the bread.
- 1/2 cup Butter (softened) Good quality butter makes a big difference.
- 4 cloves Garlic (minced) Use fresh for the brightest flavor.
- 1 cup Shredded cheese (e.g., mozzarella or cheddar) Can mix mozzarella and cheddar for tang.
- 2 tablespoons Parsley (chopped) Adds fresh, peppery lift.
- 1 teaspoon Salt
- 1/2 teaspoon Pepper A dash of black pepper gives a gentle lift.
For assembly
- 12 pieces Hawaiian rolls Use soft rolls.
Instructions
Preparation
- Preheat the oven to 375°F (190°C).
- Cut the Hawaiian rolls in half and place them on a baking sheet, cut-side up.
Mixing
- In a bowl, mix softened butter, minced garlic, cream cheese, shredded cheese, chopped parsley, salt, and pepper until glossy and smooth.
Assembly and Baking
- Spread the cheese mixture evenly over the cut sides of the rolls.
- Bake in the preheated oven for 15-20 minutes until the cheese is melted and bubbly.
Serving
- Serve warm as a side dish or appetizer.