Start with the kitchen light on, a tray of warm cookies cooling, and the kids hovering with flour on their cheeks. That smell of butter and vanilla hangs in the air and you know this is one of those simple wins. If you want a quick, shiny top that hardens just enough to stack cookies for the school lunchbox or gift tins, try this Classic Sugar Cookie Icing and the tips that follow. For the full recipe and a quick refresher when you need it, I keep the step-by-step posted as my go-to sugar cookie icing recipe so I do not have to reinvent the wheel every holiday.
Why You’ll Love This Classic Sugar Cookie Icing
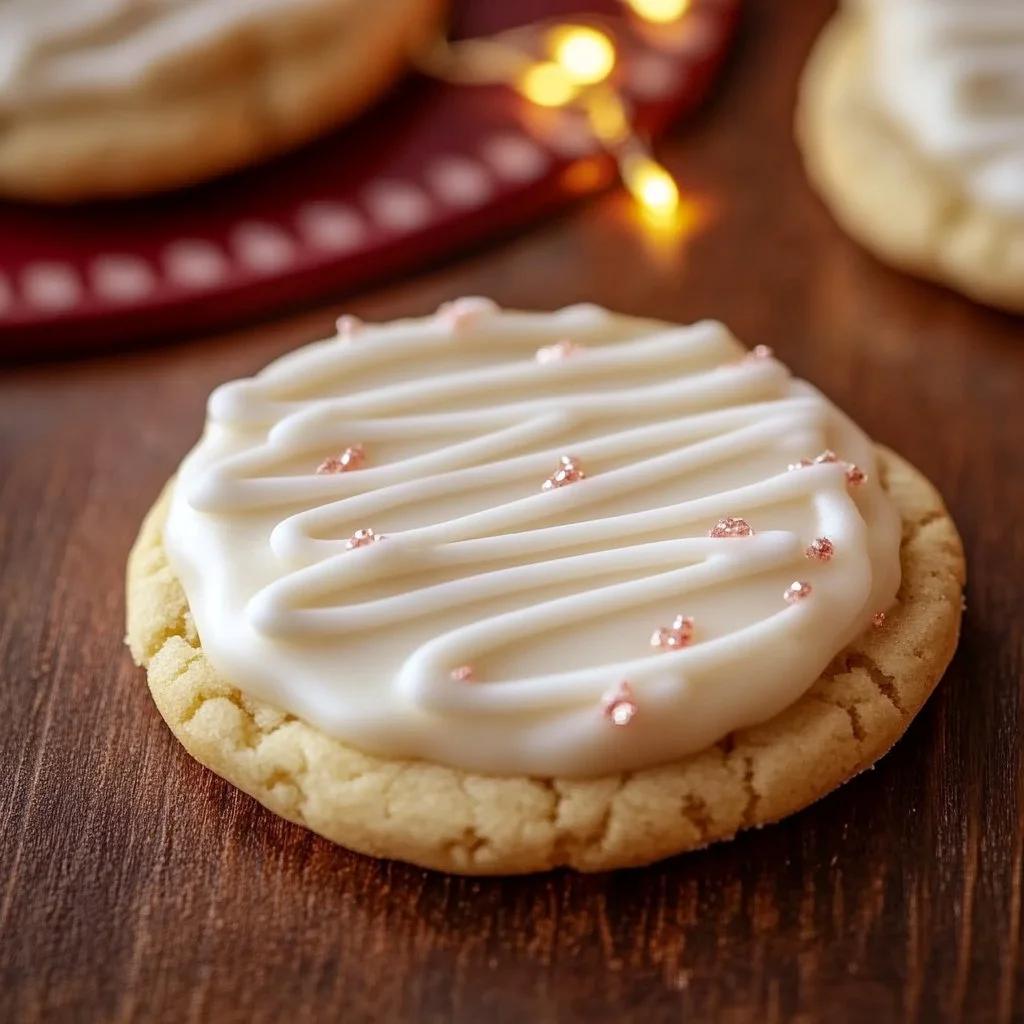
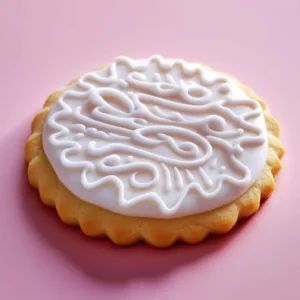
This icing is the kind of thing that looks fancy but comes together in minutes. It glows. It dries firm enough to stack cookies without them sticking together. It tastes sweet without feeling greasy. You get that glossy, smooth finish kids love and a texture that holds decorations.
It fits into busy evenings because it uses pantry basics and one bowl. No special equipment, no long chill times, and almost no cleanup. You can mix it up while the last batch of cookies cools and be decorating before dinner is fully cleared.
If you like lean recipes that still feel homey, try pairing the icing with lighter cookie recipes. For instance, I often reach for a very simple base when I want the icing to shine, like my quick 3-ingredient sugar cookies, which are easy and forgiving when you have a tight schedule.
Why it works: the corn syrup gives a smooth sheen and slows drying just enough to keep lines soft while still allowing the surface to set. The vanilla is small but big; it lifts the sugary notes into something that tastes like comfort.
How to Make Classic Sugar Cookie Icing the Easy Way
“If it smells this good halfway through, you know dinner’s gonna be great.”
Here is the short version before we get into the action. You whisk powdered sugar with a little milk, add corn syrup and vanilla, and stir until the gloss appears. If you want color, add food coloring a drop at a time. For flood icing thin with tiny amounts of milk until it moves slowly off a spoon.
Watch for the visual cues: the mix should be glossy and smooth, not grainy. It should flow but hold a little shape when you lift the spoon. When you pipe it, the edges should be clean. When you flood it, it should level out with a tiny ripple and then start to firm at the edge.
A note on flavor and pairing: this icing is sweet but neutral, which makes it a good partner for swaps where you want richer cookie flavors to shine. I sometimes use it on browned-butter cookies for contrast, which highlights nutty notes and gives the kids that classic look they expect. For ideas like that I keep a few recipes on hand such as my soft maple brown sugar cookies, which are perfect when you want a softer, deeper flavor on the base.
Ingredients You’ll Need
2 cups powdered sugar
2 tablespoons milk
1 tablespoon light corn syrup
1/2 teaspoon vanilla extract
Food coloring (optional)
A few friendly side notes: use what you have in the fridge. The milk can be whole, 2 percent, or even a non-dairy milk if needed. Light corn syrup is there for shine and flow; do not skip it if you want that glossy finish. And the powdered sugar must be sifted if it is lumpy, or whisk well to avoid tiny grainy bits in the icing.
If you are out of vanilla, you can swap with a little almond extract but use less. A drop or two of almond goes a long way and will change the flavor profile.
Step-by-Step Directions
- In a mixing bowl, combine powdered sugar, milk, corn syrup, and vanilla extract.
Stir gently at first to avoid a sugar cloud. Use a spatula to bring the sugar into the liquid. - Mix until smooth and glossy.
Look for a soft shine on the surface. If lumps appear, switch to a whisk or a hand mixer on low for a few seconds. - Stir gently and test the thickness.
For piping, the icing should hold shape. For flooding, it should run slowly off a spoon in a steady ribbon. - If desired, add food coloring to achieve the desired shades.
Start with a drop. Mix well, then add more a drop at a time until you hit the color you want. - Use immediately to decorate cookies or store in an airtight container until ready to use.
If you plan to pipe details, transfer a portion into a piping bag with a small round tip. - For flooding, thin with a little extra milk, a drop at a time.
You want the icing to flow and level, but not to be watery. A steady ribbon off a spoon is the visual cue. - Let icing set on a cooling rack or flat tray without touching the cookies.
The icing will harden after a few hours, which makes the cookies safe to stack or to place in tins. - If you need a faster set time, place cookies in a cool, dry room.
Avoid humid places like a steamy kitchen after a shower. High humidity slows setting.
Quick tips inside the steps: don’t overmix. We want a glossy silk for the icing, not foamy air bubbles. If your kitchen is cold and the icing stiffens, add a half teaspoon of milk to loosen it. If the icing becomes too runny, add a tablespoon more powdered sugar, one at a time, until you reach the right consistency.
Practical note: if you like a slightly deeper flavor, try using browned butter in your cookie base and keep the icing simple. When I pair it with richer cookies like brown butter sugar cookies, the contrast is fantastic and the icing lets the cookies shine.
Serving Classic Sugar Cookie Icing at the Table

Serve these cookies family-style on a platter where everyone can pick their favorites. For a game night, put the cookies on a board with small bowls of sprinkles and let people add their own last-minute touches. The glossy icing is forgiving and hides small crow’s feet in decorating, which is great when you are decorating with kids.
If you bring cookies to a party, stack them in parchment-lined tins. The icing is sturdy enough to allow gentle stacking once set. If you are making cookie boxes, arrange them in single layers separated by wax paper, or put a small piece of cardboard between layers to keep things neat for travel.
When serving with drinks, the icing pairs well with simple milks, coffee, or spiced teas. I like to offer a darker cookie next to iced ones so adults have a stronger flavor to balance the sweetness. For example, a cinnamon or brown-sugar cookie goes well alongside the shiny iced sugar cookie, much like my note on pairing with brown sugar cinnamon cookies for a spiced contrast.
Storage & Reheat (No Soggy Leftovers)
Short term: store leftover icing in an airtight container at room temperature for up to 48 hours. Stir briefly before using if it thickens.
Fridge: you can refrigerate icing in a sealed jar for up to a week. When ready, bring it to room temperature and stir. You may need a splash of milk to smooth it back out.
Freezer: I do not usually freeze this icing because the texture can change after thawing. If you must freeze, put it in a tight freezer bag with most of the air removed and keep it to a month. Thaw overnight in the fridge and then bring to room temperature before stirring.
Reheat tips: avoid microwaving aggressively. If the icing is too stiff from cold, warm it gently in short bursts and stir between bursts, or set the jar in a bowl of warm water for a few minutes. Do not overheat; you want to loosen the sugar, not cook it.
Cookies with icing: once iced and set, store cookies in a single layer or with sheets of parchment between layers. For the best texture, keep them at room temperature for up to a week. If you want them crispier, briefly pop them in a 300 F oven for 3 to 5 minutes, but only if the icing is set and you want that fresh-baked feel.
Honest advice: humidity is the enemy. On rainy or humid days, the icing can stay tacky longer and pick up tiny water beads. If you live in a humid place, set the cookies in the coolest, driest part of the house and consider using a dehumidifier or air conditioning to speed firming.
Quick Tips & Shortcuts (Ethan’s Notes From the Kitchen)
- Use a shallow bowl for mixing. It gives you better control when testing thickness and makes it easy to see the gloss.
- If you need a vegan version, swap milk for a neutral plant milk and use a corn syrup that is vegan. The texture will be nearly identical.
- For zero-mess piping, fill a small sandwich bag, press the icing to one corner, snip the tip, and pipe away. No special equipment needed.
- Color smart: use paste or gel color for brighter hues. Liquid food color can thin the icing and change consistency. If you use liquid, account for extra powdered sugar.
- Clean up tip: powdered sugar will dust everything. Keep a damp kitchen towel nearby to wipe counters and tools as you go, and rinse bowls right away to avoid a sticky crust.
I learned that smaller amounts mix faster. If you are decorating a big batch, mix a base quantity and keep a few small bowls ready for color. That way you can reduce waste and keep the main batch fresh.
Variations That Work
- Flavored Extract Swap: Replace vanilla with lemon, orange, or almond extract for a burst of flavor. Use half the amount if the extract is strong.
- Chocolate Drip: Stir in 1/4 cup of melted semi-sweet chocolate to make a thick glaze for drizzling. Cool the chocolate slightly before stirring it into the icing.
- Spiced Icing: Add 1/8 teaspoon cinnamon or a pinch of ground ginger for a warm note. This works well in the fall.
- Royal Icing Hybrid: Add a small amount of meringue powder (about 1 teaspoon) if you want a harder, shinier finish similar to royal icing. This will change the texture and drying time.
- Sugar-Free Swap: Use a powdered erythritol blend labeled for icing in place of powdered sugar. Expect a different mouthfeel and reduce corn syrup if needed.
Timing tricks: make a double batch if you know you’ll need extra for decorating and last-minute gifts. Portion into small jars and label them. A jar tucked into a pantry is a quick fix for guests who stop by.
FAQs About Classic Sugar Cookie Icing
Can I make this icing ahead of time?
Yes. You can make it up to a week in the fridge. Bring to room temperature and stir before using. If it is too thick, add a tiny splash of milk.
Will this icing hold sprinkles?
Absolutely. For the best results, add sprinkles while the icing is still wet. For nonpareils and heavier toppings, press gently so they set into the icing.
My icing is grainy. What happened?
Graininess usually comes from not fully dissolving the powdered sugar or from lumps in the sugar. Sift your powdered sugar or whisk vigorously. If needed, use a hand mixer on low for a few seconds.
How long does it take to harden?
At room temperature, edges firm in about 20 to 30 minutes and the surface can take a few hours to fully set. Time depends on humidity and thickness.
Can I use this icing to glue cookie layers together?
Yes, once it has firmed slightly it works well as a light adhesive. For a stronger hold, use a thicker icing or a small dab of melted chocolate.
A Final Bite
If your family licks the pan clean, don’t say I didn’t warn you. This Classic Sugar Cookie Icing is one of those small kitchen wins that makes simple cookies feel like a celebration. Keep it in your back pocket for busy holiday nights, school bake sales, or rainy afternoons when you just need an easy project that still ends with hugs and full plates.
You’ve got this. Take your time with the color, keep the countertop tidy, and remember that imperfect decorations are part of what makes these cookies real and homey. Until next time, keep the oven warm and the recipes simple.
Classic Sugar Cookie Icing
Ingredients
Icing Ingredients
- 2 cups powdered sugar Sifted if lumpy
- 2 tablespoons milk Whole, 2 percent, or non-dairy milk
- 1 tablespoon light corn syrup Essential for shine and flow
- 1/2 teaspoon vanilla extract Can substitute with almond extract
- to taste food coloring Optional, add a drop at a time
Instructions
Mixing
- In a mixing bowl, combine powdered sugar, milk, corn syrup, and vanilla extract.
- Stir gently at first to avoid a sugar cloud. Use a spatula to bring the sugar into the liquid.
- Mix until smooth and glossy. If lumps appear, switch to a whisk or a hand mixer on low for a few seconds.
- Stir gently and test the thickness. For piping, the icing should hold shape. For flooding, it should run slowly off a spoon in a steady ribbon.
- Add food coloring to achieve the desired shades, starting with a drop and mixing well.
Using the Icing
- Use immediately to decorate cookies or store in an airtight container until ready to use.
- For piping, transfer a portion into a piping bag with a small round tip.
- For flooding, thin with a little extra milk, a drop at a time, until it flows steadily off a spoon.
- Let icing set on a cooling rack or flat tray without touching the cookies.
- If you need a faster set time, place cookies in a cool, dry room.
Notes
Nutrition
What’s Cooking in Your Kitchen?
Tried this recipe your own way? I want to see it. Snap a quick pic and tag us, or drop a comment with what you tweaked. Lazy cooking works best when we swap ideas and your spin might be the next Lazy Meal Prep favorite.
Post your photo and tag @lazy_mealprep I’ll share my favorites in stories.