The kitchen fills with the warm, buttery scent of Hawaiian rolls hitting a hot skillet, the air alive with a sweet hint of pineapple in the bread and the savory promise of melted cheese. I love the little sound the top of the roll makes when I press it down and the way the edges turn golden and crisp, almost glowing. This is a recipe that feels like a quiet celebration, perfect for an afternoon with coffee or a cozy night in when you want something simple and indulgent.
If you enjoy small, comforting treats you can make in a flash, this recipe will become one of your favorites; I first learned a version of it from a neighbor, and it has been a go-to ever since. For another quick, crowd-pleasing take you might enjoy, try this Hawaiian roll grilled cheese recipe for more inspiration.
Why You’ll Love This Hawaiian Roll Grilled Cheese
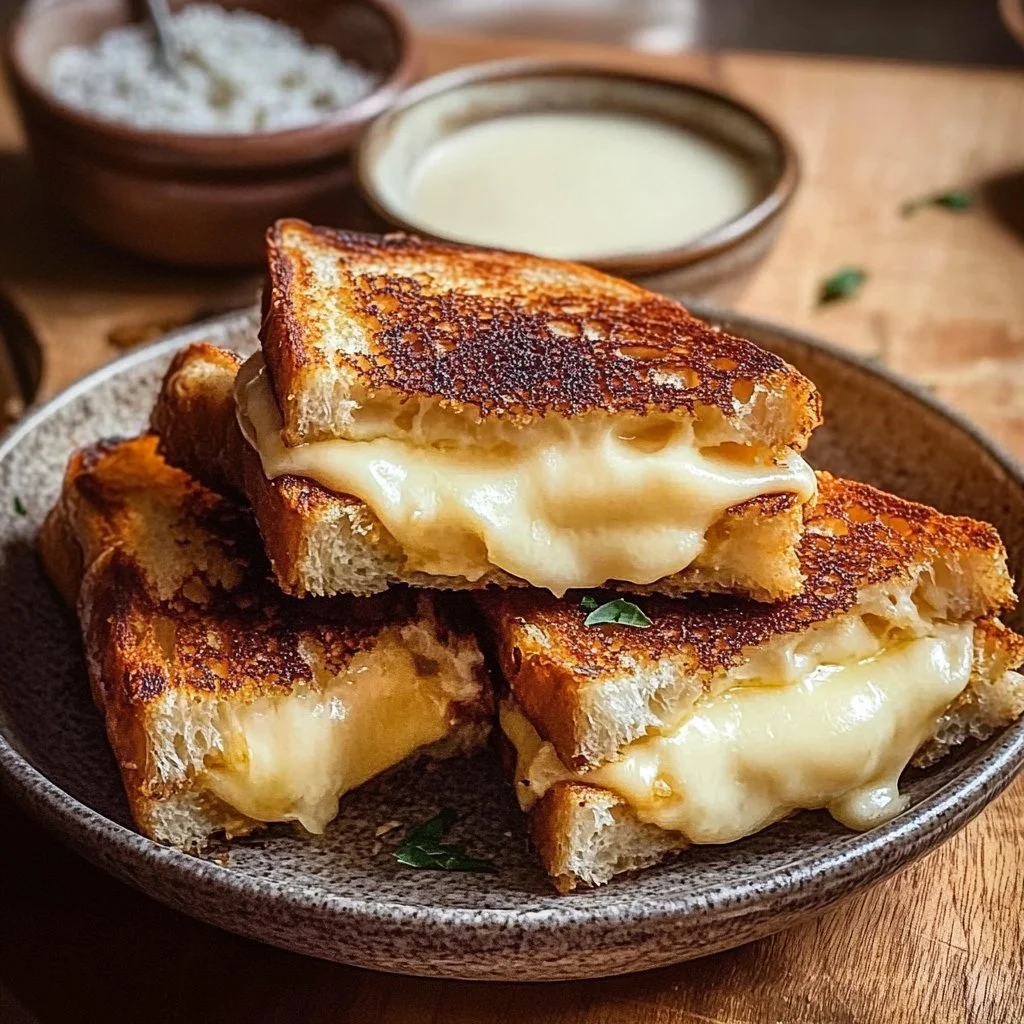
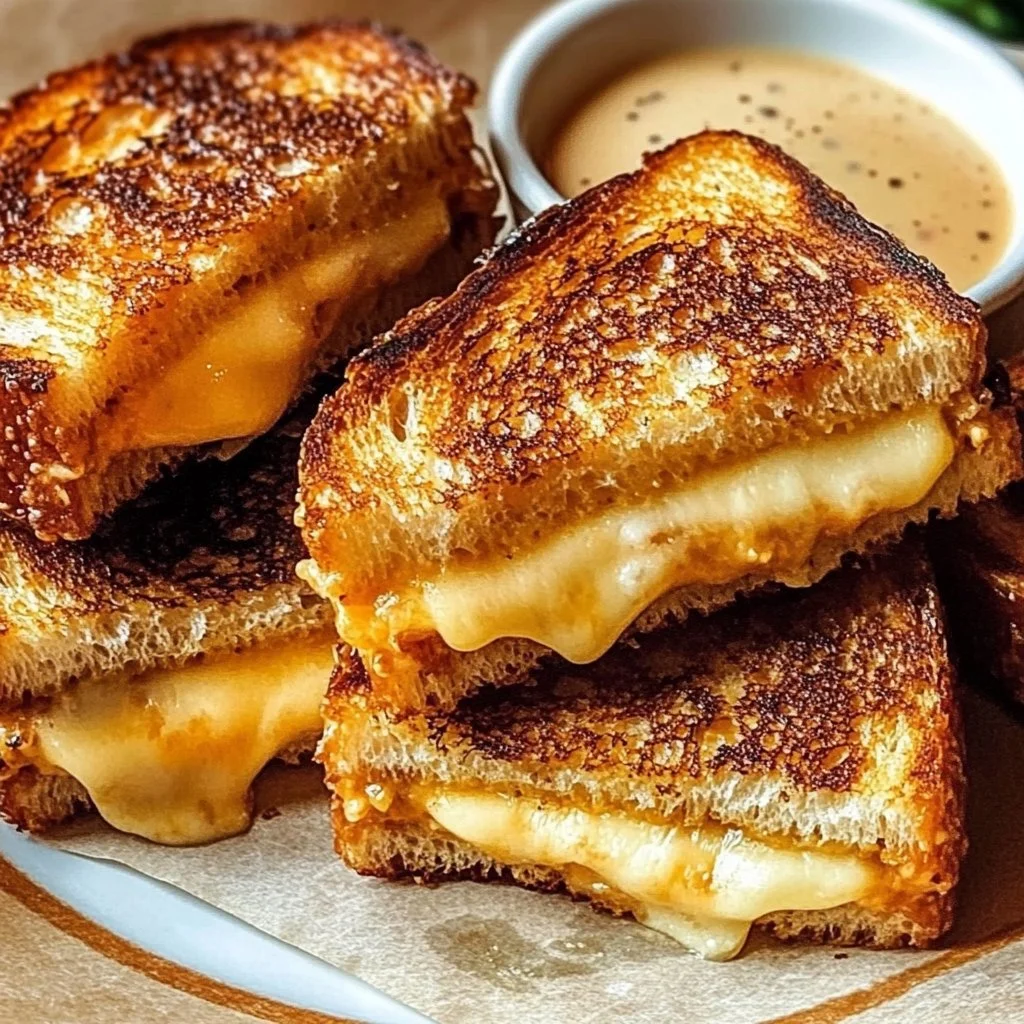
There is something very human about toasting bread and melting cheese. This recipe captures that feeling an everyday luxury that’s small enough to make for two and special enough to bring out when friends drop by. The soft, slightly sweet Hawaiian rolls cradle a molten interior and form glossy, golden edges that invite you to take the first bite.
It comforts like a childhood memory but reads as grown-up in its textures. You get buttery-soft bread, a melt-in-your-mouth cheese center, and a crisp exterior that snaps just enough to announce the contrast. It is perfect for lazy brunches, birthday breakfasts, or a simple, celebratory dessert after a quiet dinner.
This dish is forgiving and joyful. It handles swaps well and rewards small touches like a brush of butter or a scatter of crispy bacon. From my kitchen to yours, it’s an easy way to make a moment feel meaningful.
How to Make Hawaiian Roll Grilled Cheese
“When the kitchen smells like vanilla and butter, you know something special’s baking.”
Begin with a short overview so you know what’s coming. You will aim for a warm, bubbling cheese center and a roll that is toasted to a warm golden brown. Watch for glossy cheese edges leaking just a whisper of goodness; that tells you the interior is perfectly melted. The smell will change from sweet bread to rich butter and melted cheese, and that is when you reach for a spatula.
If you like to try variations, consider a savory-sweet twist that includes a little bacon or caramelized onion for contrast. The recipe is quick and excellent for feeding small gatherings, and you can double or triple it easily for a party. For a different format and some inventive mix-ins, I often look to other grilled cheese ideas such as the bacon and caramelized onion version I keep on hand when I want more depth.
Ingredients You’ll Need
- All 4 Hawaiian rolls
- 1 cup shredded Monterey Jack cheese
- 2 tablespoons unsalted butter
- Optional: Sliced tomatoes or crispy bacon
Use real butter if you can. It makes every bite worth it. The Hawaiian rolls bring a slightly sweet lift, and Monterey Jack melts down into a smooth, creamy ribbon that is mild and buttery. If you choose optional toppings, slice tomatoes thin so they warm through on the skillet without making the centers soggy. If you add bacon, cook it crisp first so it stays crunchy against the soft cheese.
I prefer shredding my own cheese because pre-shredded cheese often has anti-caking agents that can change the melt. Freshly shredded Monterey Jack turns glossy and silky faster. If you like a stronger taste, mix half sharp cheddar with the Monterey Jack for a bright, tangy edge.
Step-by-Step Directions
- Slice the Hawaiian rolls in half without cutting all the way through.
Keep the rolls hinged like a book so they hold together and make assembly fast. Work on a clean board and slice with a serrated knife for a tidy edge. - Preheat a non-stick skillet over medium heat and butter the insides of each roll.
Let the skillet warm for a minute until you can feel steady heat. Spread butter thinly and evenly so it melts into every nook. - Place the bottom halves of the rolls on the skillet and fill generously with cheese. Press down slightly with the top halves.
Pile the cheese into a soft mound in the center; the heat will do the work of melting it. Press lightly so the roll seals around the filling. - Grill until golden brown, about 3-4 minutes per side, flipping carefully.
Use a thin spatula and a confident flip to avoid losing any filling. You want a rich, golden crust that gives a little when you press it. - Once both sides are crispy and cheese is melted, remove from heat, slice, and serve hot.
Let the sandwich rest a minute so the molten cheese tucks in slightly rather than pouring out. Slice cleanly and serve immediately.
Timing tip: Keep the heat at medium. Too hot and the outside will cook long before the cheese melts. Too low and the bread will take too long to reach golden. Watch the edges; when they turn a deep honey color, you are nearly there.
Texture tip: If the center is taking too long to melt, cover the skillet for 30–45 seconds to trap heat. This pushes the cheese toward silky, buttery perfection without burning the bread.
Variations in assembly: For an open-faced version, grill the cut sides first until golden, then add cheese and place under a broiler very briefly until the cheese bubbles. This is a lovely way to serve them as little melts on a platter.
For a playful dish that borrows the handheld warmth of this sandwich, try combining the filling ideas with other formats like the grilled cheese burrito if you want to explore portability and different textures.
Serving Hawaiian Roll Grilled Cheese With Love
Serve these with a cup of strong coffee, a scoop of vanilla ice cream, or a simple fruit salad. The toasted, golden edges and buttery aroma make them a beautiful companion to both sweet and savory pairings. A tiny drizzle of honey or a smear of buttered jam on the side transforms each bite into a quiet party.
For a breakfast spread, set them beside soft scrambled eggs and roasted cherry tomatoes. For dessert-style serving, offer them with a small pot of warmed berry compote so everyone can dip or spoon as they please. The soft interior and crispy outside contrast beautifully with cool ice cream; a forkful of warm, cheesy bread with a cool scoop is an unexpected delight.
Presentation touches: place the sandwiches on a wooden board and scatter a few fresh mint leaves or thin lemon slices for color. Serve on small plates with a napkin tucked underneath the look is gentle, inviting, and unfussy.
Storage & Reheat Tips
To keep them soft: wrap leftover sandwiches in foil while still slightly warm, then tuck them into the refrigerator. The foil helps them retain moisture but prevents the bread from steaming too much.
To keep them crisp: reheat in a skillet over medium-low heat for 3–4 minutes per side. Use a lid for the first minute to encourage the cheese to warm through, then remove it to let the crust re-crisp.
Fridge note: store in the refrigerator for up to 2 days. If you plan to keep them longer, freeze individually wrapped sandwiches for up to 6 weeks.
Freezer reheat: thaw in the refrigerator overnight, then unwrap and reheat in a skillet or oven at 350 degrees Fahrenheit until warmed through. If reheating from frozen, add 5–8 minutes and keep a watch so the crust does not over-brown.
A gentle trick: if the bread feels a little dry after refrigerating, brush a thin layer of melted butter on the cut sides before reheating. It refreshes the crust and adds that buttery-soft note we cherish.
Sweet Tips & Tricks
- Use room temperature cheese for faster, more even melting. Cold cheese can delay the melt and tempt you to crank up the heat.
- Butter the skillet and the cut sides of the roll for extra golden color. Real butter gives the best aroma and mouthfeel.
- Thin slices first, then add more cheese if you like gooey centers. A little restraint at first prevents overflow and keeps the edges neat.
- For crisp bacon, cook it fully ahead of time and pat dry. Fat left on bacon will make the roll soggy.
- Keep the skillet covered briefly to help the center melt, then uncover to re-crisp the exterior for perfect contrast.
These are small habits that add up. I often memorize times by touch: a light press on the top should rebound with a slight resistance when the sandwich is ready. That tactile cue has saved many a dinner in my kitchen.
Flavor Twists & Variations
Sweet and savory balance beautifully with this sandwich. Try a slice of sharp cheddar with a thin smear of apricot jam for a bright, jammy snap against a buttery interior. Add thin apple slices and a sprinkle of cinnamon for a fall-inspired twist.
For a more dessert-like approach, spread a little cream cheese mixed with honey inside the roll and add a sprinkle of toasted coconut before grilling. The coconut crisps in the heat and the cream cheese warms into a creamy ribbon.
If you love a custardy feel, spread a touch of mascarpone inside and follow with the cheese of choice. It melts down into a luxuriously soft center that pairs beautifully with a dusting of powdered sugar on the top right before serving.
For a wholly different dessert-style pairing, take inspiration from layered, sweet bakes and try the idea in a different format. For a playful take that borrows from pastry, see the creamy textures used in the cheesecake crescent roll casserole and adapt the flavors into a sandwich form for a sweeter treat.
Family-friendly swaps: use mild mozzarella for a very kid-pleasing, stringy melt or add a whisper of smoked paprika to the butter for depth. If you have guests who enjoy heat, a thin slice of pickled jalapeño tucked under the cheese gives a wonderful contrast.
Lessons From My Kitchen
I learned to trust a skillet’s heat by starting with low heat and patience. In my early days I burned many a roll because I rushed; now I aim for the sweet spot where the cheese flows and the crust sings. Let the process be calm and pleasant.
Organization helps. Lay out your rolls, measure your cheese, and have your optional toppings nearby. Assembly goes quickly this way and you avoid overcooking.
Clean-up tip: after cooking, pour a little warm water into the skillet and let it sit while you plate. The softened butter and stray cheese peel off more easily, and a quick wipe finishes the job.
Comfort tip: invite someone to the kitchen while you cook. This recipe makes small talk easier; before you know it, you have a shared plate and a cozy memory.
FAQs About Hawaiian Roll Grilled Cheese
u003cstrongu003eCan I make this ahead?u003c/strongu003e
u003cpu003eYes. Make them fully, cool to room temperature, then wrap individually and refrigerate for up to 48 hours. Reheat in a skillet for best texture.u003c/pu003e
u003cstrongu003eCan I use a different cheese?u003c/strongu003e
u003cpu003eAbsolutely. Monterey Jack is creamy and mild, but a blend of sharp cheddar and mozzarella works well. Avoid low-moisture, pre-shredded varieties if you want the creamiest melt.u003c/pu003e
u003cstrongu003eWill this work in a panini press?u003c/strongu003e
u003cpu003eYes. Press gently and watch closely so you achieve golden color without squashing the roll flat. A press speeds the process and yields even toasting.u003c/pu003e
u003cstrongu003eHow do I avoid a soggy bottom from tomatoes?u003c/strongu003e
u003cpu003eSlice tomatoes thin, pat them dry, and consider layering a very thin piece of cheese between the tomato and the roll bottom to create a moisture barrier.u003c/pu003e
u003cstrongu003eIs it okay to freeze?u003c/strongu003e
u003cpu003eYes. Freeze fully wrapped sandwiches for up to six weeks. Thaw overnight in the refrigerator for best reheating results.u003c/pu003e
A Final Sweet Note
I hope this Hawaiian Roll Grilled Cheese brings your kitchen the same buttery joy it brings mine. It is small, simple, and delightfully indulgent, perfect for a birthday morning, a coffee chat, or a quiet night in. The golden edges, the melt-in-your-mouth center, the soft sweetness of the rolls all of it feels like a small celebration you can make any day. Try it once and keep the memory; then make it again and share it with someone you love.
Conclusion
If you would like more ideas and a slightly different presentation, the easy baked mini sliders in this Hawaiian Roll Grilled Cheese Sliders (Easy Baked Mini Grilled …) post offer a lovely baked variation for a crowd. For a bold garlic-packed twist, this recipe at Garlic Grilled Cheese Hawaiian Rolls – The Sassy Barn provides inspiring flavor details you might want to try.

Hawaiian Roll Grilled Cheese
Ingredients
Main ingredients
- 4 pieces Hawaiian rolls Sliced in half.
- 1 cup shredded Monterey Jack cheese Freshly shredded for better melting.
- 2 tablespoons unsalted butter Use real butter for best flavor.
Optional ingredients
- 1 slice tomato Sliced thinly for topping.
- 2 slices crispy bacon Cooked crunchy for topping.
Instructions
Preparation
- Slice the Hawaiian rolls in half without cutting all the way through, keeping them hinged like a book.
- Preheat a non-stick skillet over medium heat and butter the insides of each roll.
Cooking
- Place the bottom halves of the rolls on the skillet and fill generously with cheese. Press down slightly with the top halves.
- Grill until golden brown, about 3-4 minutes per side, flipping carefully.
- Once both sides are crispy and cheese is melted, remove from heat, slice, and serve hot.