
I can still smell the warm citrus and butter when I close my eyes. The kitchen would fill with a quiet hum of conversation while the braid rose on the counter, and my mother would press a colored egg into the dough with a laugh. We would tear pieces, hands sticky, tea steaming, and for a moment everything felt slow and safe. That smell, that way the crust browned at the edges, is what this Italian Easter Bread keeps bringing me back to. If you like small, old-fashioned treats, you might also enjoy the soft, cinnamon kiss of Anginetti Italian Christmas cookies, which are another family favorite to bake when the house needs gentle sweetness.
Why This Italian Easter Bread Means So Much
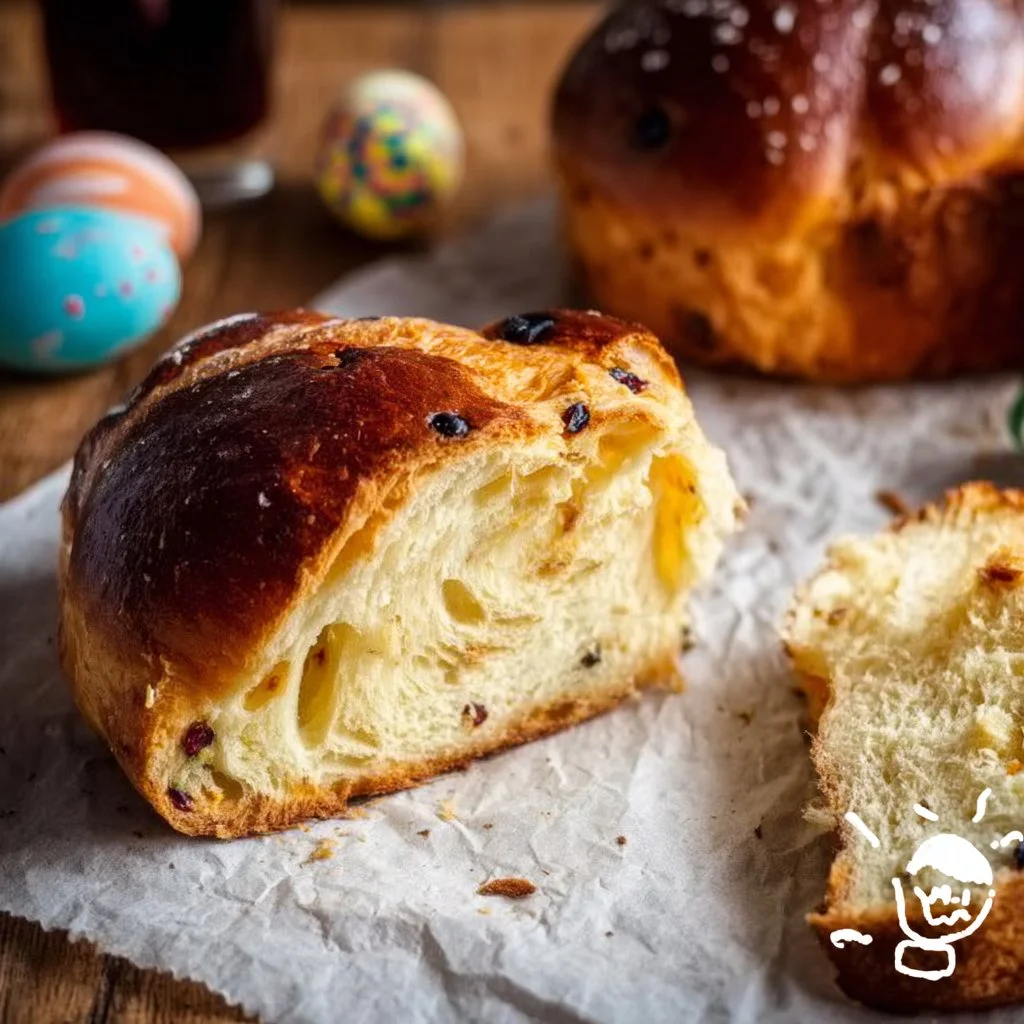
This bread has been on our table for as long as I can remember. It is not flashy; it is a simple braid of soft, slightly sweet dough with colorful eggs tucked into its folds. Yet, it holds more than flour and sugar. It holds Sundays, small hands reaching for sprinkles, and the quiet satisfaction of a kitchen that made memories.
When I say this bread feels like home, I mean the way light hits the table on a slow morning, and how nothing else matters while everyone waits for the first slice. The bread is proof that good food is often simple. It asks only for time and gentle hands. It asks for people to gather, to break its crust together, and to tell stories while the crumbs fall.
There are small rituals that make it ours. We tint the eggs gently, not to hide the shell’s natural shine but to add a wink of color. We braid the dough without fuss, letting imperfect hands make an honest shape. From there, the oven does its quiet work, turning dough into golden bread and filling the house with the scent of butter and vanilla. This is the bread my mother taught me, and the one I teach my children now.
How to Make Italian Easter Bread
“Every time I stir this pot, it smells just like Sunday at home.”
Before we get to the exact steps, imagine the dough as a soft pillow between your palms. It should feel springy and warm after rising. You will hear a gentle sigh when you press it, and the braid should look glossy after an egg wash. Those are the small cues that tell you this bread is on its way.
As you mix, watch for texture. The dough should pull away from the bowl while still sticking faintly to your fingers. When you braid, the strands should hold their shape but not resist. These simple signs are better than any timer. Meanwhile, let the room be as cozy as you can make it. A warm spot on the countertop works well, or the oven light on with the door closed for a minute. Once you get the rhythm, the whole process is comforting and easy.
Ingredients You’ll Need
4 cups all-purpose flour
1/4 cup granulated sugar
1 packet (2 1/4 tsp) active dry yeast
1 teaspoon salt
1 cup milk, warmed
1/4 cup butter, melted
3 large eggs
1 teaspoon vanilla extract
Colorful eggs (for decoration)
Sprinkles (for decoration)
A few warm notes: use fresh butter it makes all the difference. If you love cozy spice, add a dash more cinnamon to the dough. If your milk is too hot, it will kill the yeast; it should feel warm and gentle on the wrist, not hot. These little choices change the bread in small, lovely ways.
Step-by-Step Directions
- In a large bowl, combine the flour, sugar, yeast, and salt.
Whisk them together so the dry mix feels even and light.
This gives you an even rise and a tender crumb. - In a separate bowl, mix the warm milk, melted butter, eggs, and vanilla.
Beat until the mixture looks smooth and glossy.
The warmth should be gentle so the eggs do not cook. - Pour the wet ingredients into the dry ingredients and mix until a dough forms.
Use a wooden spoon or your hands to bring the flour in.
The dough will be soft and a little sticky at first. - Knead the dough on a floured surface until smooth, about 5-7 minutes.
Push and fold, turning often so the dough evens out.
Stop when it feels springy and no longer shaggy. - Place the dough in a greased bowl, cover, and let it rise in a warm place until doubled in size, about 1 hour.
I like to cover mine with a damp towel to keep the surface soft.
You will see the dough puff and feel slightly alive. - Punch down the dough, divide it into three equal pieces, and roll each piece into a long strand.
Work gently so you do not knock all the air out.
The strands should be even so the braid looks neat. - Braid the strands together and form into a wreath shape.
Tuck the ends under and press lightly so it keeps its circle.
The braid will hold the eggs later like little treasures. - Place the braid on a baking sheet lined with parchment paper.
Make sure it has room to rise and brown.
The parchment helps the loaf release easily after baking. - Decorate the wreath with colorful eggs and sprinkles.
Press each egg gently into the dough so it rests but does not sink.
The sprinkles add a playful touch and a tiny crunch. - Let it rise for another 30 minutes.
The braid will puff and look softer, almost alive.
This second rise gives the bread a light, airy crumb. - Preheat the oven to 350°F (175°C).
Give the oven time to reach the right warmth.
A steady heat makes the crust turn a gentle gold. - Bake for 25-30 minutes, or until golden brown.
Watch for the top to gain a warm color and the bottom to sound hollow when tapped.
If the edges darken too quickly, cover loosely with foil. - Let it cool before serving.
Once cooled, the scent settles and the slices cut cleanly.
Share it warm or at room temperature for best comfort.
Serving Italian Easter Bread With Family Warmth

I like to place the wreath right in the center of the table, still warm and peppered with tiny crumbs. We pull off pieces with our hands because nothing formal is needed. A cup of black coffee or a pot of tea makes a gentle pair. Sometimes I set out soft butter and a small bowl of jam. Other times, we eat it plain and let the bread speak for itself.
For a party, slice the wreath into wedges and arrange them on a simple platter. Little plates with soft butter and honey invite people to take their own comfort. Children love to choose the eggs they will keep as tokens. After that, someone will always ask for seconds, and no one leaves hungry.
If you have a small gathering, try adding thin slices of prosciutto or a few wedges of fresh cheese for a savory balance. Meanwhile, set the table with linen or a plain runner and let the bread be the bright centerpiece. The joy is in passing pieces around, telling a new story, and watching slow smiles.
Storing Italian Easter Bread for Tomorrow
If you have leftovers, wrap the cooled bread tightly in plastic wrap or store it in an airtight container. It keeps well at room temperature for two days. After that, the crumb can dry a bit, but a simple trick brings it back.
To revive a slice, sprinkle a few drops of water on the top and warm it briefly in a 300°F oven for 5-7 minutes. The steam softens the crumb and returns that fresh-baked feel. From there, you can toast slices in the morning or heat them gently for company.
For longer storage, freeze the bread wrapped in foil and plastic to protect against freezer burn. When you are ready to eat, thaw it overnight in the refrigerator, and then warm it gently in the oven. The flavor actually deepens, and the smell when it comes back to life is a small, bright comfort. Many people treat leftover sweet breads like other family favorites, and I sometimes reach for a banana loaf recipe when I want a different kind of cozy banana bread without baking soda for the week ahead.
Little Kitchen Notes
- Use room temperature eggs and warm milk. Cold ingredients slow the rise and can make the dough tight.
- If your dough seems sticky after kneading, dust with small amounts of flour rather than adding a cup all at once. A too-dry dough will bake dense.
- For a shiny finish, brush the crust with a beaten egg before baking. It gives the bread a warm, bakery look.
- If you need a shortcut, divide the dough into two strands and twist them instead of a three-strand braid. The taste is the same and the shape is just as lovely.
- For a little extra flavor, fold in a teaspoon of lemon zest or a splash more vanilla to brighten the dough. A tiny change goes a long way.
I keep a small wooden board by the sink for kneading. It is never perfect, and I like that. The flour gets on my sleeves and the timer keeps running, but those small messes become stories. If you find you love the cozy feel of baking, you might try another loaf during the week, like this simple banana bread, which bakes while the house hums with other chores.
Family Variations on Italian Easter Bread
Our family tried a few changes over the years. My sister likes to fold a handful of mini chocolate chips into the dough for a subtle sweetness that melts as it bakes. My father once suggested adding a scatter of chopped almonds on top for a nutty crunch. Both are small liberties that keep the core memory intact.
Another version we love adds a ribbon of ricotta sweetened with a bit of sugar and lemon zest. You roll a thin layer into the strand before braiding, and the baked pockets of ricotta feel like a soft surprise. If you want a rustic twist, roll the braid a touch longer and let it be a narrow wreath; it bakes a little faster and becomes slightly crisper at the edges.
For a seasonal change, fold in a tablespoon of orange zest and a few chopped toasted walnuts. The orange lifts the dough and makes the room smell like a small grove. If you like full, nutty loaves on a weekend, you might also enjoy a moist and simple nut bread like this banana nut bread recipe, which brings similar comfort with different flavors.
FAQs About Italian Easter Bread
Can I bake this a day ahead?
Yes, and honestly, it tastes even better the next day when the flavors settle together. Warm it gently before serving.
Can I use instant yeast instead of active dry yeast?
Yes. Use the same amount and mix it directly with the dry ingredients. You may find it rises a touch faster, so keep an eye on the dough.
Can I make smaller loaves or rolls instead of one wreath?
Absolutely. Divide the dough into smaller pieces, braid or twist, and bake for less time. Watch for golden color and a hollow sound at the bottom.
Are the eggs baked fully?
Yes. The eggs tucked into the braid are fully cooked during baking. They make the presentation joyful and add a classic touch.
Linda’s Tried-and-True Tips
- Measure flour the gentle way. Spoon it into the measuring cup and level with a knife rather than scooping. This keeps the dough soft.
- Give yourself time. Rushing the rise makes the crumb tight. Let it double quietly, and you will see the difference in each bite.
- Use a warm spot for rising. A sunny windowsill works if it is not too hot, or the oven with the light on for a short while.
- Clean as you go. Wipe flour off counters while the dough rests. It makes the end of baking peaceful and leaves more room to share the bread.
- Trust your senses. How the dough smells and feels tells you more than a clock. If it smells slightly yeasty and looks puffy, you are on the right track.
These tips are small and practical. They come from years of doing the same steps and learning what tiny changes make a loaf kinder and more dependable. I keep a bowl of extra sprinkles in the pantry for children to help decorate. They make a mess, and we laugh, and the bread always looks happier for it.
A Final Thought
There is a quiet power in simple recipes that are touched by a family’s hands. Italian Easter Bread is one of those recipes. It is forgiving, warm, and full of the small kindness of home. When I teach someone to braid, I tell them it does not have to be beautiful to be loved. The first bite will be proof enough.
If you bake this bread, please take a moment to breathe in the oven-scent before you slice. Share a piece with someone who needs a small comfort. From there, notice the way the crumbs fall and the laughter rises. Those are the true parts we keep.
Conclusion
Thank you for spending time in a kitchen that remembers. If you would like another classic that carries a similar family warmth, this Italian Easter Bread – Sprinkle Bakes post offers a lovely take on the same tradition that you may enjoy for comparison. For a treasured version passed down in many homes, see Nana’s Italian Easter Bread – Brown Eyed Baker which captures the nostalgia and practical tips that make this sweet bread a lasting favorite.

Italian Easter Bread
Ingredients
Main Ingredients
- 4 cups all-purpose flour
- 1/4 cup granulated sugar
- 2 1/4 teaspoon active dry yeast 1 packet
- 1 teaspoon salt
- 1 cup milk, warmed Should feel warm and gentle on the wrist
- 1/4 cup butter, melted Use fresh butter for best results
- 3 large eggs Room temperature
- 1 teaspoon vanilla extract
- Colorful eggs (for decoration) For aesthetic decoration
- Sprinkles (for decoration) Adds a playful touch and crunch
Instructions
Preparation
- In a large bowl, combine the flour, sugar, yeast, and salt. Whisk them together so the dry mix feels even and light.
- In a separate bowl, mix the warm milk, melted butter, eggs, and vanilla. Beat until the mixture looks smooth and glossy.
- Pour the wet ingredients into the dry ingredients and mix until a dough forms. Use a wooden spoon or your hands to bring the flour in.
- Knead the dough on a floured surface until smooth, about 5-7 minutes.
- Place the dough in a greased bowl, cover, and let it rise in a warm place until doubled in size, about 1 hour.
Shaping and Rising
- Punch down the dough, divide it into three equal pieces, and roll each piece into a long strand.
- Braid the strands together and form into a wreath shape, tucking the ends under.
- Place the braid on a baking sheet lined with parchment paper.
- Decorate the wreath with colorful eggs and sprinkles.
- Let it rise for another 30 minutes, then preheat the oven to 350°F (175°C).
Baking
- Bake for 25-30 minutes, or until golden brown.
- Let it cool before serving.