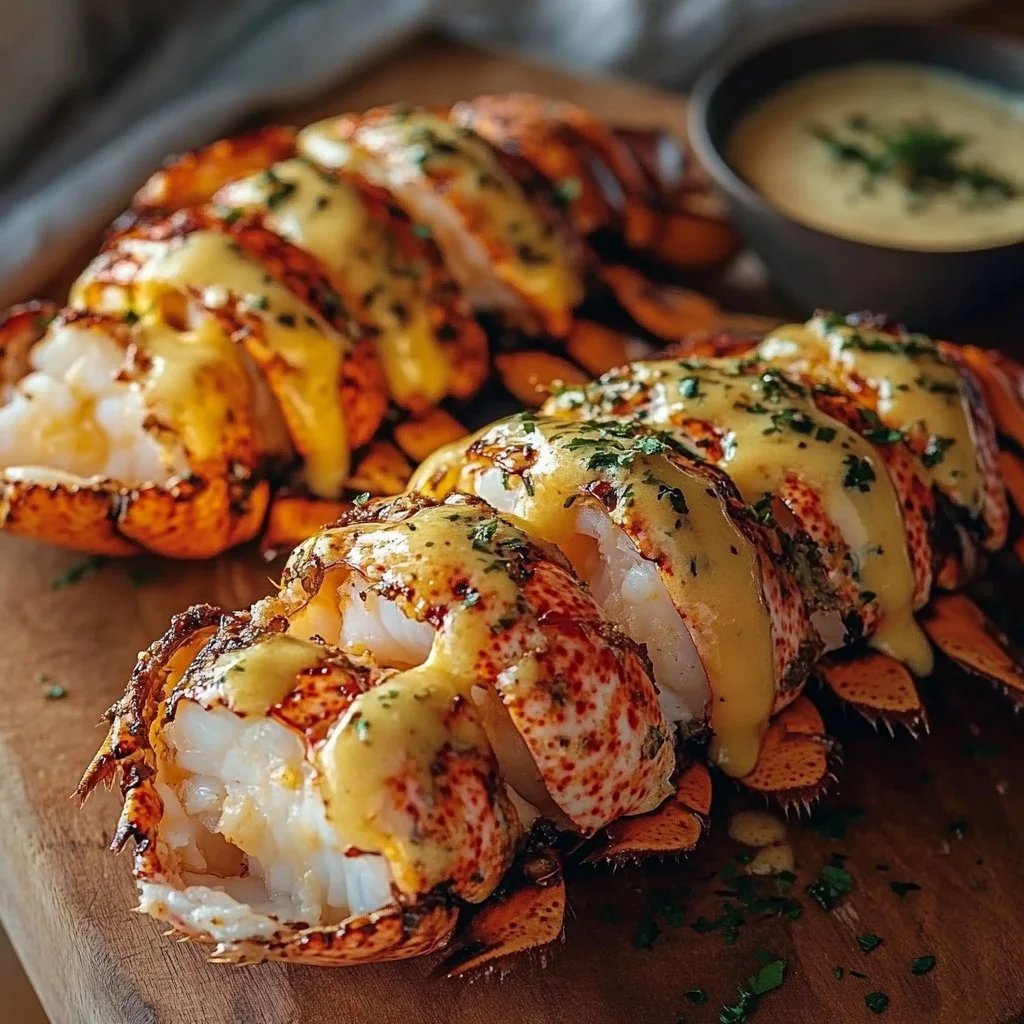
I can still smell the butter and garlic whenever I think about the first time I tried The Best Baked Lobster Tails in 2 Simple Steps with my kids. They sat on the edge of their chairs, napkins tucked under chins, eyes glued to the oven light like it was a magic show. The house filled with a warm, briny scent that felt like a weekend dinner even though it was a Wednesday night. If you want a simple way to make a special meal without the fuss, this is it and yes, you can pair it with something soothing like a cup of lemon balm tea after dinner to unwind.
Why The Best Baked Lobster Tails in 2 Simple Steps Deserves a Spot in Your Weeknight Rotation
If you are juggling work, kids, and activities, the last thing you want is a complicated recipe that needs babysitting. This dish gives you restaurant-style flavor with minimal hands-on time. The lobster looks impressive, but the process is straightforward.
It uses just a handful of ingredients and one pan. That means fewer dishes, less time at the sink, and more time to sit down as a family. The butter and garlic mix creates a golden top that smells amazing and keeps the meat tender. Don’t overthink the presentation; the lobster does most of the work.
This recipe also plays nice with busy schedules. You can prep everything earlier in the day and bake when you are ready. If you are planning a small holiday or a Friendsgiving-style gathering, these lobster tails slide into a menu of easy, reliable dishes like simple holiday recipes that keep everyone smiling without turning the kitchen into a circus.
Preparing The Best Baked Lobster Tails in 2 Simple Steps Without the Fuss
“If it smells this good halfway through, you know dinner’s gonna be great.”
Here is the lowdown on what you will do. First, you prep the lobster by cutting the shell to let the meat sit on top. Next, you brush it with a buttery, garlicky glaze and bake until the meat turns opaque and a little firm to the touch.
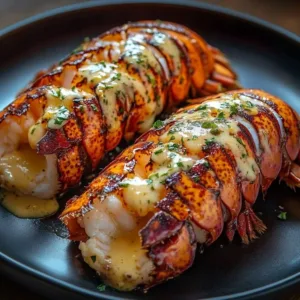
The texture you want is firm but not rubbery. The color is an opaque white with tiny flashes of pink from the shell. A little browning on top is okay and adds flavor, but avoid overcooking. The aroma should be buttery with a hint of lemon and garlic. These cues tell you the lobster is done and ready to serve.
While this is a short process, each step has a little logic behind it. Cutting the shell lets the butter hit the meat directly so every bite tastes rich. Baking in a moderately hot oven cooks evenly without making the meat tough. Simple rules, big payoff.
If you enjoy straightforward proteins with big flavor, you’ll see the same logic applied in other easy mains.
Ingredients You’ll Need
2 whole lobster tails
1/4 cup melted butter
2 cloves garlic (minced)
1 teaspoon paprika
1/2 teaspoon salt
1/4 teaspoon pepper
1 juice lemon
2 tablespoons parsley (chopped for garnish)
Don’t skip the garlic. It wakes up the butter and gives this recipe its soul. Use what’s in your fridge for parsley; fresh is best, but frozen chopped parsley works in a pinch. The paprika adds color and a gentle warmth that makes the lobster look ribbon-worthy without adding heat.
If you like to keep things pantry-friendly, note that the ingredient list is short and forgiving. You probably already have the seasonings. Lobster tails are the only real splurge, and they go a long way for an impressive dinner.
Step-by-Step Directions
- Preheat your oven to 400°F (200°C).
Keep a rack in the middle position.
A hot oven gives a quick cook without drying the meat. - Place the lobster tails on a baking sheet lined with foil or parchment.
This makes cleanup fast and keeps juices where you want them.
Use a rimmed sheet to catch any butter drips. - Using kitchen scissors, cut along the top of the lobster shell, stopping before the tail fin.
Cut through the hard shell, not the meat.
This gives you space to lift and expose the meat. - Gently spread the shell open to expose the meat.
Lift the meat and rest it on top so it sits above the shell.
This lets the butter bathe the meat and gives a nice presentation. - In a bowl, mix together the melted butter, minced garlic, paprika, salt, and pepper.
Stir until the garlic distributes evenly.
If the butter firmed up, microwave a few seconds until pourable. - Brush the butter mixture over the lobster meat.
Be generous but don’t drown it; you want flavor, not sogginess.
Reserve a spoonful to brush again halfway through baking. - Bake for 10-15 minutes until the lobster meat is opaque.
Start checking at 10 minutes; ovens vary.
A thermometer should read about 140-145°F if you use one. - Drizzle with fresh lemon juice and sprinkle with chopped parsley before serving.
Lemon brightens everything, so squeeze just before serving.
A little extra melted butter on the side never hurts.
Quick tip: a few seconds under the broiler at the end can add a golden finish, but watch closely. You’ve got this the first time you nail the timing, it becomes easy every time.
The Cooking Process Explained
Understanding a bit of the why behind each move makes cooking less stressful. Lobster meat is delicate and cooks quickly. The high oven temperature helps the meat set fast while the butter seals in moisture. Cutting the shell makes the meat accessible and helps with even cooking.
Color is a big clue. When raw, lobster meat looks translucent. As it cooks, it turns opaque and firm. A firm, slightly springy bite is what you want. If it feels rubbery, it is overcooked.
A quick check with an instant-read thermometer is reassuring. Aim for 140-145°F. If you prefer to avoid gadgets, look for the flesh to be fully opaque and just a touch firm. If in doubt, take it out early; residual heat will finish a bit more cooking.
Small details like lining the pan and saving a little extra butter to brush on halfway through make dinner feel effortless and great. These are the tricks I lean on when I have just one oven rack and two hungry kids.
Serving The Best Baked Lobster Tails in 2 Simple Steps at the Table
Serve these lobster tails family-style on a large platter with lemon wedges and an extra bowl of melted butter for dunking. They look impressive, and everyone gets to pick their favorite piece.

If you want to make the meal feel more casual, place the lobster on plates with a side of roasted potatoes and a simple green salad. For something more elegant, add a light risotto or a herbed couscous. I like to pair the lobster with a crisp, bright side like steamed asparagus or a lemony pea salad to cut through the butter.
For busy nights, use meal-prep boxes. Place a lobster tail with a scoop of rice and steamed vegetables for a quick lunch the next day. For gatherings, lay them out on a tray with cocktail forks so guests can dig in without a fuss. And if you save room for dessert, a warm cookie is always a crowd-pleaser, like the one I turn to when I want something simple but satisfying: a cinnamon cookie that finishes the meal on a sweet note.
Storage & Reheat (No Soggy Leftovers)
Leftover lobster is a treat, but it can get dry if handled wrong. Store cooled lobster meat in an airtight container in the fridge for up to two days.
If you want to freeze for longer storage, remove the meat from the shell, wrap tightly in plastic, then place in a freezer bag. Frozen lobster is best used within two months for quality. Thaw overnight in the fridge before reheating.
To reheat without losing texture, warm in a 300°F oven for about 8-10 minutes. This method is gentle and helps keep the meat tender. The microwave works in a pinch, but heat in short bursts and cover loosely to avoid rubbery meat. If you are reheating a full meal, place lobster on top of rice or veggies and warm together; the steam helps maintain moisture.
Quick Tips & Shortcuts
- Buy split lobster tails when you can. They save you the scissor step and are great for presentation.
- Make the butter mixture in advance and refrigerate. Warm it gently before brushing.
- Use foil or parchment for fast cleanup; throw it away and the pan is clean.
- If you do one extra thing, brush a little melted butter again halfway through baking for richer flavor.
- Want a shortcut side? Steam frozen vegetables in the microwave while the lobster bakes.
These tips keep the kitchen tidy and your time efficient. When I am short on time, I lean on the prep-ahead butter and a simple microwave side dish. The flavor stays strong, and the stress stays low.
If you use an Instant Pot for sides or other proteins, you can have a full dinner ready with minimal active steps.
Variations That Work
There are a few easy swaps and upgrades that let you tailor this recipe to your family.
- Spicy: Add 1/4 teaspoon cayenne or a pinch of chili flakes to the butter for a gentle heat.
- Herbed: Stir in a teaspoon of dill or tarragon for a fresh, herbal note.
- Cheesy: Add a tablespoon of grated Parmesan to the butter and sprinkle more on top before baking.
- Citrus-forward: Swap part of the melted butter for orange or lime juice for a brighter flavor.
- Garlic-lover: Double the garlic and roast a bit of it before mixing for a mellow, roasted garlic note.
These variations are small adjustments that make a big difference. Try one at a time so you know what your family likes best.
Ethan’s Notes From the Kitchen
I learned to keep this recipe simple after a few too many attempts to “improve” it with complicated sauces. The basic butter, garlic, and lemon combo is reliable and beloved. When I am cooking for picky eaters, I stick to the classic and save the experiments for weekends.
If you are feeding a crowd, roast several tails at once on a baking sheet. Give them space so they cook evenly. You can also put them under the broiler for a minute or two at the end of baking if you want a golden top. Just don’t walk away seafood broils fast.
When buying lobster tails, look for firm shells and a fresh ocean scent. Frozen tails are fine and often less expensive; just thaw them properly in the fridge overnight.
FAQs About The Best Baked Lobster Tails in 2 Simple Steps
Can I make this ahead?
Yep. You can assemble the lobster tails and refrigerate for a few hours. Brush with fresh butter and bake when you are ready. Pre-assembling saves time and stress the moment hunger hits.
How do I know when lobster is done?
The meat should be opaque and firm to the touch. If you use a thermometer, aim for 140-145°F. Overcooked lobster becomes rubbery, so check a minute early if your oven runs hot.
Is it okay to use frozen lobster tails?
Absolutely. Thaw them in the fridge overnight. Pat dry before cutting the shell so the butter sticks well and the lobster bakes evenly.
Can I cook lobster tails on the grill instead?
Yes. Butter and garlic work great on the grill. Use indirect heat and keep an eye on them. Grill flavor is lovely for a backyard meal.
What sides go well with these lobster tails?
Simple, bright sides like steamed vegetables, lemony rice, or a mixed green salad. You can also serve with mashed potatoes for a comforting plate.
What I’ve Learned After a Few Batches
One big lesson: timing beats fancy ingredients. The right oven time and a steady butter mix will impress more than rare spices. Another lesson: kids eat more when the plate looks special. A lobster tail on the plate makes dinner feel important, even on a weeknight.
Keep a small bowl for used utensils and another for trash to avoid a cluttered counter. Clean as you go and your cleanup time after dinner is much shorter. If you are prepping for a date night, set the table while the lobster bakes so everything comes together easily.
Be practical about shortcuts. Frozen tails are fine. Pre-minced garlic in a jar can save time and still taste great. The goal is a meal you can make without stress and that brings people together.
Helpful Answers Before You Cook
Can I swap ingredients?
Sure. Swap parsley for chives or basil. Use what you have and trust your taste.
Will kids like this?
Many kids do, especially when the meat is served with butter and lemon. Offer a mild dipping sauce for picky eaters.
Is this expensive?
Lobster is a splurge, but two tails can serve two to four people depending on sides. Consider it a special occasion treat or plan it for a simpler, more impressive weeknight.
Can I add a sauce?
Yes. A light herb vinaigrette or a mustard butter sauce can be served on the side. Keep sauces simple so they do not overpower the lobster.
A Final Bite
If your family licks the plate clean, don’t say I didn’t warn you. The Best Baked Lobster Tails in 2 Simple Steps is meant to be straightforward, tasty, and a little bit showy so that weeknight dinner feels special. Keep the routine simple, trust the cues we talked about, and enjoy the moment when the whole table leans in. Until the next recipe, keep the butter warm and the oven ready.
Baked Lobster Tails
Ingredients
Lobster Tails
- 2 whole lobster tails Look for firm shells and fresh ocean scent.
For the Butter Mixture
- 1/4 cup melted butter Use freshly melted for best flavor.
- 2 cloves garlic (minced) Fresh garlic gives the dish its soul.
- 1 teaspoon paprika Adds color and a gentle warmth.
- 1/2 teaspoon salt
- 1/4 teaspoon pepper
For Serving
- 1 juice lemon Drizzle over lobster before serving.
- 2 tablespoons parsley (chopped for garnish) Fresh is best, but frozen works too.
Instructions
Preparation
- Preheat your oven to 400°F (200°C) and keep a rack in the middle position.
- Place the lobster tails on a baking sheet lined with foil or parchment.
- Using kitchen scissors, cut along the top of the lobster shell, stopping before the tail fin.
- Gently spread the shell open to expose the meat and lift it to rest on top.
- In a bowl, mix together the melted butter, minced garlic, paprika, salt, and pepper.
- Brush the butter mixture over the lobster meat, reserving a spoonful to brush again halfway through baking.
Cooking
- Bake for 10-15 minutes until the lobster meat is opaque. Start checking at 10 minutes.
- Drizzle with fresh lemon juice and sprinkle with chopped parsley before serving.
- Optional: a few seconds under the broiler at the end can add a golden finish, but watch closely.
Notes
Nutrition
What’s Cooking in Your Kitchen?
Tried this recipe your own way? I want to see it. Snap a quick pic and tag us, or drop a comment with what you tweaked. Lazy cooking works best when we swap ideas and your spin might be the next Lazy Meal Prep favorite.
Post your photo and tag @lazy_mealprep I’ll share my favorites in stories.