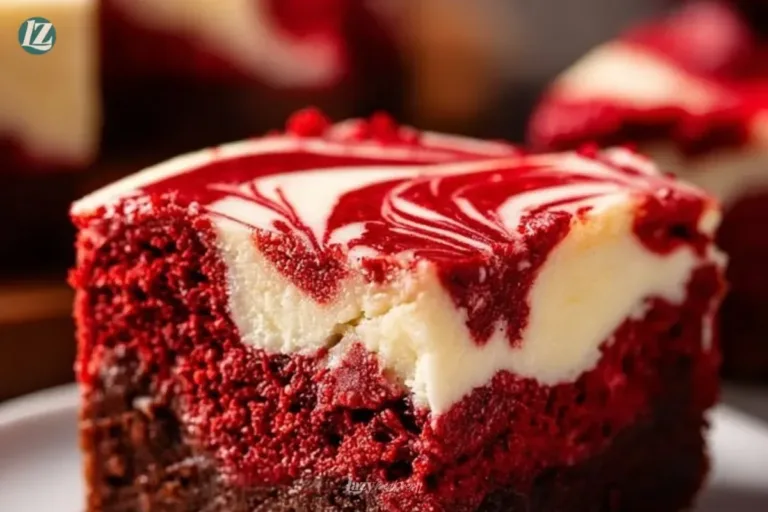
The oven door opens to a warm cloud of vanilla and cocoa, and the first hint of butter fills the kitchen like a small promise. I slice a corner of glossy, marbled red and white and press it to my tongue; the cheesecake layer is silky and the brownie underneath has golden edges and a chewy, almost buttery-soft crumb. This is my kind of quiet celebration Red Velvet Cheesecake Brownies Recipe that make an ordinary afternoon feel like a little party worth sharing.
Why You’ll Love This Red Velvet Cheesecake Brownies Recipe

There is a kind of comfort in the red velvet color that feels like a birthday and a hug at once. The cream cheese adds a cool, tangy silk that balances the cocoa-laced brownie. Together they make a treat that looks lifted for a celebration, but is simple enough for a weeknight dessert.
A good brownie is about contrast: crisp edges, a melt-in-your-mouth center, and a smooth top. These brownies do that while giving you the swoon of cheesecake in every bite. They also slice neatly, which means you can send a tray to a friend, tuck a square into a lunchbox, or stack them on a plate for a coffee chat.
Even my grandmother, who baked in a tin pan with a wooden spoon, loved anything that felt special but tasted honest. That sweet memory is why I keep this on hand for small gatherings and quiet nights in with a cup of strong coffee.
How to Make Red Velvet Cheesecake Brownies Recipe
“When the kitchen smells like vanilla and butter, you know something special’s baking.”
Before you gather bowls and spoons, picture what you want the finished brownies to show. Look for a glossy, marbled top, golden edges and a cheesecake layer that sits firm but soft. These cues tell you the bake is right, and they will guide your timing and cooling.
If you are new to swirling batters, start with dollops and a gentle swirl. Overworking will flatten the marbling. While the pan is in the oven, the aroma will move from sweet to almost floral with cocoa and vanilla. If you want a savory counterpoint for the evening, try pairing the brownies with a simple main like pan-seared chicken thighs and keep the dessert as a finishing note.
Ingredients You’ll Need
For the Red Velvet Brownies:
1/2 cup unsalted butter, melted
1 cup granulated sugar
2 large eggs
1 teaspoon vanilla extract
1 tablespoon red food coloring
1 tablespoon cocoa powder
3/4 cup all-purpose flour
1/4 teaspoon salt
For the Cheesecake Layer:
8 oz cream cheese, softened
1/4 cup granulated sugar
1 large egg
1/2 teaspoon vanilla extract
Use real butter if you can it makes every bite worth it. Real butter gives a fuller flavor and a better texture than margarine or spreadable blends. If your cream cheese is cold, let it sit on the counter until soft to the touch; it will blend smoother and give you a lump-free cheesecake layer.
Step-by-Step Directions
- Preheat the Oven:
Preheat your oven to 350°F (175°C) and line an 8×8-inch baking pan with parchment paper, leaving some overhang for easy removal.
- Prepare the Red Velvet Brownie Batter:
In a large mixing bowl, whisk together the melted butter and sugar until smooth. Add the eggs, vanilla extract, and red food coloring. Stir until well combined.
Sift in the cocoa powder, flour, and salt. Gently fold the dry ingredients into the wet ingredients until just combined. Be careful not to overmix.
- Make the Cheesecake Layer:
In a separate bowl, beat the softened cream cheese and sugar together until smooth. Add the egg and vanilla extract, beating until the mixture is creamy and free of lumps.
- Assemble the Brownies:
Pour about 3/4 of the red velvet brownie batter into the prepared baking pan, spreading it evenly.
Carefully pour the cheesecake layer over the brownie layer, spreading it gently to the edges.
Drop spoonfuls of the remaining red velvet batter on top of the cheesecake layer. Use a knife or toothpick to swirl the red velvet batter through the cheesecake to create a marbled effect.
- Bake:
Bake for 30-35 minutes, or until the center is set and a toothpick inserted into the center comes out mostly clean (a few moist crumbs are okay).
- Cool:
Let the brownies cool completely in the pan on a wire rack before removing them. For cleaner cuts, chill the brownies in the refrigerator for at least 30 minutes before slicing.
- Serve:
Slice the brownies into squares and serve them as is, or with a dollop of whipped cream or a drizzle of chocolate sauce for extra indulgence.
Baking notes inside the steps: watch the center as you near 30 minutes. The cheesecake top should not jiggle like a custard, but a slight wobble is fine. The edges will firm before the center does, and that gives you good visual guidance. When you pull them from the oven, the top will have a soft sheen. Let time do its work and cool fully for neat slices.
Serving Red Velvet Cheesecake Brownies Recipe With Love
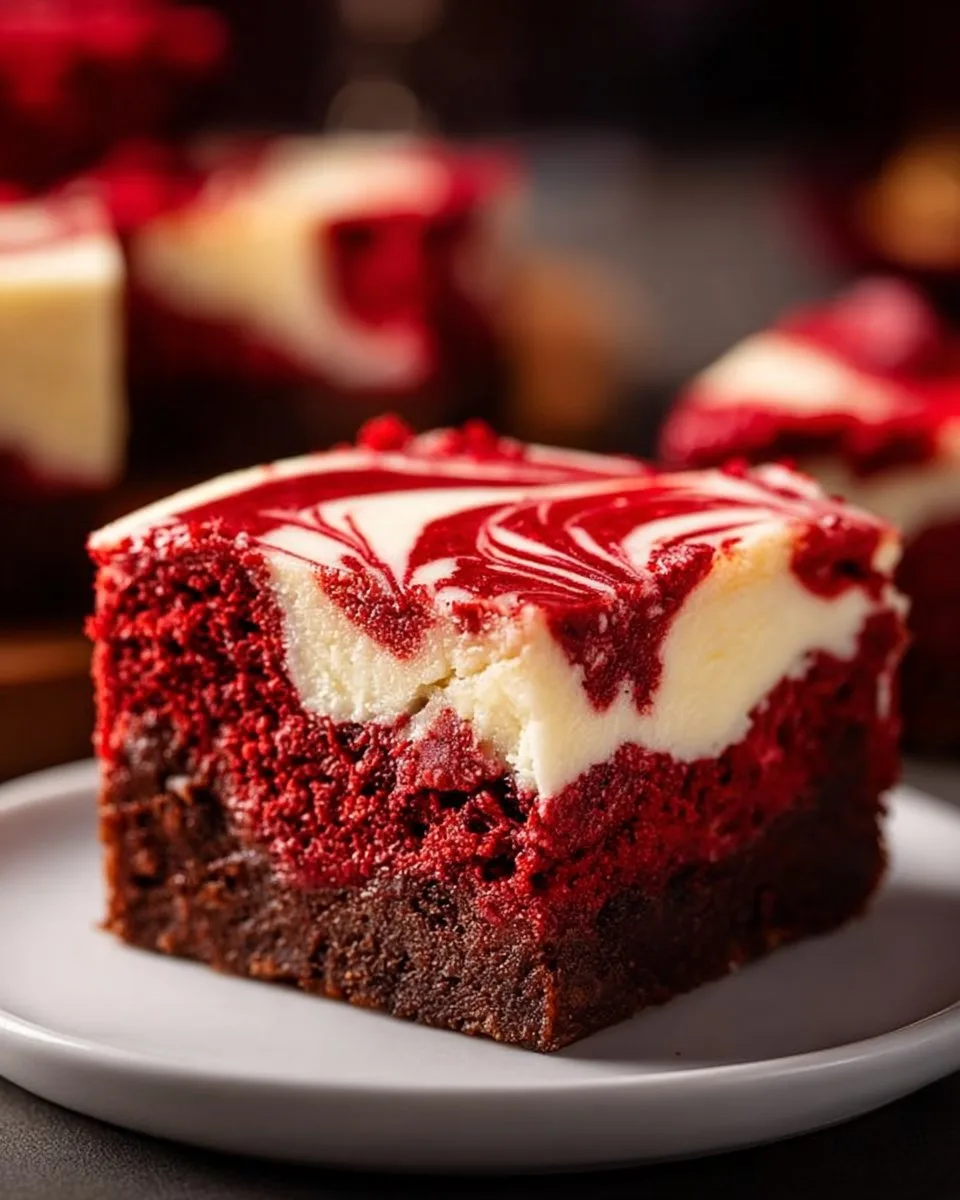
These brownies deserve a small, unhurried moment. Arrange a few squares on a white plate so the red shows clearly against the cream cheese swirl. A dusting of powdered sugar looks pretty, but I often leave them glossy and bare so the texture sings.
Pair with a cup of coffee for a morning treat, or a scoop of vanilla ice cream for an easy dessert after dinner. Smoother cheeses and mild berries make nice companions; a small bowl of raspberries brightens the plate and cuts the richness. For a cozy tea, serve with a pot of black tea and a single sprig of mint.
If you want to serve them at a gathering, cut them smaller and stack on a tiered tray. They hold well at room temperature for a few hours, so you can bake in the morning and set them out at tea time. If you need a showstopper idea, place a warm brownie next to a scoop of cold ice cream and let the textures meet on the plate.
I like to bring a small tray of these to friends on a gray day. They are simple to share, and they say I made something with care.
Storage & Reheat Tips
Keep brownies in an airtight container to hold texture and freshness. At room temperature they will stay soft for two days. If you want to keep them longer, store them in the refrigerator for up to five days.
To freeze, wrap individual squares tightly in plastic wrap, then tuck them into a freezer bag. They will keep for up to three months. Thaw in the refrigerator overnight for best texture, or bring to room temperature for an hour before serving.
If you want a warm serving from the fridge, pop a square in the microwave for 10 to 15 seconds. The cheese layer softens quickly, and a short burst of heat brings back that just-baked feel without melting the swirl.
For travel, pack the chilled brownies with a small ice pack. They slice cleaner when cold and are less likely to smear in a carrier.
Sweet Tips & Tricks
- Use room-temperature eggs and softened cream cheese. Cold eggs can make the batter stiff and affect rise, while cold cream cheese gives you lumps and a streaky top. Let both come to room temp for a smooth blend.
- Don’t overmix the brownie batter. Fold until the flour disappears. Overmixing develops gluten and makes brownies cakier than fudgy. Aim for shiny, a bit dense, and soft in the center.
- Swirl with care. Drop spoonfuls of the remaining red batter on top of the cheesecake layer and make long, gentle swirls. Small tight swirls will brown and disappear. Big graceful swirls give you a bold marble.
- Chill before slicing. For the cleanest edges, chill the pan for at least 30 minutes. A warm knife presses the marble and smears the cream chilling firms the layers for neat squares.
- Plan a simple menu around the brownies. If you need an easy dessert after a savory meal, consider a gentle finish like a creamy pasta that pairs with a compact, indulgent sweet.
Quick note: if you are short on time, you can speed the cream cheese step by using a hand mixer on low, but keep an eye on the bowl; you want creamy, not aerated.
Flavor Twists & Variations
If you love the base idea, try a few small shifts to keep things interesting. Swap half the cocoa for dark cocoa if you want a deeper chocolate note. Replace part of the sugar in the cheesecake with brown sugar for a caramel hint.
Stir a teaspoon of orange zest into the cheesecake layer for a bright citrus lift, or fold in a handful of chopped white chocolate into the red velvet batter for buttery pockets. For a festive look, top with crushed peppermint in winter, or scatter fresh berries in summer.
For a nutty texture, sprinkle toasted pecans across the brownie batter before baking. They will toast further in the oven and give a crunchy contrast to the silk of the cheesecake.
If you want smaller bites, make them in a mini-muffin tin for single-serve brownie cups. Reduce bake time to about 18 to 22 minutes and check for a slight set in the center.
Red Velvet Cheesecake Brownies
Ingredients
For the Red Velvet Brownies
- 1/2 cup unsalted butter, melted Use real butter for better flavor.
- 1 cup granulated sugar
- 2 large eggs Use room temperature.
- 1 teaspoon vanilla extract
- 1 tablespoon red food coloring
- 1 tablespoon cocoa powder
- 3/4 cup all-purpose flour
- 1/4 teaspoon salt
For the Cheesecake Layer
- 8 oz cream cheese, softened Let sit at room temperature for smooth blending.
- 1/4 cup granulated sugar
- 1 large egg Use room temperature.
- 1/2 teaspoon vanilla extract
Instructions
Preparation
- Preheat your oven to 350°F (175°C) and line an 8×8-inch baking pan with parchment paper, leaving some overhang for easy removal.
- In a large mixing bowl, whisk together the melted butter and sugar until smooth. Add the eggs, vanilla extract, and red food coloring. Stir until well combined.
- Sift in the cocoa powder, flour, and salt. Gently fold the dry ingredients into the wet ingredients until just combined.
Make the Cheesecake Layer
- In a separate bowl, beat the softened cream cheese and sugar together until smooth. Add the egg and vanilla extract, beating until the mixture is creamy and free of lumps.
Assemble the Brownies
- Pour about 3/4 of the red velvet brownie batter into the prepared baking pan, spreading it evenly.
- Carefully pour the cheesecake layer over the brownie layer, spreading it gently to the edges.
- Drop spoonfuls of the remaining red velvet batter on top of the cheesecake layer. Use a knife or toothpick to swirl the red velvet batter through the cheesecake to create a marbled effect.
Bake and Cool
- Bake for 30-35 minutes, or until the center is set and a toothpick inserted into the center comes out mostly clean.
- Let the brownies cool completely in the pan on a wire rack before removing them. For cleaner cuts, chill the brownies in the refrigerator for at least 30 minutes before slicing.
Serve
- Slice the brownies into squares and serve them as is, or with a dollop of whipped cream or a drizzle of chocolate sauce for extra indulgence.
Notes
Nutrition
FAQs About Red Velvet Cheesecake Brownies Recipe
Can I make this ahead?
Yes. Most desserts taste even better after resting overnight when the flavors meld perfectly. Bake the brownies, chill them, and slice the next day for neat squares and more developed flavor.
How do I prevent the cheesecake from cracking?
Avoid overbaking and give the brownies time to cool slowly. The cheesecake can crack if the oven is too hot or if you cool the pan too quickly. Let them cool on the counter before chilling.
Can I use a different pan size?
An 8×8 pan gives the right thickness and bake time. If you use a 9×9, the bake will be a touch thinner and may finish sooner, so start checking at 25 minutes. If you use a loaf pan, increase bake time and test for doneness with a toothpick.
What if I do not have red food coloring?
You can use natural alternatives like beet powder, but the color will be softer. The flavor will remain intact, but the classic red velvet look will be lighter.
Is there a gluten-free option?
Yes, swap the flour for a cup-for-cup gluten-free blend and watch bake time closely. Texture changes slightly, but the cheesecake swirl is forgiving and still makes a lovely treat.
Lessons From My Kitchen
When I first made these, I was trying to impress a friend with a simple but striking dessert. The first batch cracked in the middle, but the taste was so good that we ate the imperfect squares with spoons. That taught me that texture often matters more than looks and that a good recipe can forgive small mistakes.
I learned to be patient with cooling. Giving the bars time to set makes slicing easier and the layers kinder on the fork. I also learned that small touches like a warmed plate or fresh berry turn a good square into a memorable one.
A tidy baking habit I keep is to line the pan with parchment and leave an overhang. It is the small step that saves elbows and nerves when you need to lift the whole slab out for slicing.
A Final Sweet Note
I hope this Red Velvet Cheesecake Brownies Recipe brings your kitchen the same buttery joy it brings mine. Make one tray for company and one for the week; the odds are you will be asked for the recipe more than once.
Conclusion
If you want another take or a slightly different swirl, I like to compare ideas. For a similar but slightly different approach, see Red Velvet Cheesecake Brownies – Just a Taste for inspiration and plating ideas. For a recipe that leans into a creamier swirl and step-by-step photos, try Red Velvet Cheesecake Swirl Brownies – Sally’s Baking.