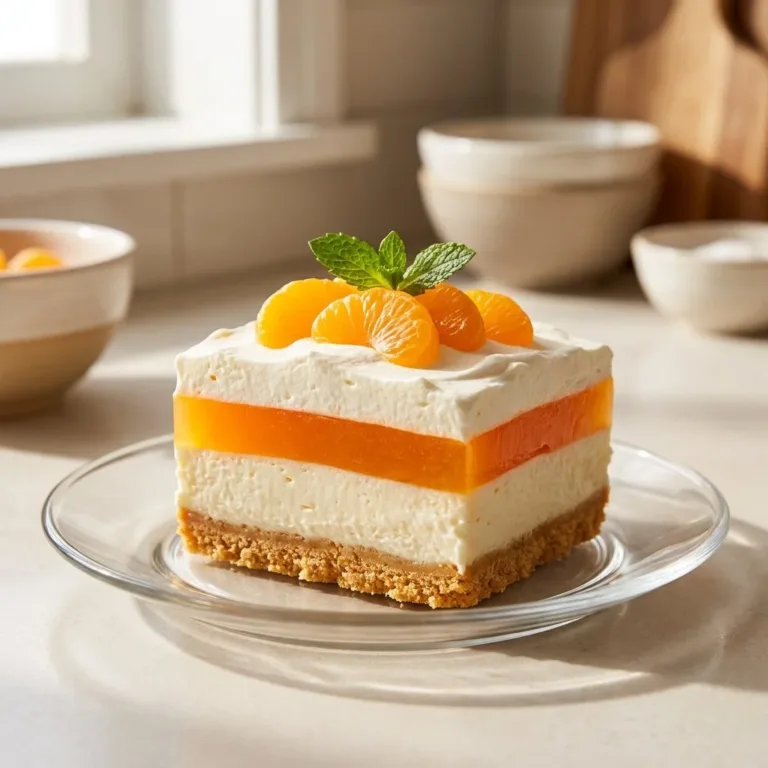
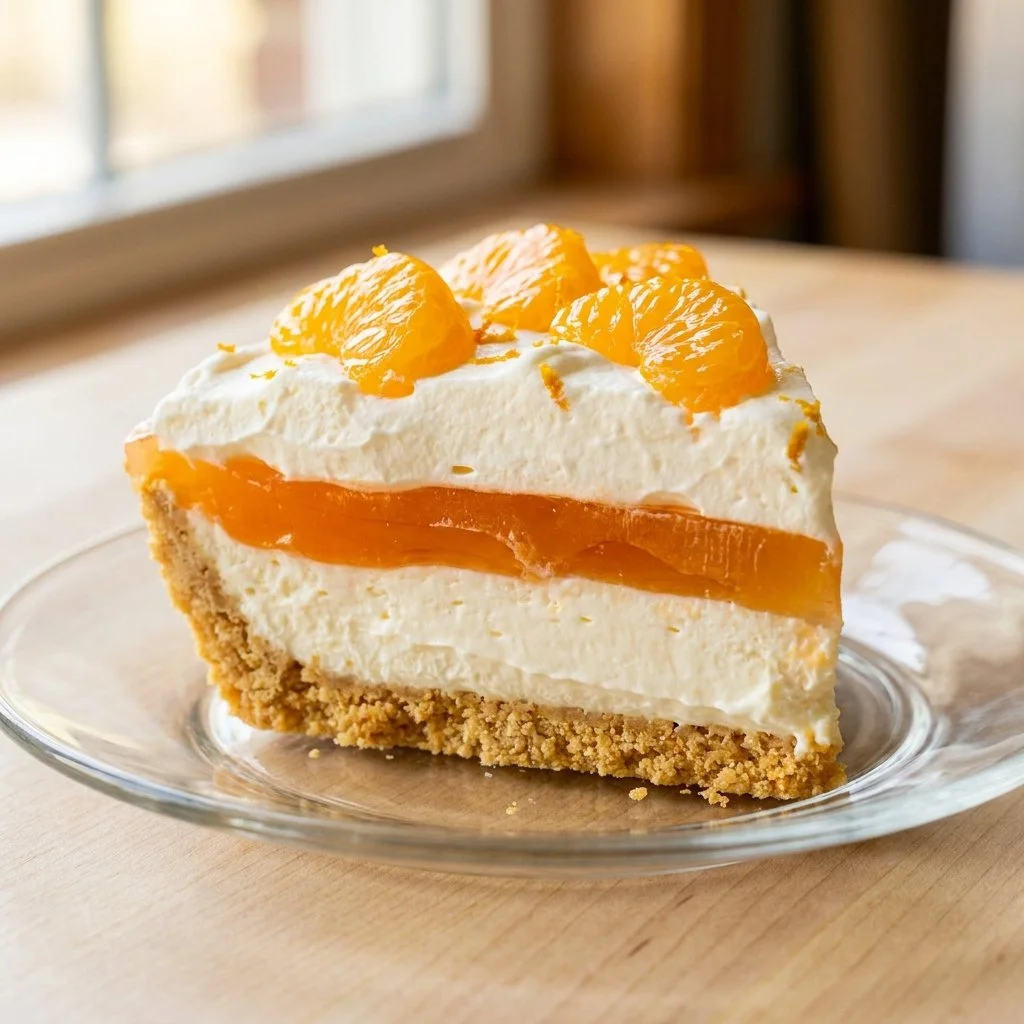
Quick No Bake Creamsicle Lush for Refreshing Party Treats
Imagine a sunny afternoon, kids laughing, and everyone gathered around the table, eagerly awaiting a sweet treat that captures the essence of summer. Enter the Quick No Bake Creamsicle Lush. This delightful dish brings back childhood memories with every bite, showcasing that vibrant orange and creamy white that makes even the simplest gatherings feel special. The best part? You don’t have to bake anything. Just layer, chill, and you’re in for a refreshing dessert that your family and friends will adore.
Why You’ll Love This Quick No Bake Creamsicle Lush for Refreshing Party Treats
The Quick No Bake Creamsicle Lush deserves a spot in your weeknight rotation because it checks all the boxes: quick prep, minimal dishes, and it’s family-friendly. Whether you’re hosting a summer barbecue or just looking for something sweet after dinner, this recipe is a total winner.
Honestly, who wants to heat up the kitchen when the weather is perfect? This dessert is perfect for those balmy evenings when you want to keep things light and breezy. Plus, it’s incredibly flexible. You can whip it up in no time, and kids can help in the kitchen too. With layers of creamy goodness and that unmistakable orange flavor, it’s refreshing without being overly heavy.
So, gather your loved ones and get ready to enjoy something that will make everyone want seconds. Trust me; this is one treat that vanishes before you know it.
Preparing Quick No Bake Creamsicle Lush for Refreshing Party Treats Without the Fuss
To get on with the fun part—making this dessert—let me give you an overview before we dive into the ingredients. The process is straightforward and totally stress-free. You’ll be mixing and layering in one dish, making cleanup a breeze.
“If it smells this good halfway through, you know dinner’s gonna be great.”
First, you’ll start with a simple cookie crust made from crushed vanilla sandwich cookies. Once that’s set, you’ll create a creamy orange-flavored layer to go on top. It’s a mix of cream cheese, powdered sugar, and whipped topping, folded together to give you that dreamy texture. Then, you’ll add a bold layer of orange gelatin mixed with vanilla pudding for a burst of flavor.
Simply chill it for a few hours, and this refreshing delight will be ready to serve. Let’s check out the ingredients you’ll need.
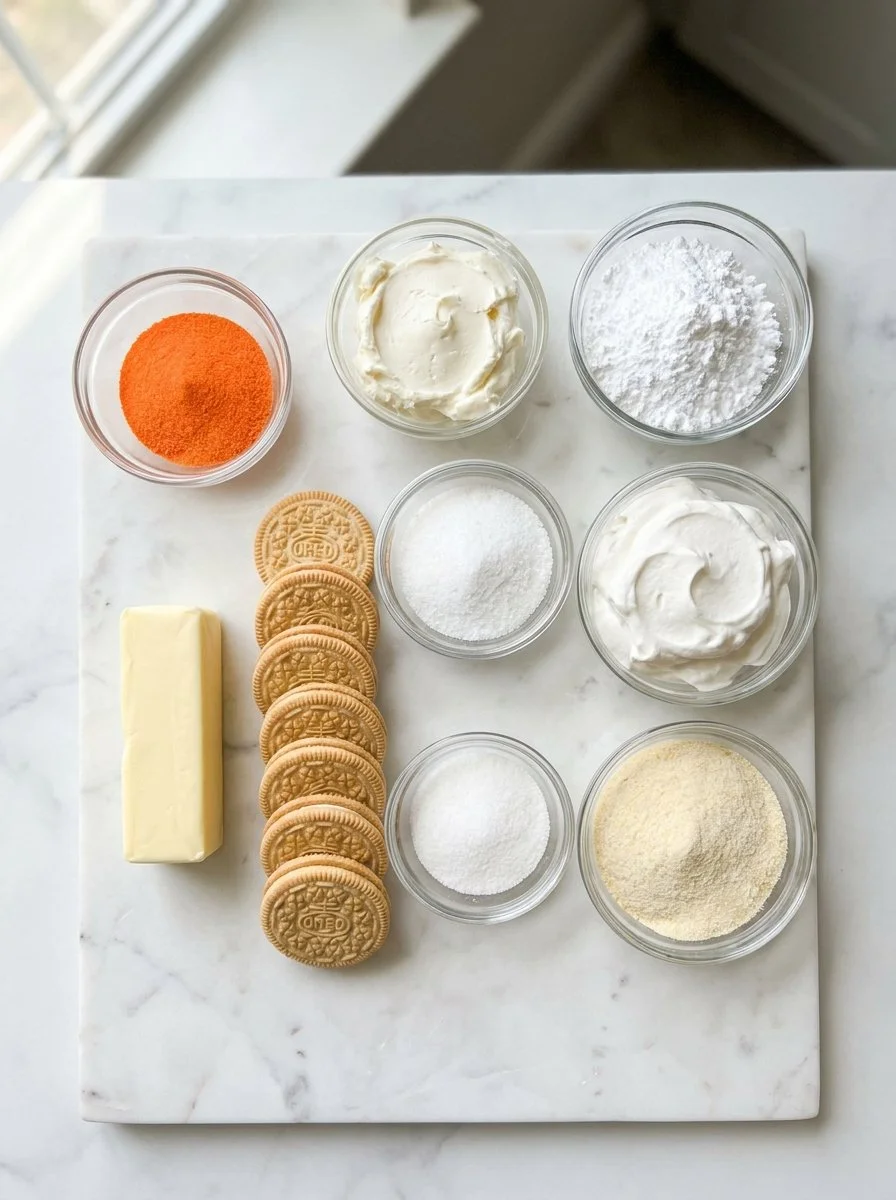
Ingredients You’ll Need
Here’s what you need to gather for this recipe:
- 1 package vanilla sandwich cookies, crushed
- 5 tbsp melted butter
- 1 box orange gelatin
- 1 cup boiling water
- 8 oz cream cheese, softened
- 1/2 cup powdered sugar
- 8 oz whipped topping
- 1 box instant vanilla pudding
- 2 cups cold milk
Feel free to use what you have in your pantry. No need for fancy ingredients here. The goal is to keep things simple yet delicious! If you can’t find orange gelatin, you can experiment with other flavors too. Strawberry or lemon would work great.
Step-by-Step Directions
Now, let’s walk through the steps to make this delicious dessert:
- Mix the crushed cookies with melted butter until well combined and press into a 9×13 dish. This will be your delicious crust.
- In a separate bowl, dissolve the orange gelatin in the boiling water and let it cool slightly. Don’t rush this step; letting it cool properly is essential.
- Beat the cream cheese and powdered sugar together until smooth. No lumps allowed here!
- Fold in half of the whipped topping gently. This helps to keep everything light and fluffy.
- Spread the cream cheese layer evenly over the cookie crust. Take your time here; a smooth layer makes for a perfect slice later.
- Whisk the pudding with the cold milk in another bowl until it thickens. This is where things start looking really good.
- Stir the cooled orange gelatin into the pudding mixture until fully combined. The color is going to look fantastic.
- Spread the pudding layer over the cream cheese. Be gentle not to disturb your previous layers too much.
- Top with the remaining whipped topping, spreading it out nicely.
- Chill in the refrigerator for at least 4 hours, or overnight if you can wait. Patience is key here!
A good tip as you’re preparing this dish: keep stirring until everything is smooth. You don’t want any lumps messing up the creaminess. Also, remember that little browning adds flavor, so don’t worry if the cookies get slightly toasted.
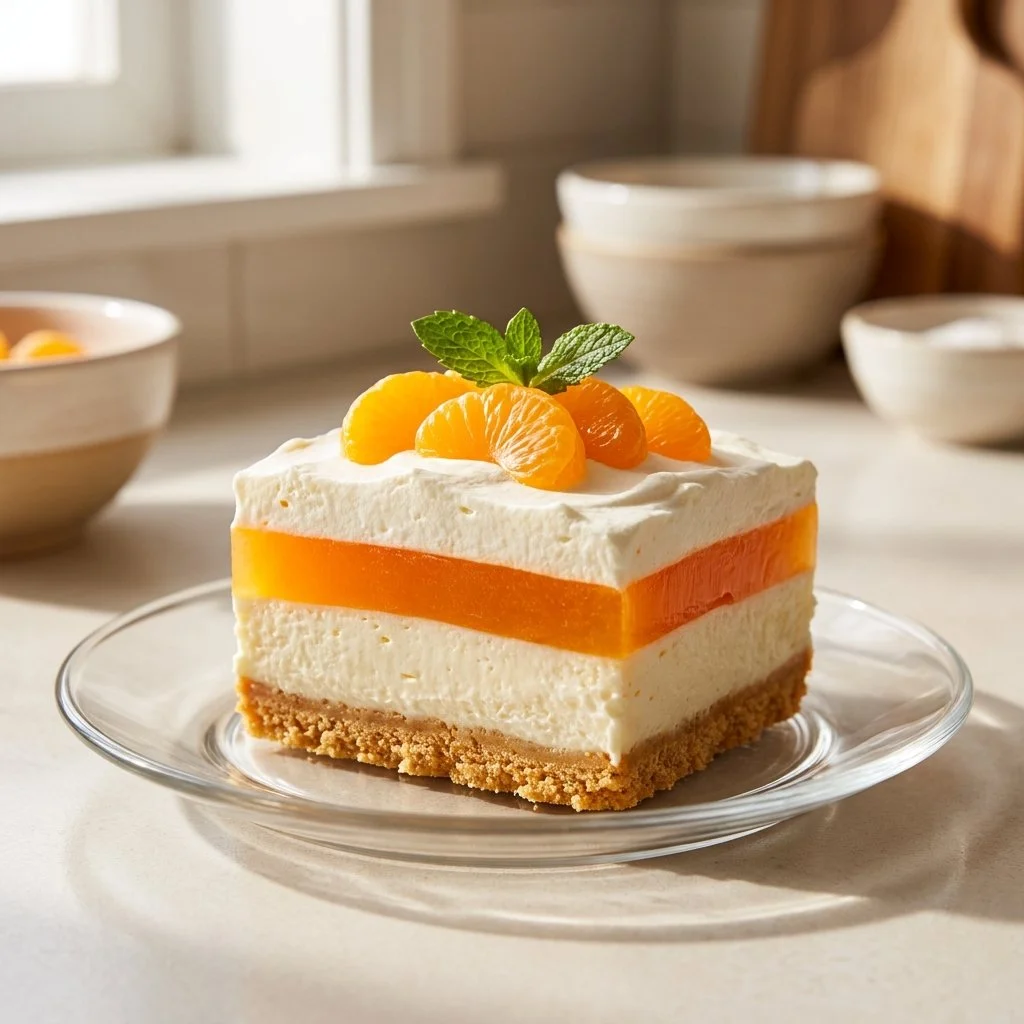
Serving Quick No Bake Creamsicle Lush for Refreshing Party Treats at the Table
Once your Quick No Bake Creamsicle Lush is ready, it’s time to serve it up! This dessert is great for family-style serving right from the dish, which is perfect for casual gatherings. Grab a large spoon and let everyone dig in.
You can pair it up with some fresh fruit like strawberries or blueberries for a pop of color and a bit of tartness. If you’re feeling fancy, a drizzle of chocolate sauce can balance the orange flavors beautifully.
Another fun approach is to prep this in individual cups or jars for a more upscale presentation at a dinner party. It not only looks great but makes serving (and cleanup) super easy.
Storage & Reheat (No Soggy Leftovers)
Now, if you find yourself with leftovers—highly unlikely but hey, it happens—let’s talk storage. To keep that creamy layer from becoming soggy, cover the dish tightly with plastic wrap or transfer slices to an airtight container. This dessert will last in the fridge for about 3–5 days.
You definitely will want to avoid reheating this dish. It’s best enjoyed chilled straight from the fridge. If you ever feel like you need some warmth or added flavor, a little zest of orange on top can refresh it nicely.
Quick Tips & Shortcuts
To help you navigate this recipe like a pro, here are a few quick tips:
- Substitutions: If you want to make it lighter, use reduced-fat cream cheese and light whipped topping. You won’t lose the flavor.
- Make Ahead: Feel free to prepare this the night before. The flavors meld beautifully, and it’s ready to go when you need it.
- Clean Up: To save on dishes, mix the pudding directly in the bowl you plan to serve it in, if it’s wide enough.
- Timing Tricks: If you’re in a rush, you can speed up chilling by placing the dish in the freezer for the first hour, then move it to the fridge to finish.
Variations That Work
If you want to change things up a bit, there are plenty of ways to tweak this dessert. Here are some fun variations:
- Add Fruits: Toss in some diced peaches or a layer of fresh berries for a fruity twist.
- Different Flavors: Instead of orange gelatin and pudding, experiment with lemon or cherry for a different taste adventure.
- Nut Crust: Try a base made from crushed nuts mixed with some dates for a gluten-free option.
It’s amazing how just switching a few ingredients can refresh a classic recipe like this.
FAQs About Quick No Bake Creamsicle Lush for Refreshing Party Treats
Here are some common questions I get about this recipe:
Can I make this ahead?
Absolutely! It actually tastes even better the next day when the flavors settle.
How do I store leftovers?
Keep it tightly covered in the fridge for up to 5 days. Just be sure it’s sealed to avoid sogginess.
Can I use fresh orange juice instead of gelatin?
While you can try using fresh juice, gelatin gives a unique texture that fresh juice won’t replicate. It may also affect the firmness.
What if I don’t have whipped topping?
Feel free to use homemade whipped cream; just make sure it’s stable enough to hold up in the layers.
Conclusion
The Quick No Bake Creamsicle Lush is one of those recipes that can easily become a family favorite. It’s simple, delicious, and perfect for any occasion. And the best part? It’s a no-fuss dessert that comes together quickly. You’ll be amazed at how much joy a little layer of orange and cream can bring. Next time you want to impress at a gathering or simply enjoy a refreshing treat on a warm day, reach for this recipe. For some more fantastic dessert ideas, be sure to check out best no-bake desserts for summer. If your family licks the pan clean, don’t say I didn’t warn you.

Quick No Bake Creamsicle Lush
Ingredients
Crust
- 1 package vanilla sandwich cookies, crushed Can substitute with other cookie types.
- 5 tbsp melted butter
Cream Cheese Layer
- 8 oz cream cheese, softened Use reduced-fat for a lighter version.
- 1/2 cup powdered sugar
- 8 oz whipped topping Can substitute with homemade whipped cream.
Orange Pudding Layer
- 1 box orange gelatin Other flavors like lemon or strawberry can be used.
- 1 cup boiling water
- 1 box instant vanilla pudding
- 2 cups cold milk
Instructions
Preparation
- Mix the crushed cookies with melted butter until well combined and press into a 9×13 dish. This will be your delicious crust.
- In a separate bowl, dissolve the orange gelatin in the boiling water and let it cool slightly.
- Beat the cream cheese and powdered sugar together until smooth.
- Fold in half of the whipped topping gently.
- Spread the cream cheese layer evenly over the cookie crust.
- Whisk the pudding with the cold milk in another bowl until it thickens.
- Stir the cooled orange gelatin into the pudding mixture until fully combined.
- Spread the pudding layer over the cream cheese.
- Top with the remaining whipped topping, spreading it out nicely.
- Chill in the refrigerator for at least 4 hours or overnight.