
When the house smells like melting chocolate and warm vanilla, the kids start appearing from every room. You know the kind of evening I mean. One pan in the oven, a quick cleanup, and the whole family crowds the counter to pick off warm Mini Egg Cookies Recipe bits before they even reach the cooling rack. That moment right there is why I make these cookies on busy nights. If you want a simple sweet that feels like a treat and does not eat your whole evening, this is it. Also, if you are fond of old school Christmas cookies, try these Anginetti Italian Christmas cookies when you want a break from chocolate.
Why You’ll Love This Mini Egg Cookies Recipe

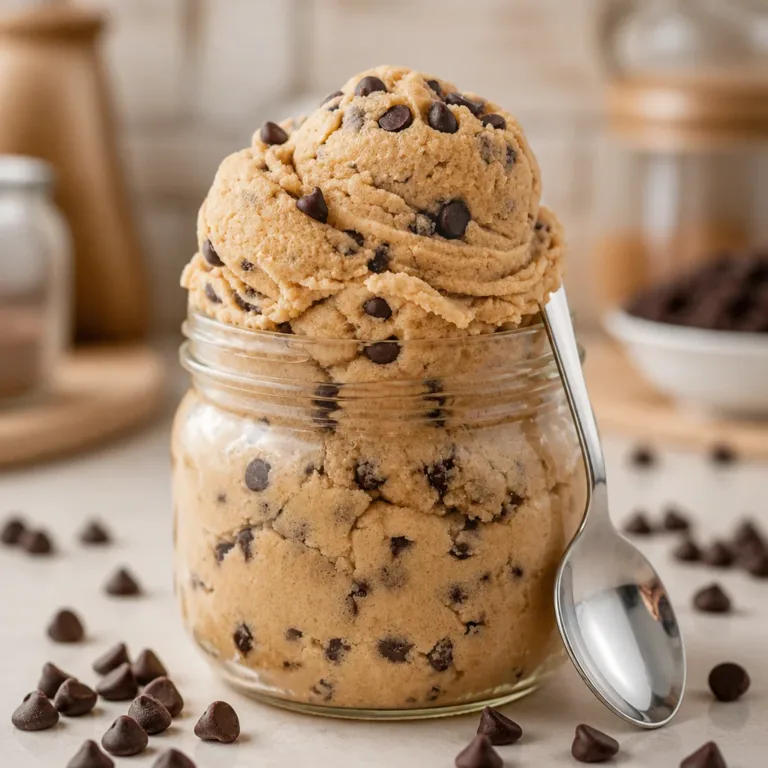
These cookies are a family magnet. They mix the comfort of a chewy chocolate cookie with the bright snap and color of Mini Eggs. You get pockets of melted dark chocolate and crunchy candy shell bits in every bite. Make them on a school night or for a weekend bake that you share.
They matter because they save time. The dough uses regular pantry basics and one bowl for most of the work. You can chill ahead. You can freeze dough balls for later. That makes weeknight baking possible even when the evening is short.
They are flexible. Want a more grown up bite? Use a higher percentage dark chocolate. Want to make kids scream with delight? Keep the full Mini Egg count. Either way, they come out tasting like something you would buy at a bakery, minus the price and the trip.
They also help with the clean up. Minimal bowls, a spatula, and one tray. You get the result you want without spending an hour at the sink. Trust me, that matters. It keeps baking fun instead of feeling like a second job.
How to Make Mini Egg Cookies Recipe the Easy Way
“If it smells this good halfway through, you know dinner’s gonna be great.”
Start with the basics and keep moving. You cream the butter and sugars, add eggs and vanilla, fold in dry ingredients and the good stuff, chill, then bake. The goal is a soft, slightly gooey center and golden edges. When the cookies smell of toasted sugar and chocolate and the edges color up, they are close.
Look for these cues. The dough should be soft and slightly tacky before chilling. After chilling, the balls should hold shape. In the oven, the cookies will spread and puff a bit. The centers will look slightly underdone when you pull them out. That is the sweet spot for a chewy middle.
Meanwhile, plan for the finishing touch. Adding the remaining Mini Egg pieces a few minutes before the end makes the cookies look irresistible. It also keeps the bright candy shells from fully melting into the cookie, which keeps texture and color.
Ingredients You’ll Need
- 230 g unsalted butter (room temperature)
- 100 g granulated sugar
- 165 g light brown sugar (firmly packed)
- 2 large eggs (room temperature)
- 2 tsp vanilla extract
- 300 g plain flour (all-purpose)
- 1 teaspoon baking soda
- 1 tsp fine salt
- 400 g Cadbury’s Mini Eggs (2/3 finely chopped, 1/3 coarsely chopped)
- 100 g dark chocolate 75% (coarsely chopped)
Small notes while you grab ingredients: use room temperature eggs for even mixing. If your butter is cold, pop it on a warm plate for a few minutes instead of nuking it. The Mini Eggs do best if you chop them in two sizes as directed so you get both melt and snap. No fancy tools needed here. If you like a creamier cookie, try a softer dark chocolate or add a few more grams. And yes, you can substitute the dark chocolate for milk chocolate if your crew prefers sweeter cookies.
Step-by-Step Directions
- In the bowl of an electric stand mixer fitted with a paddle attachment, cream the butter and both sugars on medium to high speed for 3-4 minutes until pale and the sugar has dissolved.
- Watch for the mixture to go light and fluffy.
- Pause and scrape the bowl if the mixer starts to run away.
- Scrape down the mixing bowl base and sides.
- Use a flexible spatula so nothing gets left behind.
- This keeps the dough even and prevents streaks.
- Add one egg and the vanilla extract, and beat on low speed until combined.
- Keep speed low to avoid splatter.
- Wait until the egg is fully mixed in before adding the next.
- Add the remaining egg and beat until mixed in.
- The dough will become smoother and shinier.
- If it looks curdled, it will be fine once the dry ingredients go in.
- Sift the flour and baking soda into the mixing bowl, then add the salt.
- Sifting avoids lumps and helps with even rising.
- Add salt last so it does not clump.
- Mix on low speed until just incorporated.
- Do not overmix here.
- Stop when you don’t see flour streaks.
- Add in 2/3 of the finely chopped Mini Eggs and the chopped dark chocolate.
- Fold these in gently so you keep chunks intact.
- Use a silicone spatula or low speed on the mixer.
- Use a robust spatula or wooden spoon to mix in the chocolate. Set aside the remaining third of chopped Mini Eggs.
- The dough should be studded with chocolate and candy pieces.
- Stop before all the candy melts into the dough.
- Using a cookie scoop or heaped tablespoon, scoop the dough into 2 cm balls.
- Keep the balls roughly the same size for even baking.
- Press the scoop on the counter to pack the dough if needed.
- Place the balls on a baking tray lined with parchment paper.
- Leave space between them so they can spread.
- Two inches is a good rule.
- Refrigerate the cookie dough for at least 1 hour, or freeze for 30 minutes.
- Chilling firms the dough and prevents over-spread.
- If you are in a rush, freezing works fine.
- Preheat the oven to 350°F and line a baking tray with parchment paper.
- Get the oven fully up to temp before baking.
- Rotate trays halfway through if using more than one.
- Remove the cookie balls from the fridge or freezer and place them on the trays, leaving 2 inches between each ball.
- Let very cold dough sit on the tray for a minute before baking.
- This prevents the dough from sticking to the paper.
- Bake for 12-15 minutes.
- Keep an eye at 12 minutes to judge doneness.
- Ovens vary, so use the edge color as a signal.
- At 9 minutes, remove the tray and divide the remaining Mini Egg pieces over the cookies.
- Sprinkle the candy on evenly.
- This keeps color and crunch on the top.
- Gently push the eggs into the cookies.
- Do not press too hard or you will flatten the cookies.
- Just enough to embed the candies.
- Return the tray to the oven for the remaining time.
- The last minutes are where the edges brown.
- That slight caramelization adds flavor.
- The cookies are done when they are starting to brown at the edges and are slightly set in the middle.
- Centers will still jiggle a bit.
- If you like them firmer, add another minute or two.
- For perfect round cookies, use a round cookie cutter or mug to shape them while still hot.
- Gently press in a circle without squashing.
- This step is optional but makes them pretty.
- Allow the cookies to cool on the tray for 10 minutes before transferring to a wire rack.
- Cooling on the tray sets the shape.
- Then move them so air can circulate all around.
Quick encouragement: you are making bakery-style cookies at home. Don’t overthink it. If a cookie looks a little different from the next, nobody will mind. The smell will do most of the work convincing people they are extraordinary.
Also, a little practical note: if you are short on time, make the dough at night and scoop balls before bed. Keep them refrigerated and bake the next afternoon. The flavor often improves after a night in the fridge.
Serving Mini Egg Cookies Recipe at the Table

Serve these warm for the biggest smiles. I like to plate them family-style on a big board and let everyone pick, pass, and chat while they nibble. For kids, add a simple glass of milk. For adults, a small espresso or a mug of tea pairs nicely with the dark chocolate.
If you are bringing these to a party, stack them in layers separated by parchment paper inside a Tin or a pretty box. They travel well. For a game night, arrange them on a platter with nuts and extra Mini Eggs around them so people can top their own.
For meal prep style, wrap two to three cookies in parchment and keep them in an airtight container in the fridge for a quick dessert that feels special. If you are packing them in lunchboxes, use a small container with a paper towel to prevent sliding.
Pairing ideas: serve with vanilla ice cream for an indulgent treat. Try a scoop on the side while cookies are still warm for a gooey contrast. Alternatively, drizzle a little extra melted dark chocolate over cooled cookies for show.
Storage & Reheat (No Soggy Leftovers)
Store cookies at room temperature in an airtight container for up to 4 days.
- Put a slice of bread in the container to help maintain softness.
- Replace the bread if it goes stale.
For longer storage, freeze the baked cookies in a single layer on a sheet, then transfer to a freezer bag.
- They keep well for up to 3 months.
- Thaw at room temperature or heat gently in the oven.
Reheat tips to avoid soggy cookies:
- Oven: Preheat to 300°F and warm cookies for 5 to 7 minutes. This refreshes the edges and revives texture.
- Toaster oven works great for single portions.
- Microwave: Use in 10 second bursts. This is fast but softens the shell and can make the candy sweat. Only use microwave for instant warm bites.
If you freeze unbaked dough balls, bake them straight from frozen with an extra 1 to 2 minutes of oven time.
- No need to thaw.
- This is a great weeknight shortcut.
If you find the candy shells have dulled after storage, press a few fresh Mini Eggs on top before serving. It takes seconds and makes a nice presentation.
Quick Tips & Shortcuts
- Make it ahead: Scoop dough into balls and freeze on a tray. Pop them in a bag and bake from frozen for fresh cookies in under 20 minutes.
- Swap the chocolate: Use milk chocolate for sweeter cookies or a 50/50 marble bar for a softer bite.
- Clean as you go: Use parchment paper on your counter to catch chocolate bits and candy dust. Toss and the surface is clean.
- Use a cookie scoop: It gives even cookies and speeds up shaping.
- Timing trick: If you want chewier cookies, take them out a minute earlier. If you like crisp edges, bake them a minute or two longer.
Also, a small kitchen secret: chilling the dough is not just about shape. It helps the flour hydrate and lets the flavors settle. Cookies made from chilled dough often taste more developed.
I often think of shortcuts from other weeknight dishes. If you like quick dinner sides, this same approach of planning ahead and using a short chill or rest works wonders. For example, prepping components for an egg fried rice dish has the same rhythm as prepping cookie dough: get everything ready, then finish quickly when you need it. If you ever want timing tips, I found the egg fried rice timing tip useful for fast family dinners.
Variations That Work
- Nutty addition: Fold in 70 g chopped toasted pecans or walnuts. Toast nuts for 5 minutes in a dry pan for more flavor.
- Salted top: Right out of the oven, sprinkle a pinch of flaky salt on each cookie. It balances sweetness and lifts flavors.
- Oat twist: Replace 50 g of flour with rolled oats for a chewier texture.
- Double chocolate: Replace half the flour with unsweetened cocoa powder for a deeper chocolate cookie that still has Mini Eggs for color.
- Lighter version: Reduce sugar by 20 g and use 60% dark chocolate instead of 75% for a milder bite.
- Festive option: Stir in orange zest for a citrus hint that pairs well with chocolate and candy shells.
- Allergy swap: Use dairy-free butter and dairy-free dark chocolate for a vegan-ish version. Eggs are more difficult to swap without changing texture, but a flax egg will work in a pinch.
If you want inspiration for other cookie riffs, try a pumpkin and chocolate combo. My take on that idea gives a different texture but the same family-friendly success that this Mini Egg Cookies Recipe offers. See my take on pumpkin chocolate chip cookies for ideas on how spices can change a cookie mood: pumpkin chocolate chip cookies.
Ethan’s Notes From the Kitchen
I have baked a lot of cookies in a small, noisy kitchen with two small helpers. Here are the small notes that make a big difference.
- Don’t rush the creaming. You want the butter and sugar to lighten because that traps air for a better rise.
- Chill without overthinking. One hour is the minimum. Overnight is fine and often better.
- The candy shells will lose color if fully melted. That is okay for flavor but not for looks. That is why we reserve some to press on at the end.
- If your batter seems too soft after chilling, add a tablespoon or two of flour to firm it up.
- Baking times in the recipe account for a standard household oven. If your oven runs hot, check at 10 minutes. If it runs cool, add a minute or two.
I also like to make a double batch and freeze half the dough. On a school morning when homework and dinner are both demanding, popping a few frozen balls in the oven gives you straight-from-the-oven cookies in 20 minutes. You will be surprised how many high fives that gets.
If you are curious about small-batch tricks or how to adapt frozen dough for other cookies, I often look at smaller dessert recipes to borrow ideas. This apple crisp mini cheesecake idea gives a good sense of how small portions can pack a lot of flavor without a lot of work: apple crisp mini cheesecakes.
FAQs About Mini Egg Cookies Recipe
Can I make this ahead?
Yep. It actually tastes even better the next day when the flavors settle. Scoop and chill or freeze the dough and bake when ready.
Will the Mini Eggs melt completely?
Some will. That gives a delicious swirled look inside. For color and crunch, sprinkle the reserved pieces on top at 9 minutes so they stay visible and keep some texture.
Can I use other candies?
Yes. M&Ms work fine. White chocolate chips will give a softer, richer melt. Avoid candies that have centers that may explode when baked.
How do I get chewy centers?
Pull the cookies when the edges are set and the center still looks slightly soft. Cooling on the tray allows the center to finish without overbaking.
What if my cookies spread too much?
Chill the dough longer, reduce butter by 10 g, or add one extra tablespoon of flour. Also make sure your baking tray is not warm when you place the dough on it.
Troubleshooting Guide
If cookies are flat and greasy:
- Your butter was likely too soft or warm. Chill the dough.
- You may have over-creamed the butter and sugar, which can cause too much air and then collapse. Mix until combined.
If cookies are dry and crumbly:
- You overbaked them. Take them out at the earlier time next batch.
- Check that you measured flour correctly. Spoon flour into a cup and level it rather than scooping.
If the Mini Eggs all melt into one color:
- Add the reserved pieces on top later to preserve color.
- Use coarser chopping so shells take longer to melt.
Scaling and Feeding a Crowd
Want to scale this recipe? Double everything and work in batches. Scoop dough onto multiple trays and freeze extra balls on a sheet. For a crowd of 30, a double batch usually gives about 40 regular cookies, depending on your scoop size.
If you have helpers, assign one person to chop Mini Eggs and another to measure dry ingredients. This divides work and keeps the dough moving forward. Kids enjoy rolling dough balls and pressing the final Mini Eggs on top.
When baking large quantities, rotate trays in the oven and let the oven recover to temperature between batches. This helps keep even bake times.
A Final Bite
If your family licks the pan clean, don’t say I didn’t warn you.
These Mini Egg Cookies Recipe bites are made for lives that are busy, full, and loud. They hold up to quick prep, a messy kitchen, and hungry kids. They also reward patience: the longer the dough rests, the better it tastes. So scoop the dough, take a breath, and know you can make something delicious without spending all evening in the kitchen.
If you want to compare versions, see Weekend Craft’s Cadbury Mini Egg Cookies for another approach to the candy studded cookie. Or for a different take that leans New York style, check out What Jessica Baked Next’s Mini Egg NYC Cookies.

Mini Egg Cookies
Ingredients
Cookie Base
- 230 g unsalted butter, room temperature Use room temperature for even mixing.
- 100 g granulated sugar
- 165 g light brown sugar, firmly packed
- 2 large eggs, room temperature Room temperature eggs help with even mixing.
- 2 tsp vanilla extract
- 300 g plain flour (all-purpose) Sift to avoid lumps.
- 1 tsp baking soda Sifted in for even rising.
- 1 tsp fine salt Add last to prevent clumping.
Mix-ins
- 400 g Cadbury’s Mini Eggs (2/3 finely chopped, 1/3 coarsely chopped) Chop in two sizes for texture.
- 100 g dark chocolate (75%, coarsely chopped) Can substitute with milk chocolate for sweeter cookies.
Instructions
Preparation
- In the bowl of a stand mixer fitted with a paddle attachment, cream the butter and both sugars on medium to high speed for 3-4 minutes until pale and the sugar has dissolved.
- Scrape down the mixing bowl base and sides and add one egg along with the vanilla extract, then beat on low speed until combined.
- Add the remaining egg and beat until fully mixed in, then sift in the flour and baking soda followed by the salt.
- Mix on low speed until just incorporated, avoiding overmixing.
- Fold in 2/3 of the finely chopped Mini Eggs and the chopped dark chocolate gently.
Chilling
- Using a cookie scoop or heaped tablespoon, scoop the dough into 2 cm balls and place them on a baking tray lined with parchment paper, leaving space between each.
- Refrigerate the cookie dough for at least 1 hour, or freeze for 30 minutes.
Baking
- Preheat the oven to 350°F (175°C) and line a baking tray with parchment paper.
- Remove the cookie balls from the fridge or freezer and place them on the trays, ensuring they are spaced.
- Bake for 12-15 minutes, checking at 12 minutes to judge doneness.
- At 9 minutes into baking, evenly sprinkle the remaining Mini Egg pieces over the cookies and gently push them into the dough.
- Return the tray to the oven for the remaining baking time.
- Once done, cookies should be starting to brown at the edges while still slightly jiggly in the center. Let them cool on the tray for 10 minutes before transferring to a wire rack.