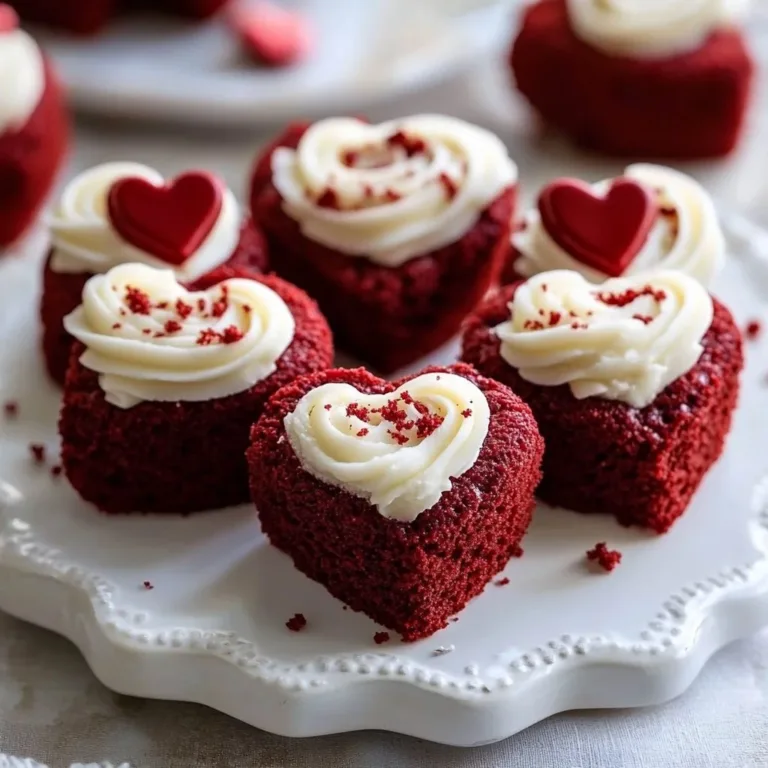
The warm scent of butter, vanilla, and a hint of cocoa rises as a tray of tiny heart-shaped cakes comes out of the oven, their edges just turning golden and the centers soft to the touch. I love to pull these Heart-Shaped Red Velvet Mini Cakes close, breathe in that melt-in-your-mouth aroma, and imagine them shared over coffee with a friend. If you like the idea of small cakes that feel special every day, you might also enjoy a soft and familiar take on red velvet in this soft and moist red velvet cupcakes recipe I often turn to when I want quick comfort.
The Sweet Story Behind Heart-Shaped Red Velvet Mini Cakes

There is something quietly romantic about making tiny cakes shaped like hearts. They are the kind of small luxury you can reach for when you want to say “I care” without much fuss. I remember baking these for a quiet birthday a few years ago, watching someone light a single candle and smile as the red crumbs fell onto the plate like confetti.
These mini cakes are soft and slightly tangy from buttermilk, with a gentle cocoa note and a velvet crumb that feels almost buttery-soft on the tongue. They are the kind of dessert that works for a big celebration, a simple coffee chat, or a low-key night in. The heart shape makes them feel celebratory even when the baking is not complicated.
What makes these especially rewarding is how little effort lends such a polished result. The red coloring brings warmth to the plate, the cream cheese frosting adds a glossy, smooth finish, and the small size means each person gets their own neat, melt-in-your-mouth moment. The memory of that first bite tender crumb, tangy cream cheese, and a touch of cocoa keeps me coming back.
Bringing Heart-Shaped Red Velvet Mini Cakes Together
“When the kitchen smells like vanilla and butter, you know something special’s baking.”
Before you mix your first bowl, take a moment to set out your pans and ingredients. Look for visual cues as you work: flour that is airy and sifted, batter that is glossy and falls slowly from the spoon, and a top that develops a thin, slightly firm skin in the oven. When these small signals line up, the cakes will have the best texture.
The baking process is straightforward. You will whisk wet ingredients until they are smooth and glossy, sift dry ones to keep the crumb light, and fold gently so the cakes stay tender. Expect a sweet, toasted aroma as the edges brown and a faint cocoa scent underneath. These signs show that the tiny cakes are baking evenly and will pull out of the pan with clean edges.
Ingredients You’ll Need
2 cups all-purpose flour
1 ½ cups granulated sugar
1 cup vegetable oil
1 cup buttermilk, room temperature
2 large eggs, room temperature
2 tablespoons cocoa powder
1 teaspoon baking soda
1 teaspoon vanilla extract
1 teaspoon white vinegar
1 teaspoon salt
Red food coloring (about 1 ounce)
8 ounces cream cheese, softened
1 cup powdered sugar
½ teaspoon vanilla extract (for frosting)
For a richer flavor, use real butter if you can. It makes every bite worth it and gives the crumb a rounder, more buttery note. If you do choose butter, swap half of the oil for melted, cooled butter and expect a slightly firmer crumb and deeper flavor.
If you like to keep things organized, measure the dry ingredients into one bowl and the wet into another. This little step helps you combine everything smoothly and reduces the risk of overmixing, which keeps the cakes tender.
Step-by-Step Directions
- Preheat oven to 350°F (175°C).
Set an oven rack in the center position so heat circulates evenly. Allow the oven to reach temperature before you put the cakes in. - Grease heart-shaped mini cake pans well.
Use a thin coat of butter or nonstick spray and press a small circle of parchment into each well if you have it. This helps release the tiny hearts cleanly. - Sift flour, cocoa powder, baking soda, and salt together.
Sifting removes lumps and gives a lighter crumb. Stir the mixture once more so everything is evenly distributed. - Whisk buttermilk, oil, eggs, vanilla, vinegar, and red food coloring.
Whisk until the mixture looks glossy and homogeneous. You should see a smooth, slightly thick batter ready to meet the dry ingredients. - Gently mix wet ingredients into dry until just combined.
Fold with a spatula in two or three turns until no streaks of flour remain. Stop as soon as it comes together to keep the cakes tender and buttery-soft. - Divide batter evenly into pans, filling about 2/3 full.
Use a small scoop or spoon so each heart rises evenly. The batter should sit slightly domed but not mounded. - Bake 18–20 minutes until a toothpick comes out clean.
Watch the golden edges and the center that springs back when touched lightly. Small pans bake quickly; start checking at 16 minutes. - Cool cakes in pans 10 minutes, then transfer to a rack.
Once they feel firm at the edges, run a thin knife around each heart and turn the pan to release. Cooling in the pan first prevents them from breaking. - Beat cream cheese, powdered sugar, and vanilla until smooth.
Start with room-temperature cream cheese for a glossy, lump-free frosting. Beat until the mixture is silky and can be spread without tearing the cake. - Frost cooled cakes using a spatula or piping bag.
Spread a thin layer for a delicate finish, or pipe rosettes for a pretty, bakery-style look. Chill briefly if you want a firmer frosting for stacking.
Each step moves you closer to that gentle, melt-in-your-mouth texture. If the batter looks too thick, a tablespoon of extra buttermilk will loosen it just a little without changing the flavor. If it seems thin, give it a gentle fold and another minute at a slightly lower oven temperature if your pans are shallow.
Serving Heart-Shaped Red Velvet Mini Cakes With Love

There are many small ways to make serving feel thoughtful. Place each mini cake on a tiny dessert plate and dust the top with a light sift of powdered sugar for a soft, snowy look. A single fresh raspberry or a few pomegranate seeds on top contrast beautifully with the red crumb and the glossy cream cheese.
These cakes pair wonderfully with coffee, a milky latte, or an herbal tea. For a cool contrast on warm evenings, serve a mini cake beside a scoop of vanilla ice cream that melts into the crumb. For a breakfast treat, try a slice with a cup of strong, dark coffee so the sugar and cocoa play against the bitter notes.
If you want to set a small spread, arrange a few cakes on a wooden board with fresh berries and a small jar of extra frosting for guests to add as they like. That little gesture turns a simple treat into a shared moment and makes the cakes feel special without fuss.
I often bring a small tray when I visit someone and let them pick their favorite topping. For more ideas on small, shareable desserts, try these lovely apple crisp mini cheesecakes which follow the same idea of tiny, indulgent portions.
Keeping Heart-Shaped Red Velvet Mini Cakes Fresh
Store unfrosted mini cakes, wrapped in plastic, at room temperature for one day. After that, place them in an airtight container in the fridge to keep the crumb moist and the flavor bright. The cream cheese frosting needs refrigeration to stay safe and smooth.
To freeze, put the cooled, unfrosted cakes on a tray and freeze until firm, about an hour. Then wrap each in plastic and store in a freezer bag. They will keep for up to two months. When you are ready to serve, thaw in the fridge overnight and frost just before serving for the freshest texture.
If you have already frosted the cakes, chill them uncovered for 15 minutes to set the frosting, then cover gently with plastic wrap and refrigerate. For the best melt-in-your-mouth feel, take refrigerated cakes out 20–30 minutes before serving so the frosting softens and the crumb returns to a pleasant temperature.
When reheating a single cake, a 10-second burst in the microwave can help the frosting soften; be careful not to overdo it. For larger batches, let them come to room temperature on a rack for an hour to restore the tender crumb.
Susan’s Baking Notes
- Use room-temperature eggs and buttermilk. Cold ingredients slow the batter from coming together and can make a dense crumb.
- If you prefer a deeper red, add food coloring a little at a time until you reach the shade you love. A touch more coloring will not affect the bake time.
- For an extra-silky frosting, sift the powdered sugar before you add it. This keeps the frosting glossy and avoids any grainy texture.
- Steam cleanup tip: soak any pans or utensils that touched cream cheese in warm, soapy water right away. The residue comes off more easily that way.
- If you like to vary shapes, you can use the same batter for small rounds or a sheet pan for bite-sized bars.
For another small cake idea that feels cozy and seasonal, I will often turn to the texture of a fruit-topped treat like this apple crisp mini cheesecakes, which bring a crisp topping to a soft base much like the velvet crumb here.
Flavor Twists & Variations
Consider subtle changes to keep these mini cakes interesting.
- Chocolate lover’s note: Add a tablespoon more cocoa for a deeper chocolate note that pairs well with dark coffee.
- Citrus lift: Add a teaspoon of orange zest to the batter for a bright, fresh note. The citrus plays nicely with cream cheese.
- Berry top: Fold tiny chopped strawberries into the frosting or spoon a berry compote over the top for a juicy contrast.
- Spiced version: Add 1/2 teaspoon cinnamon and a pinch of nutmeg for warmth that makes these perfect for a chilly afternoon.
- Mini layer cakes: Split each heart and spread a thin layer of frosting between the halves for a petite double-decker treat.
Small changes like these make every batch feel new while keeping the simple heart-shaped charm that makes them so delightful.
How to Store and Enjoy Later
If you plan to make these ahead, bake the cakes one or two days in advance. Store them unfrosted at room temperature for the first day, then refrigerate. Frost on the day you serve for the freshest taste and texture.
To freeze with frosting, place the frosted cakes on a tray and freeze until the frosting is firm. Wrap individually in plastic and store in a freezer bag. Thaw in the fridge overnight and bring to room temperature before serving to let the frosting soften.
If you choose to ship these for a gift, pack them with a layer of parchment between stacked cakes and include a small ice pack if you expect long transit. Use a sturdy box and cushion well so the heart shapes arrive intact and presentable.
A small note on texture: refrigeration firms the frosting but can dry the crumb slightly. Take cakes from the fridge 20–30 minutes before serving so the crumb relaxes and the frosting becomes glossy again. This step restores the melt-in-your-mouth feeling I love.
FAQs About Heart-Shaped Red Velvet Mini Cakes
Can I make this ahead?
Yes. Most desserts taste even better when flavors have time to meld. Bake the cakes a day ahead, store unfrosted if possible, and frost just before serving. If already frosted, refrigerate and bring to room temperature before serving for the best texture.
Can I substitute regular milk for buttermilk?
You can make a quick buttermilk by adding 1 tablespoon of white vinegar to a cup of milk and letting it sit for five minutes. That tang helps the baking soda react and gives the crumb its signature tenderness.
How do I avoid overmixing?
Mix until the flour disappears and the batter looks smooth. A few small streaks are fine; over-stirring develops gluten and leads to a denser cake. Fold gently and stop when combined.
What if my cakes sink in the middle?
This can happen if the oven temperature is too low or if the pans were opened too early. Make sure your oven is at the right temperature and resist opening the door during the first 12 minutes. Also, check your baking soda is fresh.
Can I make a dairy-free version?
Yes. Use a non-dairy cream cheese for the frosting and a plant-based milk mixed with a little vinegar as the buttermilk substitute. The texture will be slightly different but still delicious.
A Final Sweet Note
I hope this Heart-Shaped Red Velvet Mini Cakes recipe brings your kitchen the same buttery joy it brings mine. Little cakes have a way of turning an ordinary afternoon into a small celebration, whether you share them with a friend over coffee or keep one for a quiet, indulgent moment alone.
Baking is about warmth and care. These mini hearts are easy enough for a weekday treat and pretty enough for celebrating birthdays, quiet anniversaries, or simple hospitality. Take your time, savor each step, and let the aroma fill your kitchen.
Conclusion
If you would like a different take on very small red velvet cakes, this Super-Moist Mini Red Velvet Cakes – Amycakes Bakes article has lovely photos and tips that echo the same cozy charm. For a classic, larger heart-shaped approach, see this inspiring guide to a larger version at Heart-Shaped Red Velvet Cake – A Classic Twist.

Heart-Shaped Red Velvet Mini Cakes
Ingredients
Dry Ingredients
- 2 cups all-purpose flour Sifted
- 2 tablespoons cocoa powder Unsweetened
- 1 teaspoon baking soda
- 1 teaspoon salt
Wet Ingredients
- 1 cup vegetable oil
- 1 cup buttermilk, room temperature
- 2 large eggs Room temperature
- 1 teaspoon vanilla extract
- 1 teaspoon white vinegar
- 1 ounce red food coloring Approximately
Frosting Ingredients
- 8 ounces cream cheese, softened Room temperature
- 1 cup powdered sugar
- ½ teaspoon vanilla extract For frosting
Instructions
Preparation
- Preheat oven to 350°F (175°C). Set an oven rack in the center position.
- Grease heart-shaped mini cake pans well. Use a thin coat of butter or nonstick spray, and press a small circle of parchment into each well if you have it.
- Sift flour, cocoa powder, baking soda, and salt together.
Mix Wet and Dry Ingredients
- Whisk buttermilk, oil, eggs, vanilla, vinegar, and red food coloring until glossy.
- Gently mix wet ingredients into dry until just combined.
Baking
- Divide batter evenly into pans, filling about 2/3 full.
- Bake for 18–20 minutes, checking with a toothpick before removing from the oven.
Cooling and Frosting
- Cool cakes in pans for 10 minutes, then transfer to a rack.
- Beat cream cheese, powdered sugar, and vanilla until smooth.
- Frost cooled cakes using a spatula or piping bag.