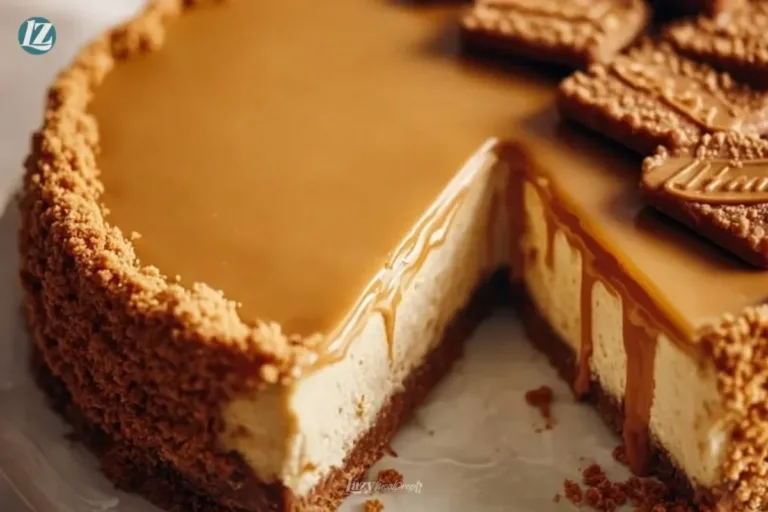
The warm scent of caramel and vanilla fills the kitchen as you stir a glossy ribbon of Biscoff spread into silky cream cheese. The crust is golden and buttery-soft, and every time I cut a slice it feels like a small celebration perfect for a quiet night in, a birthday with a few close friends, or a slow weekend coffee chat. I often think of a rainy afternoon when I first paired Biscoff crumbs with cream cheese and discovered how melt-in-your-mouth and comforting the result could be. For a no-bake version that is even more effortless, I sometimes peek at no-bake Biscoff ideas for inspiration.
Why You’ll Love This Biscoff Cheesecake
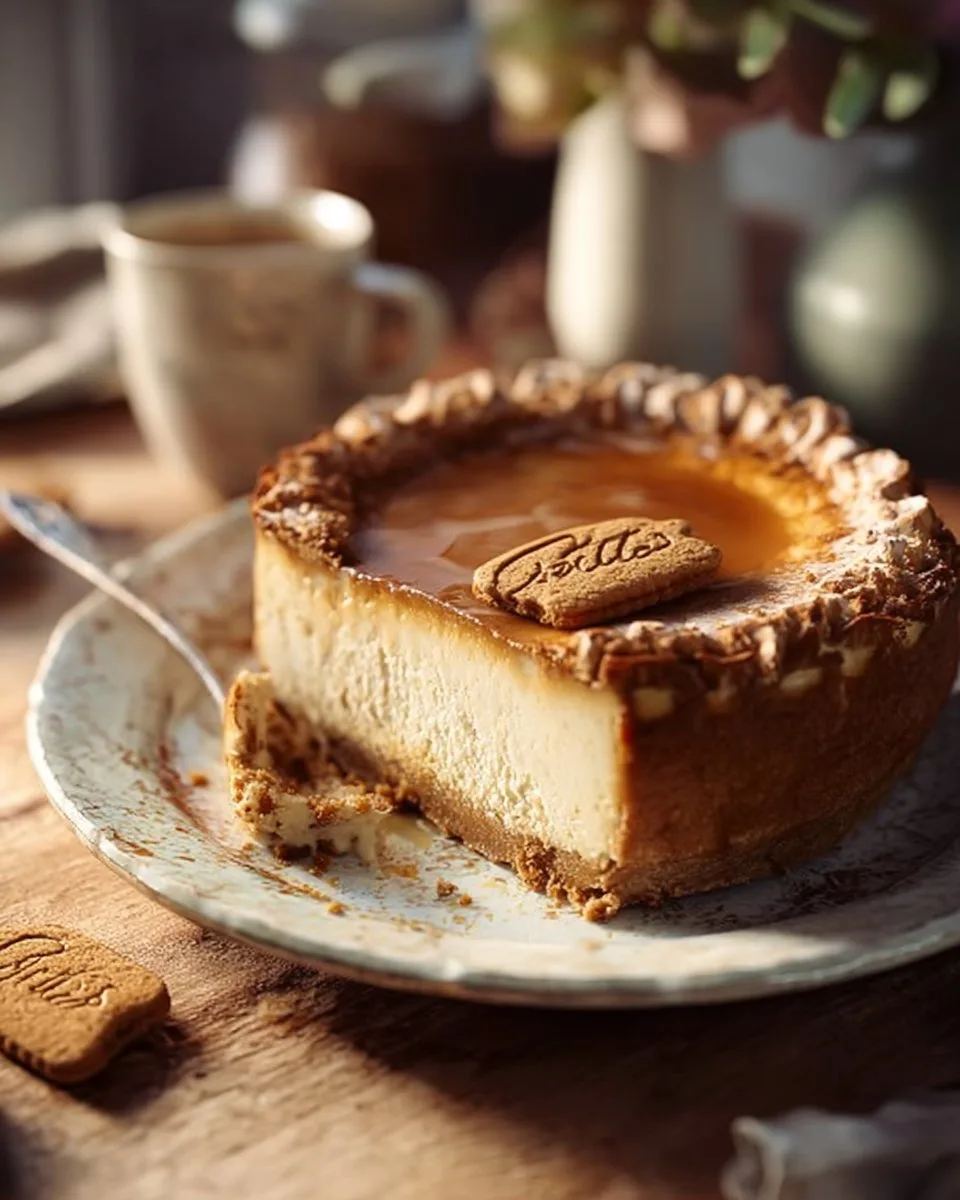
This Biscoff Cheesecake brings simple, cozy luxury to your table. The flavor is warm and spiced, with caramel notes that feel like a familiar hug. Texture matters here: a crisp, golden crust meets a rich, buttery-soft filling that melts on the tongue. I like to think of this dessert as the kind you slice for birthdays, slow Sunday coffee, or a small celebration when you want something that looks special yet feels effortless.
There is something about the cinnamon and caramel hints that wakes up memory. It reminds me of late afternoons with friends, warm mugs, and the way a good dessert turns ordinary time into a moment. The Biscoff spread and cookie crumble make each bite lightly spiced and deeply satisfying. If you love creamy cakes with a bit of crunch, this is a recipe that keeps people coming back.
The Baking Process Explained
“When the kitchen smells like vanilla and butter, you know something special’s baking.”
Before you start, picture the signs of success: a crust that holds together when you lift the pan, a filling that is glossy and just set at the center, and a topping that sits smooth and slightly glossy. You will see golden edges on the baked crust, and the aroma of baked butter and spice will tell you the cheesecake is nearly ready. This overview will guide you through each part: making the crust, beating a silky filling, and finishing with a glossy Biscoff swirl.
I will walk you through exact oven temperatures, chill times, and texture cues so you feel confident from the first stir to the final slice. For more playful variations that borrow a fall mood, you might enjoy seeing ideas like my caramel-apple approaches at caramel apple cheesecake bars.
Ingredients You’ll Need
350 g biscoff cookies (about 45 cookies)
150 g unsalted butter (melted)
920 g cream cheese (4 bricks, softened to room temperature)
150 g granulated sugar
150 g greek yogurt (room temperature)
1 tablespoon vanilla extract
1 teaspoon ground cinnamon
4 large eggs (room temperature)
150 g biscoff spread (warmed until runny)
biscoff cookies (as many as you’d like)
Use real butter if you can; it makes every bite worth it. Let the cream cheese sit at room temperature for an hour so it mixes smooth and lump-free. Warming the Biscoff spread just a bit makes it easier to swirl and keeps the topping glossy. If you prefer a tangier bite, try a little less sugar and a touch more greek yogurt, but for the classic melt-in-your-mouth texture this balance works beautifully.
Step-by-Step Directions
Crust
- Preheat the oven to 175°C (350°F). Line a 9-inch springform pan with parchment and lightly butter the sides.
- Place the 350 g biscoff cookies in a food processor and pulse to fine crumbs, or put them in a bag and crush with a rolling pin until sandy.
- Pour the crumbs into a bowl, stir in the melted 150 g unsalted butter until the mix looks like damp sand. Press evenly into the bottom and slightly up the sides of the pan.
- Bake for 10 minutes until the edges are fragrant and the top has golden edges. Let cool while you make the filling.
Cheesecake
- Reduce the oven to 160°C (325°F). In a large bowl, beat 920 g cream cheese until creamy and smooth, scraping the sides often.
- Add 150 g granulated sugar and beat until glossy and soft to the touch. Mix in 150 g greek yogurt, 1 tablespoon vanilla extract, and 1 teaspoon ground cinnamon until evenly blended.
- Add the eggs one at a time, beating only until each is incorporated. Avoid overmixing; stop when the batter is smooth and silk-like.
- Pour half the batter into the cooled crust. Warm 150 g biscoff spread until runny and drizzle two-thirds over the batter. Use a knife to swirl gently, creating glossy ribbons. Pour the remaining batter over the swirls and top with whatever biscoff spread remains, swirling lightly.
- Place the pan on a baking sheet and bake for 45 to 60 minutes. The center should wobble slightly like gelatine. This wobble tells you the cake is set but not overbaked.
- Turn off the oven and crack the door open. Let the cheesecake cool inside the oven for 1 hour. This slow cool prevents cracks and keeps the top smooth.
Toppings
- Once the cake is at room temperature, chill it in the fridge for at least 6 hours, preferably overnight. The flavors marry and the filling firms to the right texture.
- Just before serving, warm a little more biscoff spread and spoon a thin layer or drips over each slice. Add a whole biscoff cookie on top for a pretty finish and extra crunch.
- To get clean slices, dip a sharp knife in hot water and wipe it between cuts. Serve with a small scoop of vanilla ice cream or a dusting of cinnamon if you like.
Serving Biscoff Cheesecake With Love
When you are ready to present the cake, think small touches that feel thoughtful. Cut slices with a warm knife to keep edges neat, and place each slice on a plate that shows the contrast between the golden crust and the buttery-soft filling. I like to add one whole cookie on the side and a tiny drizzle of warmed Biscoff spread on the plate for a melt-in-your-mouth finish.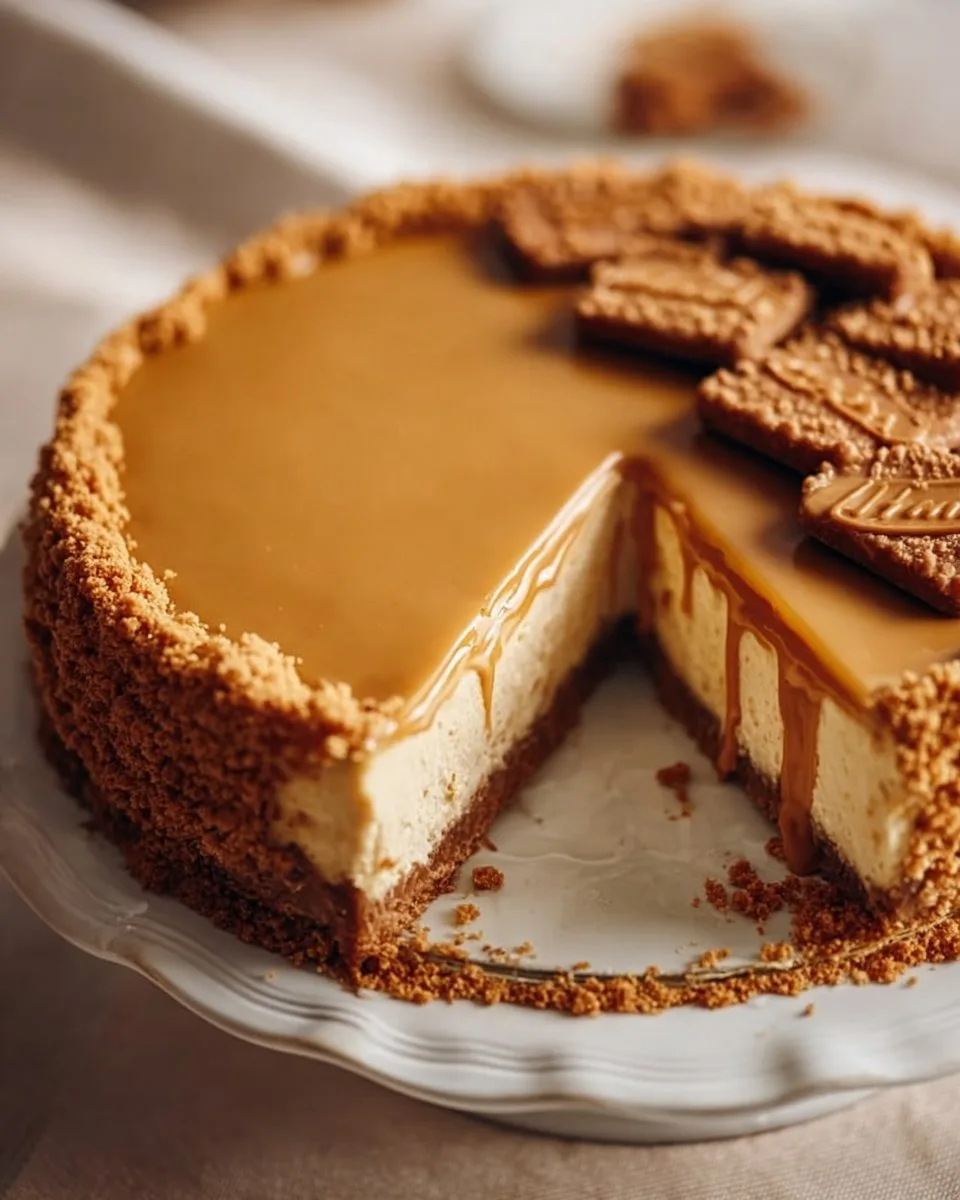
Pairing with coffee is classic pour a rich espresso or a milky latte and let the caramel notes sing. For a summer evening, serve slices with fresh berries or a spoonful of lightly whipped cream. In winter, a scoop of cinnamon ice cream alongside a warm wedge makes the moment feel cozy and a bit indulgent. These small touches turn right-now dessert into a memory for birthdays or a quiet night in.
Storage & Reheat Tips
To keep the cake at its best, cover it loosely with plastic wrap or place it in an airtight container and refrigerate. Properly stored, the cheesecake will stay rich and soft for up to 4 days.
If you want to freeze it, wrap the whole cake or individual slices tightly in plastic and then in foil. Freeze for up to 2 months. Thaw overnight in the fridge for best texture. Once thawed, resist the urge to refreeze.
To serve after chilling, take the cheesecake from the fridge about 20 minutes before cutting. This lets the filling lose a fraction of its chill and become more buttery-soft without getting soft enough to lose shape. If the Biscoff topping firms in the cold, warm a spoon and swirl it on again for a glossy finish.
Susan’s Baking Notes
- Texture matters: let cream cheese come to room temperature. Cold cream cheese leads to lumps and a heavy batter.
- Swirl gently: too much motion will deflate the batter. Use a gentle hand for glossy ribbons of Biscoff.
- Crack prevention: cool in the oven with the door open to ease the cheesecake through the temperature change. This step keeps the top smooth and pretty.
- Clean slices: dip your knife in hot water and wipe between each cut. It keeps edges clean and elegant.
- Cookie count: the recipe calls for about 45 cookies for the crust. Save a few extras for decoration and crunch on top.
Flavor Twists & Variations
If you want to nudge the flavor, start small. Add a teaspoon of orange zest to the filling for a bright note that plays well with the caramel spice.
Try a salted caramel drizzle for contrast; the salt cuts through richness and brings out the buttery notes. You can also stir 50 g of crushed pecans into the crust for a nutty crunch.
For a lighter touch, fold 100 g of whipped cream into the filling after it is mixed and then chill. It gives a slightly airier texture while keeping the Biscoff character. Or swap the greek yogurt for sour cream for a tangier bite.
If you prefer a no-bake choice on busy days, a chilled version pairs beautifully with fresh fruit and requires far less hands-on time. For more cheesecake varieties, look at this easy strawberry idea or a matcha approach to broaden your dessert offerings: strawberry cheesecake dump cake and matcha Basque cheesecake.
Biscoff Cheesecake
Ingredients
For the crust
- 350 g biscoff cookies (about 45 cookies)
- 150 g unsalted butter (melted) Use real butter for the best flavor.
For the filling
- 920 g cream cheese (4 bricks, softened to room temperature) Let it sit at room temperature for an hour.
- 150 g granulated sugar Adjust for a tangier bite.
- 150 g greek yogurt (room temperature) Can swap for sour cream for a tangy taste.
- 1 tablespoon vanilla extract
- 1 teaspoon ground cinnamon
- 4 large eggs (room temperature)
- 150 g biscoff spread (warmed until runny)
- biscoff cookies (for topping) As many as you’d like for garnish.
Instructions
Crust
- Preheat the oven to 175°C (350°F). Line a 9-inch springform pan with parchment and lightly butter the sides.
- Place the biscoff cookies in a food processor and pulse to fine crumbs, or crush them with a rolling pin until sandy.
- Pour the crumbs into a bowl, stir in the melted unsalted butter until it looks like damp sand. Press evenly into the bottom and slightly up the sides of the pan.
- Bake for 10 minutes until the edges are fragrant and the top is golden. Let cool while you make the filling.
Cheesecake
- Reduce the oven to 160°C (325°F). In a large bowl, beat the cream cheese until creamy and smooth, scraping the sides often.
- Add the granulated sugar and beat until glossy and soft to the touch. Mix in the greek yogurt, vanilla extract, and ground cinnamon until evenly blended.
- Add the eggs one at a time, beating only until each is incorporated. Avoid overmixing; stop when the batter is smooth and silk-like.
- Pour half the batter into the cooled crust. Warm the biscoff spread until runny and drizzle two-thirds over the batter. Swirl gently with a knife.
- Pour the remaining batter over the swirls and top with the remaining biscoff spread, swirling lightly.
- Place the pan on a baking sheet and bake for 45 to 60 minutes. The center should wobble slightly. Turn off the oven and crack the door open, letting the cheesecake cool inside for 1 hour.
Toppings
- Once the cake is at room temperature, chill it in the fridge for at least 6 hours, preferably overnight.
- Before serving, warm a bit more biscoff spread and drizzle it over each slice. Add a whole biscoff cookie on top for garnish.
- For clean slices, dip a sharp knife in hot water and wipe it between cuts.
Notes
Nutrition
FAQs About Biscoff Cheesecake
Can I make this ahead?
Yes. This cheesecake is even better when made ahead. Make it a day before your event so the flavors blend and the texture sets firm. Chill overnight for best results.
Will the filling crack as it cools?
If you follow the cool-in-oven step and don’t overbeat the batter, cracks are unlikely. Slow cooling and avoiding overmixing are your best defenses for a smooth, even top.
Can I use a different cookie for the crust?
Yes. You can swap Biscoff crumbs for graham crackers or digestive biscuits, but the caramel-spiced charm comes mainly from Biscoff. If you switch, consider adding a pinch of cinnamon to the crumbs.
How do I get the swirls to look neat?
Warm the Biscoff spread until runny, spoon it in small amounts over the batter, and swirl once or twice with a knife. Less is more. Too many swirls can deflate the batter and blur the glossy ribbons.
Is there a gluten-free option?
You can use gluten-free Biscoff-style cookies or gluten-free graham crackers for the crust. Check labels to make sure the spread and cookies are certified gluten-free.
A Final Sweet Note
I hope this Biscoff Cheesecake brings your kitchen the same buttery joy it brings mine. Baking it is a quiet act of care, and serving it invites a slow moment of pleasure. Whether you slice a piece for a friend, tuck it into a special celebration, or enjoy it with an afternoon coffee, let each bite be a small, everyday luxury. If you ever want a mini version or a crisp-topped twist, try baking smaller portions in tart pans or adding a thin caramel layer on top.
Conclusion
For another take with lovely photos and a slightly different twist, see Biscoff Cheesecake – Pies and Tacos.
If you want more family-friendly notes and serving ideas, this version at Biscoff Cheesecake is a great read.