The warm smell of butter and vanilla fills the kitchen while the oven hums softly, and on the counter a simple round cake waits to become a floppy-eared bunny. I love those small, quiet baking moments when the mixer turns powdered sugar into glossy frosting and the house feels like a hug. This Beginner Easter Bunny Cut Up Cake is the kind of dessert that turns ordinary afternoons into tiny celebrations, perfect for birthdays, coffee chats, or a slow, cozy night in. For a fun extra, try a nearby recipe for apple pie cupcakes and you will see how easy it is to keep a line of small luxuries on your table.
Why You’ll Love This Beginner Easter Bunny Cut Up Cake
There is something very tender about a cake that looks like a bunny and tastes like comfort. Beginner Easter Bunny Cut Up Cake brings together buttery-soft cake, melt-in-your-mouth frosting, and playful decorations. It is approachable for bakers who want a special-looking cake without complex shaping or fondant.
This cake feels nostalgic. It calls to mind kitchen tables dusted with flour, small hands helping to press stars of frosting into place, and the nervous pride of serving something homemade that looks delightful.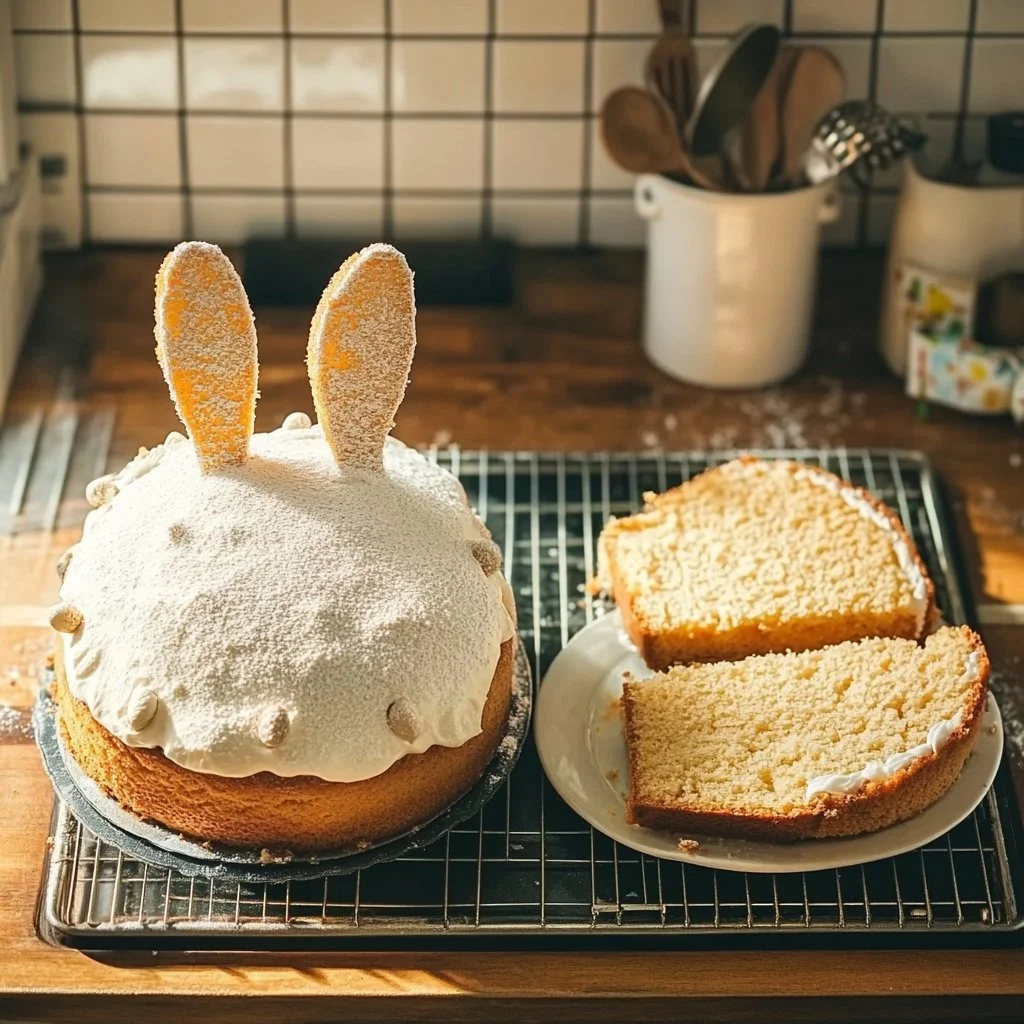
It is also practical. Using a standard cake mix keeps the base simple and reliably tender. The frosting is a smooth, pipeable buttercream that holds classic star shapes and gives glossy texture across the cake’s surface. The design is forgiving; small mistakes hide beneath a spray of sprinkles or a flourish of colored stars.
You can make it for a child’s birthday, an Easter brunch, or a quiet celebration when you want something pretty and easy. The cut-up method turns ordinary round cake rounds into ears, a face, and a bowtie with minimal fuss. The result looks like a bakery creation but comes straight from your own cozy kitchen. This is baking that feels like an act of care.
The Sweet Story Behind Beginner Easter Bunny Cut Up Cake
I remember the first time I tried a cut-up cake design. The idea of turning two golden rounds into a bunny seemed so clever and kind of magical. The first slice I served was met with delighted gasps. It became a ritual in my house to use this method for small celebrations.
Beginner Easter Bunny Cut Up Cake has become a favorite because it invites participation. Children can help pipe stars. Friends can choose the bowtie color. It is a cake that invites the table to linger and to talk. The textures tell the story: the gentle give of the cake, the buttery gloss of the frosting, and the tiny crisp of sprinkles under the fork.
This cake also teaches good kitchen habits. You will learn to judge doneness by golden edges and a toothpick that comes out clean. You will practice smoothing frosting so it spreads easily without tearing the cake crumb. And you will experience the small triumph of a decorated cake that looks special but was surprisingly simple to make.
How to Make Beginner Easter Bunny Cut Up Cake
“When the kitchen smells like vanilla and butter, you know something special’s baking.”
Start with a clear plan and gather your tools. You will bake two round cakes, cool them completely, then cut one to create ears and a bowtie. Frosting and piping give the bunny its face, ears, and bow. Expect the kitchen to fill with a warm, vanilla scent as the cake bakes and the frosting comes together glossy and smooth.
Watch for visual cues. The cakes are done when they have golden edges and a toothpick comes out clean. The frosting should be thick enough to hold star shapes but soft enough to spread a bit when smoothed. When you pipe stars, hold the bag at 90 degrees and release steady pressure for compact, buttery-soft peaks.
Below is the full ingredient list followed by the step-by-step method. Read through the steps once so you know how the pieces fit together before you begin. Happy baking.
Ingredients You’ll Need
- 1 standard cake mix, any flavor, prepared and cooled using the directions for 2 8″ round cakes.
- 2 sticks unsalted butter, room temperature.
- 3 cups powdered sugar.
- 1 tsp vanilla extract.
- 1 tsp almond extract.
- 1/4 tsp salt.
- 1-2 TBS milk or cream.
- Food coloring for frosting (pink, brown/black, green, purple, or whatever you like).
- Additional sprinkles or decorations as desired.
Use real butter if you can; it makes every bite worth it. If you prefer, swap the cake mix for a scratch white or yellow cake recipe. Keep the cake layers level by trimming domes with a serrated knife. For smoother piping, chill the frosting briefly if your kitchen is warm.
Equipment note: have on hand a stand or hand mixer, pastry bags, a small round writing tip (Tip #3), a star tip (#17), a cake board or baking sheet, and parchment or foil for assembly. A toothpick is handy for tracing shapes in the crumb before you pipe.
Step-by-Step Directions
- Bake two 8-inch round cakes according to the cake mix directions and let them cool completely on a wire rack. Cool until the cakes are just above room temperature and firm enough to trim cleanly.
- Use the photos in the blog post to cut one of the cake rounds into ears and a bowtie as shown. Arrange cake pieces on a cake board or baking sheet covered with aluminum foil or parchment.
- Crumb coat the whole cake lightly with a thin layer of frosting and chill for 15 minutes to set. This makes final decorating easier and keeps the stars tidy.
- Use a hand or stand mixer to blend together the butter, powdered sugar, vanilla extract, almond extract, and salt. Add the milk or cream a little at a time until frosting isn’t too thick and spreads easily.
- Measure out about 1/3 cup of the frosting into a small bowl and add drops of black or brown food coloring until desired color is reached.
- Use a pastry bag fitted with a small round writing tip – such as Tip #3 – and pipe facial features using the brown/black frosting.
- Use a toothpick to trace out the shape of the nose and what will be the interior (pink) part of the ears.
- Use a clean pastry bag fitted with star tip #17 and fill the bag with the white frosting. Hold the bag at 90 degrees from the cake and pipe close-fitting stars across the entire cake layer with the face, and also the outer parts of the ears, leaving the inner part you marked off bare.
- Measure out a small amount of remaining white frosting and color it pink. Use a clean piping bag fitted with the same #17 tip and pipe stars into the nose shape and into the center of the ears.
- Color remaining frosting as desired for the bowtie and pipe stars across the top and sides of the cake. You may choose to leave a circular section in the middle bare to spread with frosting and top with sprinkles.
- Finish by adding small details: little dots for whiskers, a tiny smile, and a dusting of sprinkles if you like. Chill the cake briefly to let stars set without losing shine.
- Slice and serve with soft, confident cuts so the bunny face stays intact. Offer spoons of vanilla ice cream or a sprig of mint beside each slice for contrast.
Timing tips: bake the cakes until the edges are golden and a toothpick comes out clean. Whisk the frosting until glossy and smooth, about 3 to 4 minutes on medium speed. Pipe stars steadily to avoid air gaps, and chill between the crumb coat and final decoration so the frosting holds its shape.
Texture tips: aim for a frosting that is stiff enough to hold stars but soft enough to smooth into small gaps. If your frosting is too soft, add a bit more powdered sugar. If too stiff, add milk a quarter teaspoon at a time. Room temperature butter gives the frosting a silky mouthfeel; cold butter will give lumps.
Bringing Beginner Easter Bunny Cut Up Cake Together
The fun part is watching the shape change from two rounds to a bunny. Once the cakes are baked and trimmed, you will see how an ear takes shape from a cake wedge and a bowtie becomes a happy accent built from a small round disc.
Arrange the cake pieces on a foil-covered board so you can move the whole thing gently if needed. Use a dab of frosting as glue between pieces. The crumb coat will hide crumbs and lock pieces together so your final frosting layer looks clean and polished.
When you pipe, keep the tip steady and work methodically. Start with the face features in the center, then fill in the larger field with stars. Finish with the colored accents. The result feels custom and charming but comes from a simple set of steps.
Serving Beginner Easter Bunny Cut Up Cake With Love
Serve slices of Beginner Easter Bunny Cut Up Cake with a small cup of coffee or a chilled scoop of ice cream. This cake pairs well with bright fruit, like fresh strawberries or a citrus salad, which cuts through the buttery sweetness.
For a festive table, set the cake on a pretty cake stand and surround it with small plates of cookies and a pitcher of tea. A simple garnish of edible flowers or pastel sprinkles makes each slice feel like an event.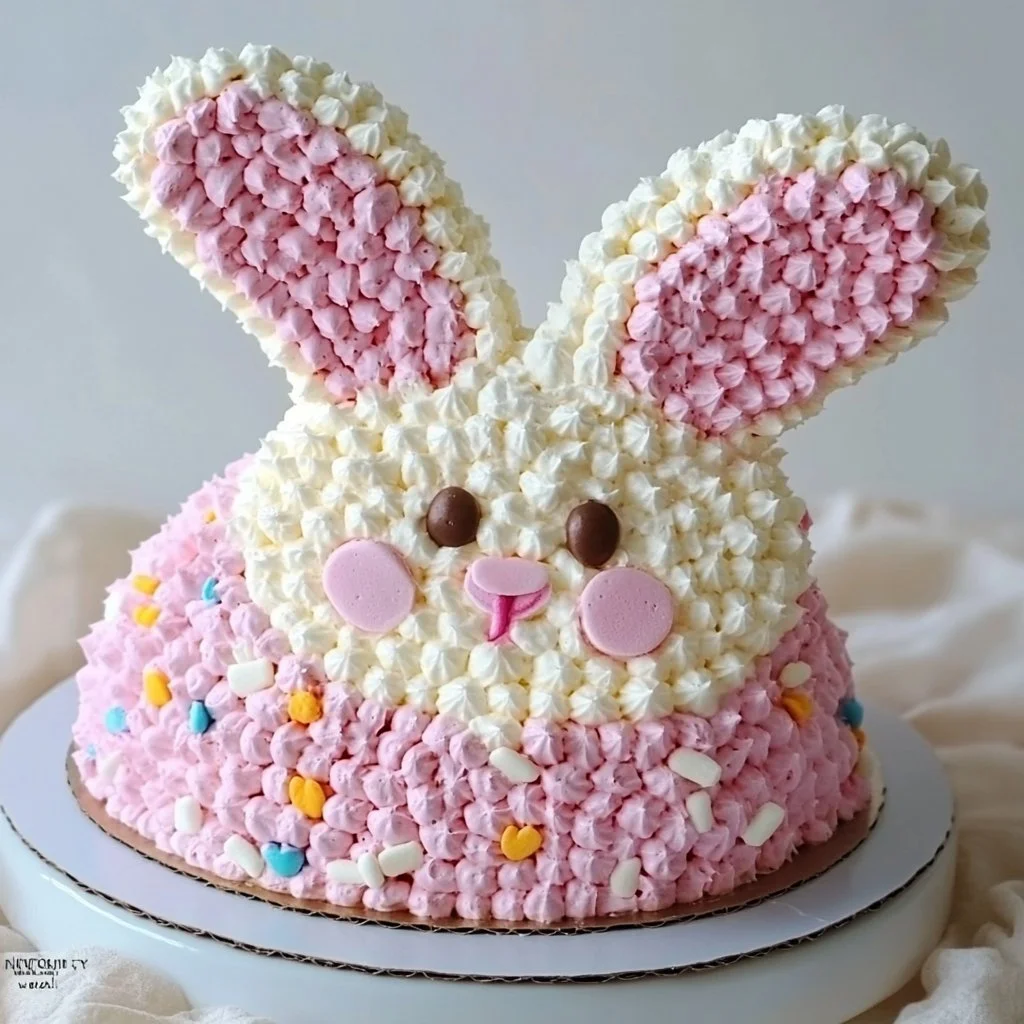
If you are serving to little ones, keep napkins handy and offer small forks. For a grown-up twist, serve a spoonful of lightly whipped cream with a small drop of liqueur for an evening celebration. A chilled glass of milk also feels wonderfully nostalgic with each forkful.
Pair this cake with a drink that complements the frosting. Coffee brings out the almond note in the buttercream. A light herbal tea makes the cake feel delicate and sweet. If you want a full party idea, try a homemade punch alongside the cake for a bright, fruity balance and a playful table setting that children will adore. You can find a simple drink idea for Easter events in this Easter Bunny Punch recipe.
Storage & Reheat Tips
Keep Beginner Easter Bunny Cut Up Cake fresh by storing it in an airtight cake container in the fridge. The frosting will stay stable for up to 4 days in the refrigerator. For best texture, bring slices to room temperature for 20 to 30 minutes before serving.
If you want to freeze the cake, wrap whole or individual slices tightly in plastic wrap, then place in a freezer-safe bag. Freeze up to 2 months. Thaw overnight in the fridge, then allow slices to warm to room temperature before serving to regain that buttery-soft feel.
To refresh a slice, warm in a 300 F oven for 5 to 8 minutes covered with foil. This gives the cake a soft, just-baked warmth and keeps frosting from melting too fast. Reheat only briefly; you want warmth, not melting.
If your kitchen is humid, store for short periods only, as frosting can soften. For travel, a flat cake carrier with a lid works well. Place the cake in the coolest part of the car and avoid direct sun.
Susan’s Baking Notes
- Use real butter if possible. It gives the frosting a richer mouthfeel and a more golden color than margarine. If you must use margarine, look for a baking variety with high butterfat.
- Chill between steps. After your crumb coat, chill the cake for 10 to 15 minutes so the final piping does not drag crumbs into the frosting.
- Keep your piping tips clean. Wipe tips between colors to avoid muddy shades when you switch from white to pink or brown.
- For even layers, level cake tops with a serrated knife. This makes stacking and cutting cleaner and gives a smooth canvas for your bunny face.
- If you plan to make this in advance, assemble the cut pieces and keep them chilled. Final piping looks brighter and stays tidy when the cake is well chilled.
In my kitchen, these little lessons made the difference between a beginner attempt and a cake I happily bring to a table. Small pauses of planning and chilling give a big payoff in the finished look.
Creative strawberry shortcake sushi roll dessert ideas inspired me to try playful shapes when I began cut-up cakes, and they can help spark color or filling ideas for your bunny design.
Flavor Twists & Variations
Beginner Easter Bunny Cut Up Cake is flexible. Here are ways to shift flavor and mood without changing the basic method.
- Lemon-Blueberry: Use lemon cake mix and fold fresh blueberries into the batter. Tint the frosting a soft yellow and add tiny dots of blueberry jam on the nose for a fresh bite.
- Chocolate Surprise: Bake chocolate cake rounds and use a chocolate buttercream for the face with white stars for contrast. Sprinkle mini chocolate chips around the bowtie for texture.
- Almond-Raspberry: Add a teaspoon of almond extract to the batter, swirl raspberry jam into the layers, and use pink-tinted frosting for the ears and nose.
- Carrot Cake Option: Use a carrot cake mix and a cream cheese frosting piped with star tips. This gives a naturally Easter-friendly flavor and a speckled crumb.
- Candy Topped: Press small pastel candies or chocolate eggs into the bowtie for a festive look.
If you like more dramatic chocolate notes, try ideas from a classic chocolate cherry upside-down cake to borrow layers of fruit and chocolate for a grown-up version.
These variations let you pair the cut-up technique with seasonally inspired flavors or your family favorites. The method stays the same: bake, cut, arrange, and decorate.
Sweet Tips & Tricks
- Swap extracts with care. A little almond extract goes a long way. If you use it in both batter and frosting, reduce to half a teaspoon in each to avoid overpowering the cake.
- Keep powdered sugar on hand. It saves time and makes quick repairs to frosting that is too soft.
- For neater cuts, chill the cake rounds slightly before trimming. A gently cool cake trims cleanly and keeps crumbs down.
- Use parchment under your cake board for easy cleanup. It makes moving the cake simpler and protects surfaces during decorating.
- If piping stars is new to you, practice on a plate first to get comfortable with tip pressure and bag angle. The stars should look like small mounds with a clean point on top.
These small tricks come from practice and a few happy mistakes. Baking is easier when you expect small imperfections and know how to fix them.
FAQs About Beginner Easter Bunny Cut Up Cake
Can I make this ahead?
Yes. Make the cakes and crumb coat a day ahead, refrigerate, then finish pipelines and stars the next day. The flavors meld and the frosting sets nicely overnight.
What if I do not have pastry tips?
You can cut a small hole at the end of a sturdy plastic bag for piping stars. The points will be softer, but the overall look will still be charming.
Can I use homemade cake instead of a mix?
Absolutely. A simple vanilla or yellow cake from scratch works beautifully. Make sure your layers are even and fully cooled before cutting.
How do I avoid crumbs in the final frosting?
A thin crumb coat that chills for 10 to 15 minutes before the final decoration will trap crumbs and give a clean surface for piping.
What if my frosting is too soft to hold stars?
Add more powdered sugar a tablespoon at a time and chill for a few minutes. If it gets too stiff, add a little milk and beat until spreadable.
The Heart of Beginner Easter Bunny Cut Up Cake
At its core, this cake is about turning a simple baking day into a small celebration. It is not about perfection but about the joy of making and sharing. The feel of soft cake, the gloss of buttercream, and the tiny satisfaction of piping a neat star come together to create a moment people remember.
I often think of this cake as a gentle nudge to slow down. When you cut one round into ears and a bowtie, you are practicing creativity in a friendly, approachable way. You make something that looks baked by someone with patience and care, and that feeling travels to anyone you serve.
Whether you are baking for a party or for a quiet night, this cake invites you to make beauty from simple tools and flavors. It is accessible, forgiving, and small enough to become a regular addition to your baking rotation.
A Final Sweet Note
I hope this Beginner Easter Bunny Cut Up Cake brings your kitchen the same buttery joy it brings mine. It is meant to be easy to make, lovely to present, and comforting to eat. Invite a friend over, pour a warm drink, and let one slice turn an ordinary moment into a memory.
Conclusion
If you want a clear, photo-driven guide to complement these directions, I recommend the helpful tutorial on Beginner Easter Bunny Cut Up Cake – Brownie Bites Blog that shows the cutting and placement step by step. For another step-by-step take on a cut-up bunny cake with different piping ideas, see the useful walkthrough at Easy Bunny Cut-Up Cake (Step-by-Step Tutorial!) – Homan at Home for extra visuals and tips.
Thank you for letting me share this recipe and these tips with you. May your kitchen fill with the smell of butter and vanilla, and may your table hold a small, lovely cake that brings people together.

Beginner Easter Bunny Cut Up Cake
Ingredients
Cake Ingredients
- 1 box standard cake mix, any flavor, prepared and cooled using the directions for 2 8″ round cakes. Use real butter for better flavor.
- 2 sticks unsalted butter, room temperature. Room temperature for easier mixing.
- 3 cups powdered sugar.
- 1 tsp vanilla extract.
- 1 tsp almond extract.
- 1/4 tsp salt.
- 1-2 TBS milk or cream. Adjust for desired frosting consistency.
- Food coloring for frosting (pink, brown/black, green, purple, or whatever you like).
- Additional sprinkles or decorations as desired.
Instructions
Baking the Cake
- Bake two 8-inch round cakes according to the cake mix directions and let them cool completely on a wire rack.
- Cool until the cakes are just above room temperature and firm enough to trim cleanly.
Cutting and Arranging
- Use the photos in the blog post to cut one of the cake rounds into ears and a bowtie as shown.
- Arrange cake pieces on a cake board or baking sheet covered with aluminum foil or parchment.
Crumb Coating
- Crumb coat the whole cake lightly with a thin layer of frosting and chill for 15 minutes to set.
Making the Frosting
- Use a hand or stand mixer to blend together the butter, powdered sugar, vanilla extract, almond extract, and salt.
- Add the milk or cream a little at a time until frosting isn’t too thick and spreads easily.
Decorating the Cake
- Measure out about 1/3 cup of the frosting into a small bowl and add drops of black or brown food coloring until desired color is reached.
- Use a pastry bag fitted with a small round writing tip to pipe facial features using the brown/black frosting.
- Use a toothpick to trace out the shape of the nose and the interior part of the ears.
- Fill a clean pastry bag with white frosting, hold it at a 90-degree angle and pipe stars across the whole cake layer, leaving marked areas bare.
- Color remaining frosting pink for the nose and center of the ears, then pipe stars accordingly.
- Color the frosting for the bowtie and pipe stars over it.
- Add small details for whiskers, a smile, and sprinkle as desired.
Serving
- Slice and serve with soft cuts so the bunny face stays intact. Optionally offer vanilla ice cream or mint beside each slice.