
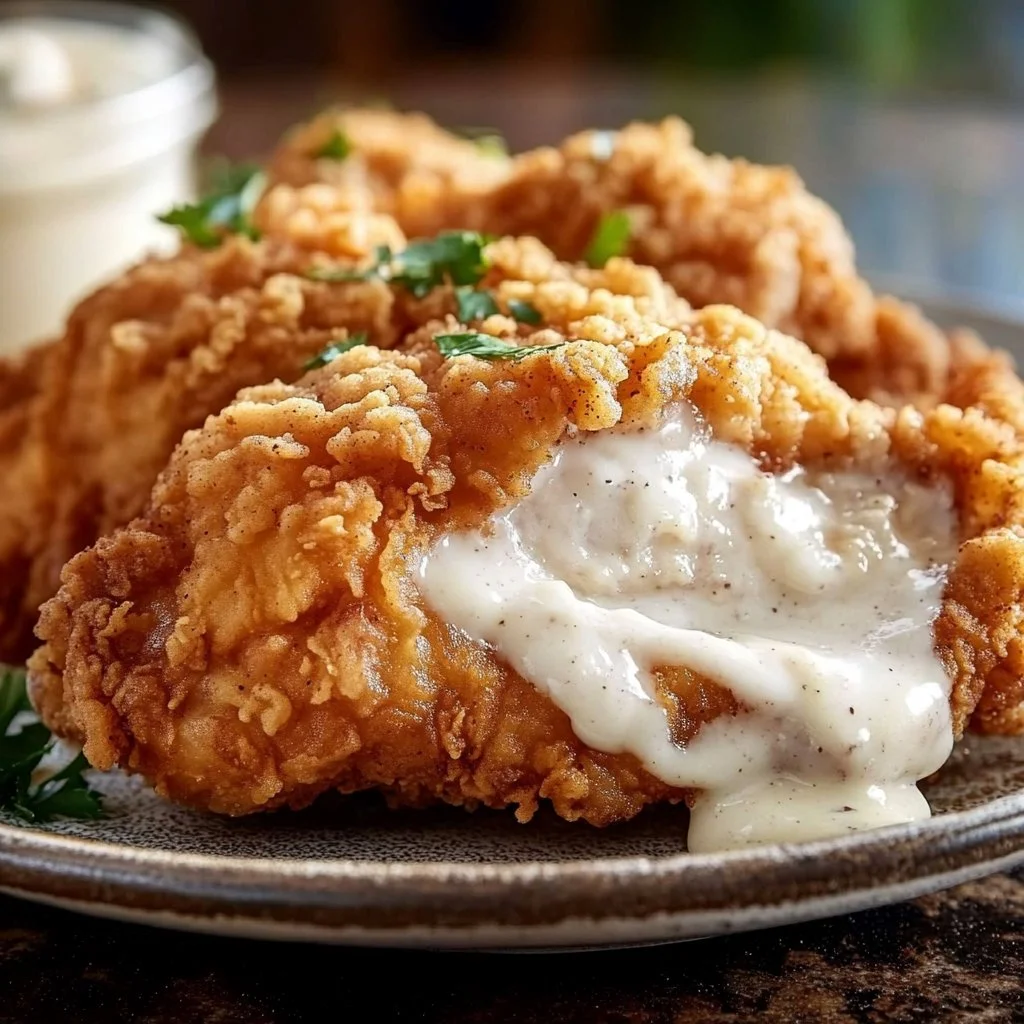
I can still smell it now: hot oil on the stove, the sizzle when the chicken hits the pan, and everyone drifting toward the kitchen because dinner smells like home. That image pretty much sums up Chicken Fried Chicken for me loud, simple, and somehow always satisfying. If you want a weeknight meal that feels like a hug without a lot of fuss, this is it. I’ll also point you to a nearby twist if you’re craving a cousin of this dish, like my take on chicken fried steak with country gravy for another comfy night.
Why This Recipe Always Works for Busy Nights
Chicken Fried Chicken deserves a spot on your weeknight menu because it hits a few sweet spots at once. It’s fast enough to make after work, flexible with what you have in the pantry, and satisfying in a way that makes leftovers welcome instead of a chore.
The prep is short: a dry mix, a wet mix, and a frying pan. The clean up is manageable if you use two bowls and a single pan for gravy. Kids like it. Adults love it. And you get crunchy exterior and juicy meat inside each time if you follow the key cues I’ll share.
What’s more, this recipe is forgiving. Short on buttermilk? A quick mix of milk and a splash of vinegar works in a pinch. Want to speed dinner up even more? Pound the breasts thin the night before and keep them covered in the fridge. Simple, reliable, and crowd-pleasing. You’ve got this.
How to Make Chicken Fried Chicken the Easy Way
“If it smells this good halfway through, you know dinner’s gonna be great.”
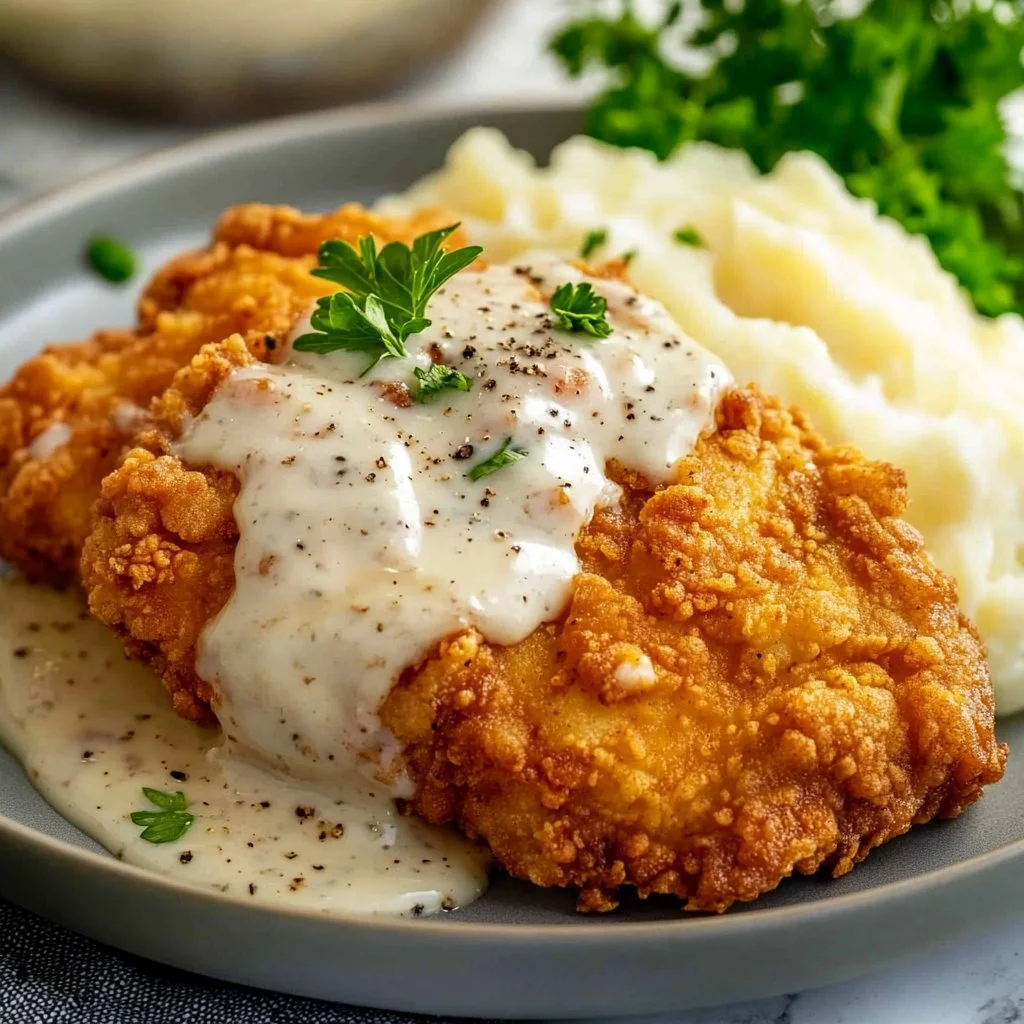
Before we list the ingredients, here’s the short version of how this comes together. You season and dredge thin chicken breasts in a flour mix, dip them in a tangy egg-and-buttermilk batter, then coat again in flour to get a thick crust. Fry the pieces until golden brown, then use some of that cooking oil to make a silky, peppery white gravy. Serve the gravy over the chicken and let the fork do the rest.
Look for a golden brown crust and a steady sizzle while frying. The chicken will release from the pan when the crust is ready to flip. Smell is a great guide here too. If the kitchen smells nutty and toasty but not burnt, you’re in the right spot. Color should be deep golden, not pale and not dark brown.
Ingredients You’ll Need
- 6-8 thin sliced chicken breasts
- 2 cups flour
- 2 tsp baking powder
- 1 tsp baking soda
- 1 tsp salt
- 1 tsp pepper
- 1 tsp garlic powder
- 1 1/2 cup buttermilk
- 1 egg
- 1 Tbs hot sauce
- Oil for frying
- 1/4 cup reserved oil from frying
- 1/3 cup flour
- 2 cup milk
- Salt & pepper
Don’t skip the garlic powder. It’s small but it makes a big difference in the flavor of the crust. Use plain all-purpose flour. No need for fancy ingredients. If you don’t have buttermilk, stir a tablespoon of white vinegar or lemon into regular milk and let it sit for 5 minutes. The hot sauce gives the batter a little lift and keeps things interesting, but you can leave it out for kids.
Step-by-Step Directions
- Heat oil in deep fryer or large pan on stove (a few inches deep) to 325.
Use a thermometer if you have one; steady 325 F keeps the crust crisp and the inside cooked.
If you don’t have a thermometer, test with a pinch of flour it should bubble steadily. - In large bowl whisk together your flour, baking powder, baking soda, salt, pepper and garlic powder.
Make sure the baking powder and soda are evenly mixed for a light crust.
Toss a little extra pepper if you like a punchier gravy later. - In another bowl whisk together buttermilk, egg and hot sauce.
Beat until smooth so the batter clings to the chicken.
If the batter separates, whisk for a few more seconds; it should be cohesive. - Dredge your chicken in the flour mixture then dip into the egg mixture than back into the flour mixture making sure to press down flour to get stuck on the steak real good.
Pressing the flour into the meat creates thick, crunchy pockets once fried.
Let the coated pieces rest on a rack for a minute so the coating adheres. - Place chicken in pan/deep fryer and fry on each side 3-5 minutes until golden brown, remove and drain on paper towel lined plate, repeat with all chicken.
Cook times depend on thickness; thin breasts finish quickly.
Use a thermometer inside the thickest part if you like 165 F is done. - To make your gravy, in large pan add 1/4″ of oil from cooking and heat on medium-high, stir in your flour until absorbed and cook for about 1 minute.
This lightly toasts your roux and removes raw flour taste.
Keep stirring; a little browning adds flavor but don’t burn it. - Slowly add in your milk whisking to blend and heat until thickened then stir in salt and pepper to desired taste.
Whisk constantly to keep it smooth while it thickens.
If it gets too thick, add a splash more milk and keep whisking. - Pour gravy over individual chicken before serving.
Serve immediately so the crust stays crisp under a velvety gravy.
If you prefer, serve gravy alongside so people can spoon what they like.
Quick tips while you fry: don’t crowd the pan. Keep the oil at a steady temperature by frying in small batches. Use tongs to flip and a slotted spatula to lift the pieces out cleanly. It’s better to fry in 2 shorter batches than try to fit everything at once and end up soggy.
Serving Chicken Fried Chicken at the Table
I like to bring this to the table family-style. A platter of golden chicken, a bowl of warm gravy, and a few sides makes it easy for everyone to serve themselves. Let a couple of little bowls with pickles, hot sauce, or honey sit nearby for folks who want a flavor twist.
Classic sides include mashed potatoes, green beans, coleslaw, or corn. For a faster plate, serve with microwave-steamed veggies and a quick bagged salad. If you’re doing game night or a casual crowd, slice the chicken and place on rolls for smash-style sandwiches.
Want to prep some parts ahead? Potatoes can be mashed earlier and reheated gently. The chicken crispness is best fresh, so fry on the evening you eat. If you want ideas for quick sides, pair the plate with my 10-minute favorites like this chicken Caesar wrap when you need a handheld option for picky eaters.
Storage & Reheat (No Soggy Leftovers)
Leftovers happen, and I am all for making them taste great again. Here’s the honest way to store and reheat so you don’t end up with mushy coating.
To store: let the chicken cool to room temperature for no longer than two hours. Place in an airtight container with a layer of paper towels between pieces to absorb excess oil. Refrigerate up to 3 days. For longer storage, flash-freeze on a tray and transfer to a freezer bag for up to 1 month.
To reheat for crispiness: preheat your oven to 400 F. Place chicken on a wire rack over a baking sheet and heat for 10-15 minutes until warm and crisp. Reheat gravy gently over low heat, whisking to bring back creaminess. Microwave will warm faster, but expect softer crust. If you must use microwave, re-crisp briefly in a hot pan for 1-2 minutes.
If you froze the chicken, thaw in the fridge overnight and reheat as above. Do not refry already fried chicken; it tends to overcook inside and still can’t regain that first-crisp texture.
Quick Tips & Shortcuts
- Pound and prep early: Pound breasts thin and store between plastic for up to 24 hours to speed the evening. It also helps ensure even cooking.
- One-pan gravy trick: Use 1/4 cup of the frying oil for the gravy to pick up flavor and save dishes. Deglaze any brown bits in the pan before adding flour.
- Make it kid-friendly: Skip the hot sauce in the batter and add a little on the side for adults.
- Cleaner frying: Line a baking sheet with foil next to the stove for used paper towels and discard safely. Wipe splatters while warm but not hot.
- Less oil, more control: Use a heavy skillet or cast iron so oil temperature stays steady and you can control browning.
Variations That Work
Chicken Fried Chicken is a template for adjustments. Here are variations that keep the heart of the dish while changing the mood.
- Spicy Crispy: Add 1 tsp cayenne and replace the hot sauce with a stronger variety. This gives a slow heat that plays well with the gravy.
- Herb Butter Drizzle: Finish with a light drizzle of melted herb butter (parsley, thyme) over the chicken right before serving for a fresh lift.
- Lighter Oven Option: For fewer calories, bake at 425 F on a wire rack for 12-15 minutes, then broil 1-2 minutes for color. The crust will be lighter but still satisfying.
- Panko Crunch: Swap half the second coating flour for panko crumbs for extra crunch and a different texture.
- Country Gravy Swap: Make a pepper-free cream sauce with added cheddar for a richer finish.
If you’re leaning into sandwiches, slice and place on toasted rolls with pickles and slaw. That makes for quick lunches the next day.
Ethan’s Notes From the Kitchen
- I learned early that thin cutlets fry evenly and speed everything up. If your grocery store sells them, grab thin sliced breasts.
- The flour press step bonds more coating to the meat. It takes a few extra seconds but pays off when each bite is crunchy.
- Keep an eye on oil temp. A cold pan makes greasy crust, a hot pan burns the exterior. The sweet spot is stable 325 F.
- Use a splatter screen if you have kids around the stove. It keeps splatters contained without hiding the pan.
- Don’t skip resting the chicken briefly on a rack before serving. It keeps steam from softening the crust.
FAQs About Chicken Fried Chicken
Can I make this ahead?
Yep. You can bread the chicken and keep it refrigerated for up to 24 hours before frying. Frying fresh is best for crunch, but prepped chicken saves evening time.
Is buttermilk really necessary?
Buttermilk tenderizes and adds tang, but a quick substitute is milk plus a tablespoon of vinegar or lemon juice. Let it sit five minutes before using.
How do I know the oil is the right temperature without a thermometer?
Drop a pinch of flour into the oil. If it bubbles steadily and rises to the surface, you’re close. If it smokes, it’s too hot. Adjust the heat and try again.
My gravy is lumpy. What went wrong?
Lumps mean the roux wasn’t blended well with milk. Whisk constantly while slowly adding milk. If lumps form, strain the gravy or blend with an immersion blender.
Can I use skin-on chicken?
You can, but skin behaves differently when breaded. For this recipe, skinless thin cutlets give the classic texture and quick cook time.
What I’ve Learned After a Few Batches
The first time I made Chicken Fried Chicken for a crowd I was nervous. I burned a batch, learned pacing, and discovered the power of resting pieces on a rack. Now I know the magic moments: when that first batch’s aroma hits the hallway, and when the family crowds the counter to taste-test.
Timing is everything. Fry in small batches for steady oil temperature. Make the gravy in between batches using reserved oil so you don’t waste flavor and keep washing down to a minimum. If someone offers to help with mashed potatoes or setting the table, let them. It makes the job faster and dinner better.
If you’re trying to shave time, prep flour mix and batter an hour ahead. Keep the coated pieces on a pan in the fridge covered with plastic wrap. Fry straight from the fridge; the coating holds and cooks fine.
Variations That Make Weeknights Easier
- Sheet Pan Side: Roast cubed potatoes and carrots on a single sheet pan while the chicken fries for fewer pans and hot sides ready with minimal babysitting.
- Meal Prep Bowls: Slice rested chicken and pack over rice with steamed veggies and a small container of gravy. Reheat in oven for best texture.
- Leftover Remix: Turn leftovers into a casserole with biscuits and extra milk, topped with cheese and baked until bubbly.
- Kid Swap: Make a milder dipping gravy with less pepper and offer ketchup or ranch for kids.
I often keep it simple when time is tight: a quick salad and a starch. The chicken is the star, so let it shine.
Final Tips Before You Start
- Read the recipe top to bottom. Gather your bowls and thermometer so the process flows.
- Keep a trash bowl handy for used paper towels and bits of flour. It speeds cleanup.
- Use a digital thermometer for accuracy. You’ll hit 165 F and avoid dry chicken.
- Trust your nose and your eyes. Golden brown and toasty smell mean success.
- Don’t overthink it. Cooking should be part skill, part feel. This recipe rewards both.
Conclusion
If you want to explore a slightly different take on chicken fried comfort food, check out this deep-dive Chicken Fried Chicken – Tornadough Alli for tips and variations that inspired some of my tweaks. For a Texan perspective and history on the dish and another solid recipe, this write-up on Chicken-fried chicken | Homesick Texan is a great read and worth bookmarking.
If your family licks the pan clean, don’t say I didn’t warn you.

Chicken Fried Chicken
Ingredients
Chicken and Coating
- 6-8 pieces thin sliced chicken breasts Thin cutlets ensure even cooking.
- 2 cups flour All-purpose flour recommended.
- 2 tsp baking powder
- 1 tsp baking soda
- 1 tsp salt
- 1 tsp pepper Adjust to taste.
- 1 tsp garlic powder Essential for flavor.
Wet Mixture
- 1.5 cups buttermilk Substitute with milk and vinegar if needed.
- 1 piece egg Beaten.
- 1 Tbs hot sauce Optional for flavor.
Gravy
- 1/4 cup reserved oil from frying
- 1/3 cup flour
- 2 cups milk
For Frying
- Oil for frying Enough to fill your pan a few inches deep.
Instructions
Preparation
- Heat oil in a deep fryer or large pan on stove to 325°F. Use a thermometer if available.
- In a large bowl, whisk together flour, baking powder, baking soda, salt, pepper, and garlic powder.
- In another bowl, whisk together buttermilk, egg, and hot sauce until smooth.
- Dredge the chicken in the flour mixture, dip in the egg mixture, and then back into the flour mixture, pressing to adhere.
- Let the coated chicken rest on a rack for 1 minute.
Cooking
- Fry the chicken in batches for 3-5 minutes on each side until golden brown. Drain on paper towels.
- To make the gravy, add reserved oil to a pan, heat on medium-high, and stir in flour until absorbed.
- Slowly add milk while whisking until thickened, seasoning with salt and pepper.
- Serve gravy over the chicken immediately for best results.