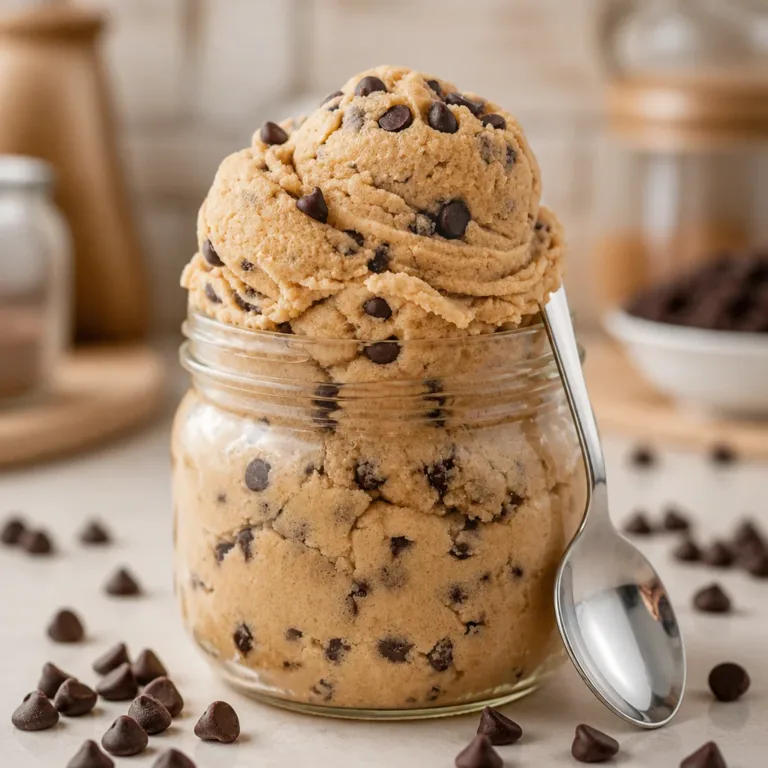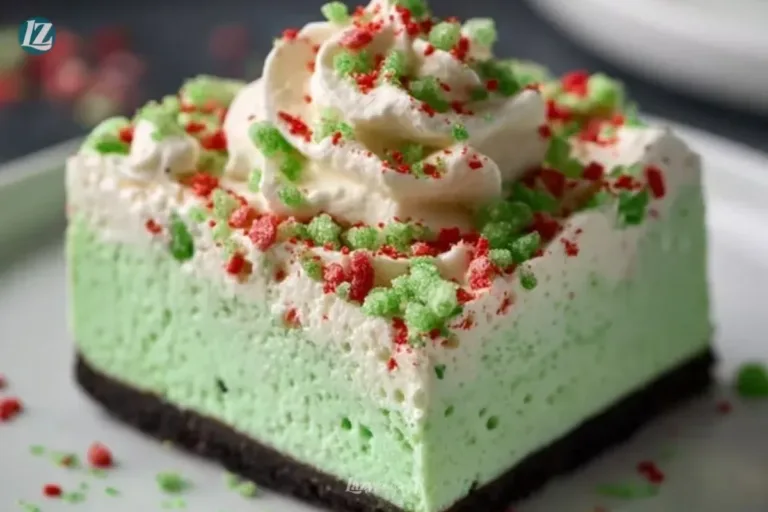
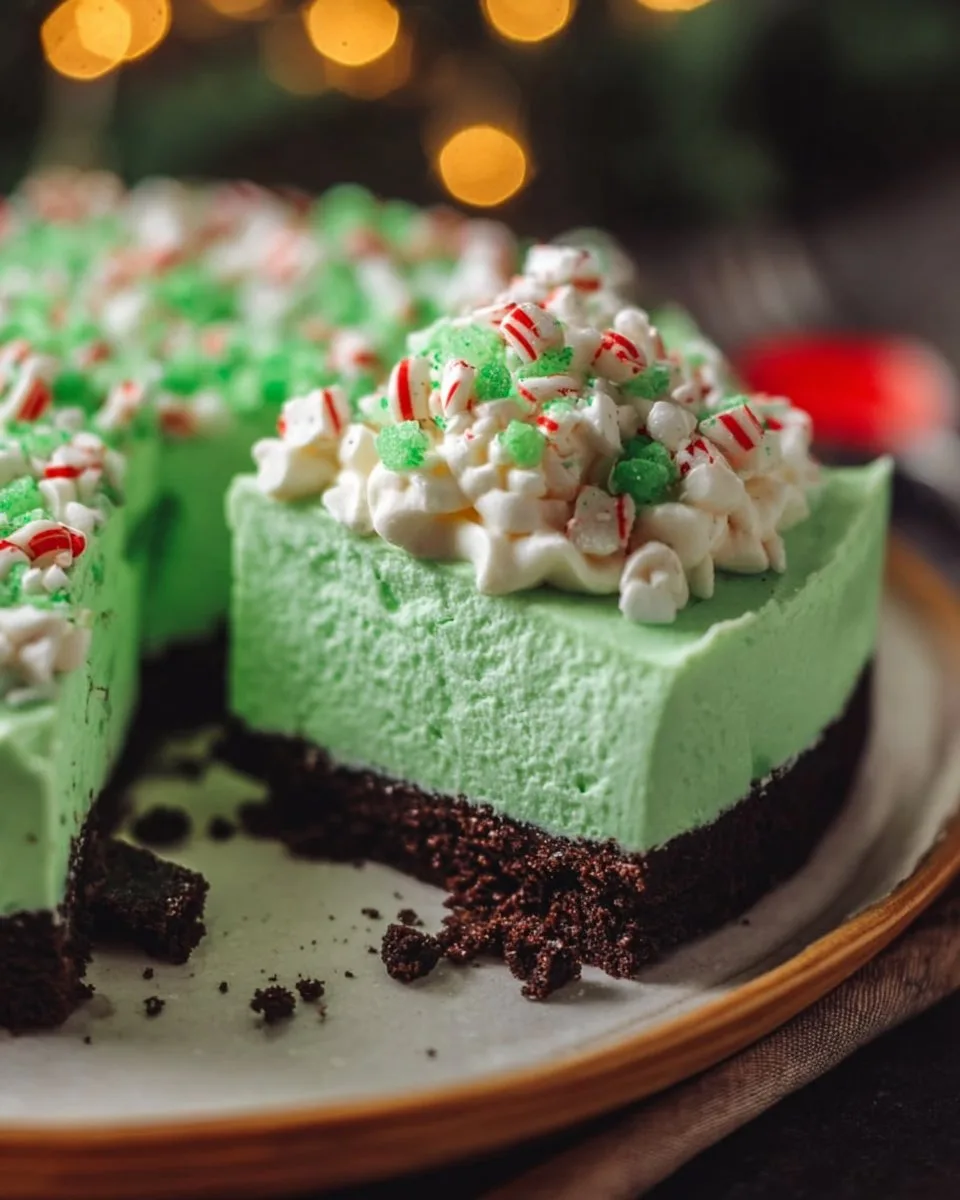
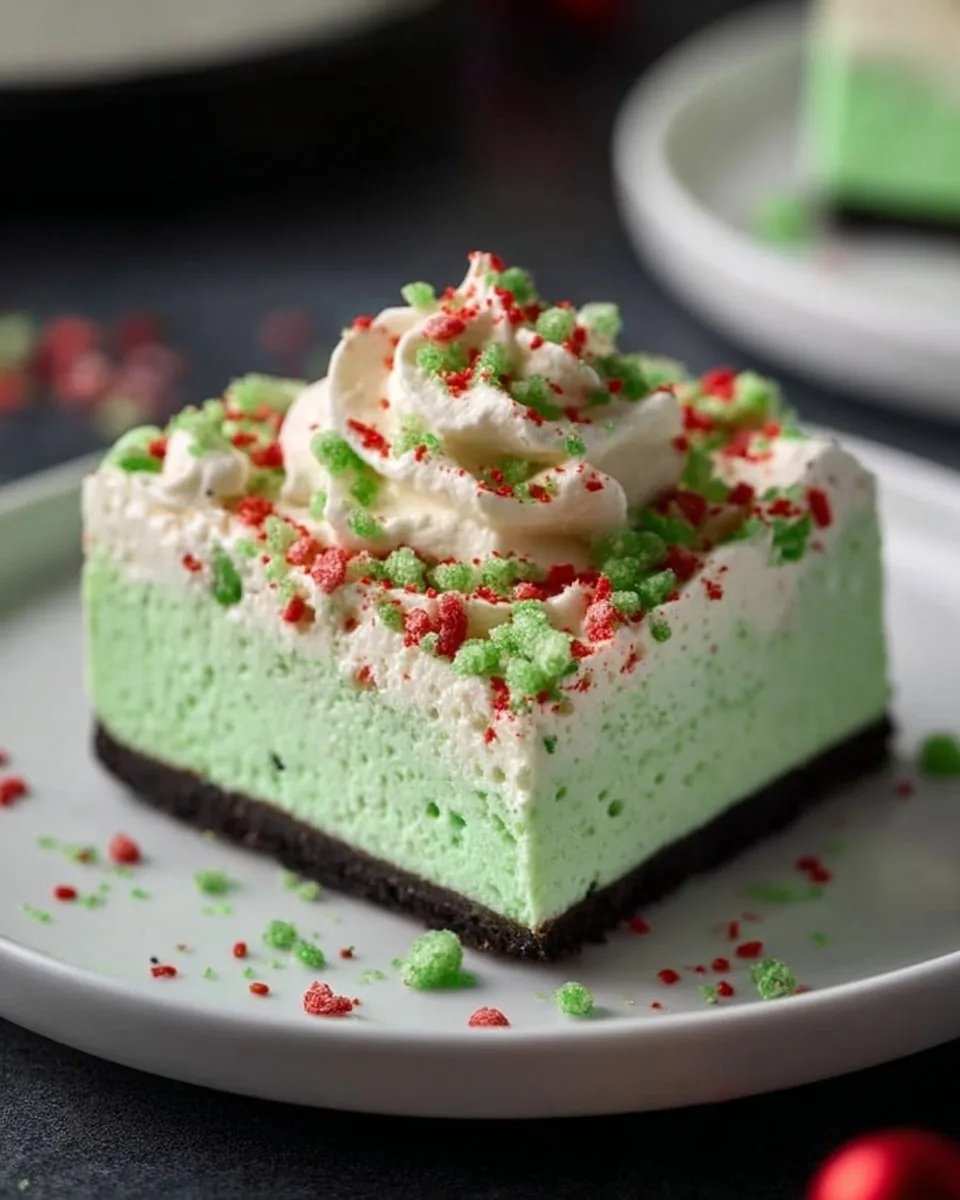
The warm scent of vanilla and crushed chocolate fills the kitchen as I press the buttery Oreo crumbs into the pan, a small, satisfying ritual that promises bright green, silky cheesecake and a quiet moment of holiday pleasure; this No Bake Grinch Christmas Cheesecake became my favorite way to send a cheerful slice to a neighbor or to tuck into after a slow afternoon coffee, and it pairs wonderfully with other no-bake treats like no-bake Biscoff cheesecake when I want to lay out a small, indulgent dessert spread.
Why You’ll Love This No Bake Grinch Christmas Cheesecake
This cheesecake is all warm memories and easy delights. It looks like a party on a plate with its green, creamy filling and festive sprinkles, yet it asks for very little time in the kitchen. It is a dessert that feels special without being fussy.
There is an emotional pull to foods we make by hand. This cheesecake sends the same signal as a ribboned gift: care and a bit of whimsy. It is perfect for birthdays, coffee chats, holiday gatherings, or a quiet night in when you want something buttery-soft and a little bit playful.
Technically, it is a simple set-and-chill dessert. The filling is melt-in-your-mouth smooth, and the Oreo crust gives a faint chocolate crunch under every forkful. It keeps well and travels well, so you can bring a slice to a neighbor or set out a platter for friends without worry.
The Heart of No Bake Grinch Christmas Cheesecake
This dessert answers a very sweet question: how do we make a holiday moment at home that looks as joyful as it tastes? The emerald green of the filling brings that first smile, and the whipped texture invites a slow, appreciative bite.
It also rewards small details. Use real butter for the crust if you can; it deepens the flavor and gives you those golden edges in memory, even if they are under the crust. Freshly whipped cream on top brightens the palate against the rich cream cheese. Little touches like a sprinkling of red sugar or a few festive candies make each slice feel like a celebration.
How to Make No Bake Grinch Christmas Cheesecake
“When the kitchen smells like vanilla and butter, you know something special’s baking.”
Before we list ingredients, here is a short overview so you know what to expect. You will press a crisp Oreo crust into a springform pan, whip a cloud-like cream mixture, tint it green, and let it rest until set. Look for a glossy, smooth top and a filling that gives slightly when you touch the side of the pan. Aroma cues are simple: vanilla notes and a gentle chocolate scent from the crust.
This recipe is forgiving. If your cream cheese has a few lumps at first, keep beating; patience turns it silky. If your whipped cream softens a bit, gently re-whip until it holds glossy peaks. The refrigerator does the heavy lifting: it turns the airy filling into a sliceable, melt-in-your-mouth cheesecake.
Ingredients You’ll Need
- 16 oz cream cheese, softened
- 2/3 cup powdered sugar
- 1 tsp vanilla extract
- 1 cup heavy whipping cream
- Green food coloring
- 1 package of Oreo cookies, crushed
- 1/4 cup unsalted butter, melted
- Whipped cream for topping
- Red and green sprinkles for decoration
Use real butter if you can; it makes every bite worth it. For the Oreo cookies, you can use original Oreos or a similar chocolate sandwich cookie. If you prefer a slightly less sweet crust, remove a couple of the cream centers before crushing.
Step-by-Step Directions
- In a bowl, mix crushed Oreo cookies with melted butter and press it into the bottom of a springform pan to create the crust.
Use the bottom of a measuring cup to press the crumbs evenly. Aim for a compact, even layer that reaches the edges. - In a separate bowl, beat cream cheese until smooth. Gradually add powdered sugar and vanilla, mixing until well combined.
Beat on medium speed until the mixture is glossy and lump-free. Scrape down the sides so everything is evenly mixed. - In another bowl, whip heavy cream until stiff peaks form. Then, fold the whipped cream into the cream cheese mixture.
Gently fold to keep the mixture light and airy. Fold in thirds, lifting from the bottom to keep the cream intact. - Add a few drops of green food coloring until the desired color is achieved.
Start with one drop and add more a drop at a time. You want a bright, but not artificial, green. - Pour the cheesecake filling over the crust and smooth the top.
Use an offset spatula for a clean finish. Tap the pan gently on the counter to remove air pockets. - Refrigerate for at least 4 hours or until set.
Overnight is even better; the flavors become more harmonious and the texture firms to a perfect sliceable consistency. - Once set, remove from the springform pan, top with whipped cream, and decorate with sprinkles before serving.
Run a thin knife around the pan edge before releasing the ring for a clean presentation. Add a few whole Oreos or festive candies if you like.
Serving No Bake Grinch Christmas Cheesecake With Love
Serve this cheesecake thoughtful and simple. I like to slice it with a warm knife, wiping the blade between cuts for clean edges and a pretty presentation. Offer it with a small jug of strong coffee or a lightly sweetened tea for a pairing that balances the richness.
This cake is also lovely with a scoop of vanilla ice cream on the side. The cold of the ice cream and the soft, buttery filling create a delightful contrast. If you are making a dessert board, include a few seasonal fruits like candied oranges or fresh raspberries to cut through the creaminess.
Small presentation touches matter. Place each slice on a white plate to let the color pop. A dollop of whipped cream and a sprig of mint or a few extra sprinkles bring an elegant finish. If you are sharing at a gathering, label the cake with a tiny handwritten note. It turns a simple dessert into a memory.
You can also layer this cheesecake into individual glasses for a different presentation. Spoon crust, then filling, and finish with whipped cream these make lovely individual gifts to friends or neighbors.
Storage & Reheat Tips
Keep this cheesecake in the refrigerator, covered tightly with plastic wrap or in an airtight container. It will stay fresh for 3 to 4 days when chilled. For the best texture, keep it on a flat shelf in the fridge where it will not get jostled.
If you need to freeze it, remove the ring from the pan and wrap the whole cheesecake in two layers of plastic wrap and a layer of foil. Freeze for up to 2 months. Thaw in the refrigerator overnight before serving. Avoid refreezing after thawing.
If your whipped topping softens after a few days, give it a light stir or re-whip a small amount of cream to top each slice just before serving. Do not attempt to reheat this no-bake cheesecake; it loses structure and texture. Instead, let chilled slices come to room temperature for 10 to 15 minutes before serving for the softest mouthfeel.
Sweet Tips & Tricks
- Use full-fat cream cheese and heavy cream. They give the filling a rich, smooth mouthfeel that lower-fat versions cannot match. This is one of those times the small indulgence matters.
- Chill your mixing bowl and beaters in the freezer for 10 minutes before whipping the cream. Cold metal helps the cream reach firm peaks faster and cleaner.
- If your filling seems too soft after mixing, give it a little time in the fridge to firm up before pouring over the crust. A quick 30 to 60 minutes can make a difference.
- For a clean slice, warm your knife under hot water, wipe dry, and then slice. Warming the blade reduces drag through the creamy filling and keeps edges neat.
- If you like a slightly tangy note, add a teaspoon of lemon zest to the cream cheese mixture. It brightens the flavors without changing the beloved Grinch-green profile.
I often suggest trying different crusts when hosting a dessert spread. A chocolate crust like this pairs beautifully with other no-bake treats such as no-bake pumpkin cheesecake on cooler evenings.
Flavor Twists & Variations
This recipe is a friendly base for small adjustments. You can keep the green theme or take it in a new direction.
- Mint chocolate: Fold in a teaspoon of peppermint extract and add chocolate shavings for an after-dinner finish. Mint pairs well with the chocolate crust and feels refreshingly seasonal.
- Citrus bright: Stir in a tablespoon of lime juice and a little lime zest to the filling for a cheery, slightly tangy lift. The green color will look natural with this variation.
- Berry ribbon: Spoon a thin layer of raspberry compote on top before topping with whipped cream. The red against green is festive and the tart berry balances sweetness.
- Oreo double: Crush extra Oreos to dust the top or press into the sides for added texture and a more chocolate-forward bite.
- Mini cheesecakes: Use a muffin tin with papers or small tart shells to create single-serve portions. They set faster and are perfect for a holiday buffet.
If you love no-bake treats, consider pairing slices with a tray of other chilled sweets like no-bake strawberry cheesecake lasagna or small bars like no-bake nectarine bars to build a dessert table that feels abundant but requires little oven time.
The Baking Process Explained
This is a no-bake dessert, but the process still has techniques worth noting. The crust benefits from being compacted firmly; this gives structural support for the filling. The cream cheese must be fully softened so it blends smoothly with the powdered sugar and vanilla. Cold lumps will create an uneven texture.
When whipping the heavy cream, watch closely. You want stiff, glossy peaks. Under-whipped cream will collapse into the filling, and over-whipped cream can turn grainy. Fold the whipped cream gently into the cream cheese mix. A light hand preserves air, which creates that melt-in-your-mouth feel.
The chilling step is essential. Even though there is no oven time, the refrigerator firms the filling. Allowing it to rest overnight gives the flavors a chance to marry and the texture to mature into a clean slice. If you need it sooner, a firm chill of at least 4 hours will still give you good results.
Lessons From My Kitchen
From testing this recipe many times, I learned a few small, consistent truths. First, patience rewards you with texture. A rushed set leaves the cake too soft to slice. Second, small amounts of flavor add up. A little vanilla, a touch of lemon zest, or a careful pinch of salt can change the complexity of a bite.
Keep your utensils clean and dry. Any water in the whipped cream bowl will cause the cream to break or refuse to whip properly. Clean up as you go and you will save time at the end.
Finally, remember presentation matters. A neat top and a few extra sprinkles or a ribbon on the serving plate tell people you cared. Desserts make moments, and a pretty slice turns a simple moment into a remembered one.
No Bake Grinch Christmas Cheesecake
Ingredients
For the crust
- 1 package Oreo cookies, crushed You can use original Oreos or a similar chocolate sandwich cookie.
- 1/4 cup unsalted butter, melted Use real butter for better flavor.
For the filling
- 16 oz cream cheese, softened Use full-fat for best texture.
- 2/3 cup powdered sugar
- 1 tsp vanilla extract Use quality vanilla for better flavor.
- 1 cup heavy whipping cream Chill the bowl and beaters for best results.
- a few drops green food coloring Start with one drop and add more until desired color.
Instructions
Prepare the crust
- In a bowl, mix crushed Oreo cookies with melted butter and press them into the bottom of a springform pan to create the crust.
- Use the bottom of a measuring cup to press the crumbs evenly, aiming for a compact, even layer that reaches the edges.
Make the filling
- In a separate bowl, beat cream cheese until smooth. Gradually add powdered sugar and vanilla, mixing until well combined.
- Beat on medium speed until the mixture is glossy and lump-free, scraping down the sides to ensure everything is evenly mixed.
- In another bowl, whip heavy cream until stiff peaks form.
- Gently fold the whipped cream into the cream cheese mixture, folding in thirds to keep the mixture light and airy.
- Add a few drops of green food coloring until the desired color is achieved.
Assemble and chill
- Pour the cheesecake filling over the crust and smooth the top with an offset spatula.
- Tap the pan gently on the counter to remove air pockets and refrigerate for at least 4 hours, or preferably overnight.
Serve
- Once set, remove from the springform pan, top with whipped cream, and decorate with sprinkles before serving.
Notes
Nutrition
FAQs About No Bake Grinch Christmas Cheesecake
Can I make this ahead?
Yes. Make it up to two days ahead for best texture. Overnight chilling deepens flavor and firms the filling for clean slices.
Is there a gluten-free option for the crust?
Yes. Use gluten-free chocolate sandwich cookies or a mix of ground nuts and cocoa powder to form a crumb crust. Press firmly and chill to set.
How do I fix a lumpy cream cheese mixture?
Beat longer on medium speed and scrape the bowl often. If needed, gently warm the bowl over a pan of warm water while stirring to soften the cheese, but avoid making it too warm.
Can I use gel food coloring?
Absolutely. Gel color gives vivid hues with less liquid. Start with a small amount and add more until you reach the desired shade.
Will this cheesecake hold up at room temperature?
It is best kept refrigerated. If serving at a party, let it sit out for no longer than two hours, then return it to cold storage.
A Final Sweet Note
I hope this No Bake Grinch Christmas Cheesecake brings your kitchen the same buttery joy it brings mine. It is one of those desserts that feels fancy, yet it is simple to make. Each slice is a small, everyday luxury that folds into conversation, slow smiles, and quiet celebrations.
If you enjoy adapting recipes, keep this one nearby. It is a canvas for mint, lime, berries, or chocolate. It plays well with coffee mornings, birthday gatherings, or cozy winter nights.
Conclusion
If you would like another version or inspiration for a similar bright holiday dessert, the original No Bake Grinch Christmas Cheesecake that inspired many home bakers is a lovely reference at No Bake Grinch Christmas Cheesecake | Baking You Happier. For a baked take with a similar festive spirit and helpful tips, see Grinch Christmas Cheesecake – Barbara Bakes™.