The kitchen smells like warm vanilla, a soft sweetness that curls into the corners and stays. I set a kettle on the stove, pull a wooden spoon from its jar, and watch as glossy white chocolate melts into sweetened condensed milk. The first spoonful of The Joy of Christmas Fudge tastes like a memory: buttery-soft, melt-in-your-mouth, and just a little like sitting by a tree on a quiet evening.
Why You’ll Love This The Joy of Christmas Fudge
This fudge is the kind of small everyday luxury that makes ordinary moments feel special. It asks for little fuss and gives back a lot: creamy texture, gentle sweetness, and a holiday look with swirls of red and green. It is nostalgia in a square, a bite that brings back school plays, cookie exchanges, and coffee chats with friends.
I remember making a similar batch with my mother when I was a child. We sang half the carols off-topic and accidentally spilled a sprinkle or two into our pockets. Those small slips became part of the day and the fudge tasted better for it. That memory guides how I make this recipe: simple, careful, and with room for laughter.
What you get here is a fast, dependable fudge that looks beautiful on a plate. It does not demand special equipment or tricky techniques. You need a saucepan, a few bowls, a pan, and a little patience while the layers set. The result is glossy, soft, and easy to slice into small squares for sharing at birthdays, coffee chats, or quiet nights in.
I like to pair a small square with a hot cup of coffee or a bowl of simple vanilla ice cream. If you find yourself planning a whole tray of sweets, consider alternating shapes and textures. For a crunchy companion, try a batch of soft maple brown sugar cookies to offer a contrast of chew and cream.
The Sweet Story Behind The Joy of Christmas Fudge
This fudge is born from holiday tradition and a desire to simplify. Many old-school fudge recipes call for candy thermometers and long stirring. This one takes a shortcut using sweetened condensed milk and good white chocolate, giving you a glossy, creamy finish without standing over a pan for hours.
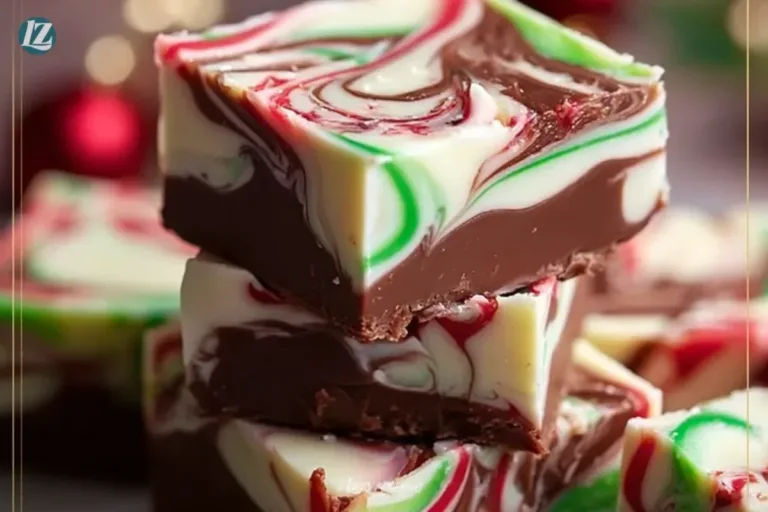
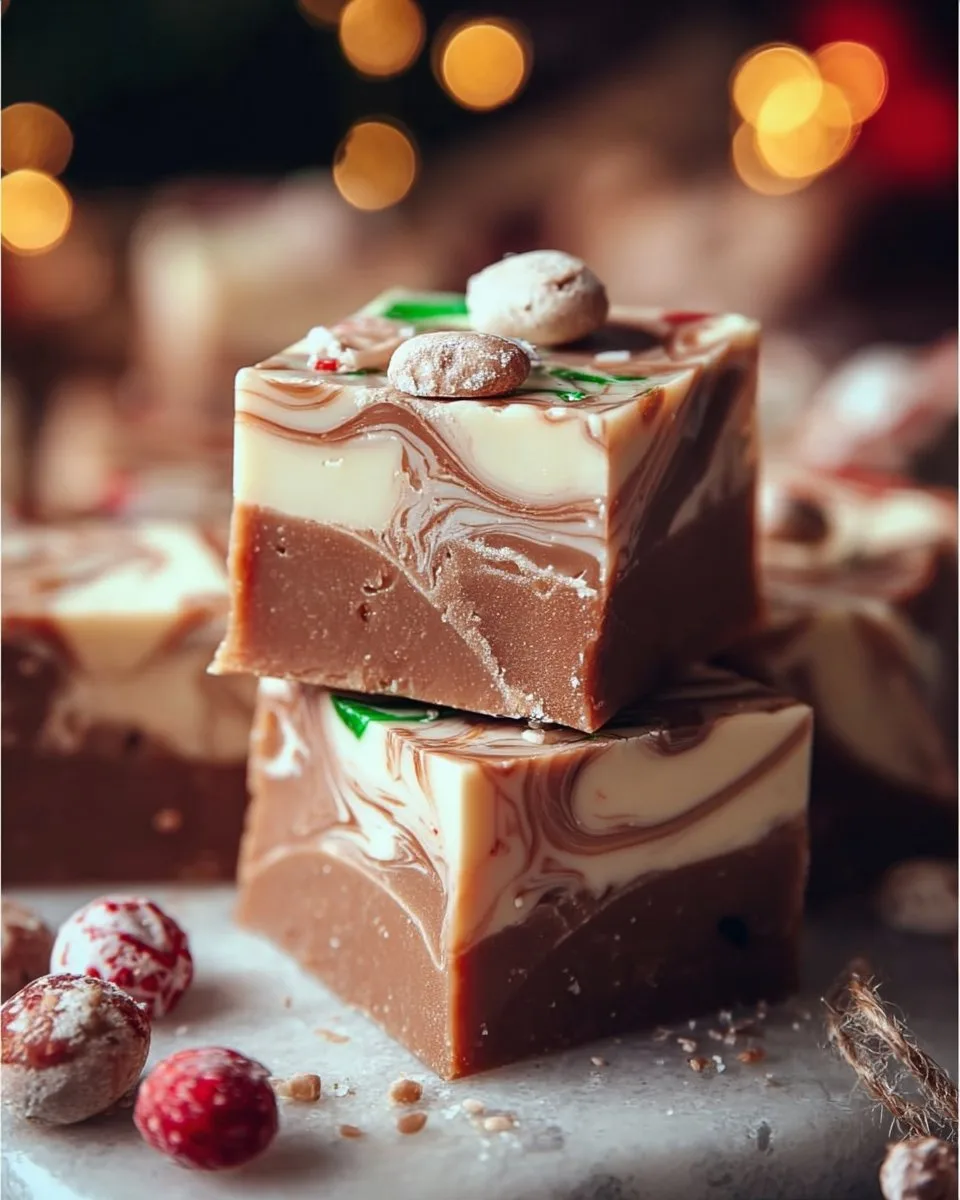
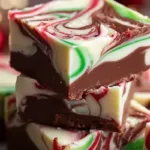
The emotional pull of this fudge is in its layers. The red and green stripes are bright and cheerful. They remind me of holiday plates at family gatherings and the way children’s faces light up at a decorated cookie platter. There is comfort in that color and in the precise softness of a well-made square.
Technically, the sugars here come pre-mixed in the condensed milk, so you avoid grainy textures that can come from improperly heated sugar. Your job is to melt gently, stir until smooth, and allow the fudge to cool slowly. The textures you want are velvety, not waxy, and the edges should be clean when you slice them.
This recipe is a great entry point for bakers who want to make candy with confidence. It is forgiving and fast. If you want to experiment, try swapping a portion of the white chocolate with milk or dark chocolate for a two-tone effect. The basic method stays the same.
How to Make The Joy of Christmas Fudge
“When the kitchen smells like vanilla and butter, you know something special’s baking.”
Before you begin, gather everything. You will watch the mixture go from silky to slightly more set as it cools. Look for a glossy, smooth texture when you stir. You want no graininess and no clumps.
Small visual cues will tell you the fudge is on track. The melted mixture should be shiny and pourable, not stiff. When you layer, each layer should spread easily and keep its color. If one layer looks dull or lumpy, warm it gently to bring back the shine.
A practical note on timing: cooling in the refrigerator for at least two hours gives the best, cleanest slices. If you cut it too soon, the pieces will smear. If you leave it overnight, it will slice even cleaner but may lose a tiny bit of surface gloss. I like to chill until firm to the touch but still slightly soft in the center for the most satisfying bite.
I learned a few layering tricks over the years. Use a small offset spatula or the back of a spoon to encourage even layers. If you want a gentle swirl, drag a knife through the layers in a single, decisive motion. Hesitation can make messy lines.
For a different kind of recipe inspiration on layered treats, sometimes I read about other simple recipes and adapt their approach to my kitchen. If you enjoy exploring other playful ideas, try this piece about burger bowls for a reminder that layers can be both savory and sweet.
Ingredients You’ll Need
- 3 cups white chocolate chips
- 1 (14-ounce) can sweetened condensed milk
- 1/2 teaspoon vanilla extract
- Red and green food coloring
- 1/4 cup holiday sprinkles (optional, for decoration)
Use real butter if you can. It makes every bite worth it. If you like, keep a small pat of butter on hand when you are melting; a teaspoon folded in at the end can help the surface shine. Fresh vanilla really lifts the flavor, so choose pure vanilla extract rather than imitation for the best result.
When choosing white chocolate, look for bars or chips with cocoa butter listed as the first ingredient. Lower-quality white baking bars may contain waxes that can change texture. If you prefer, chop good-quality white chocolate from a bar; it melts more evenly and adds extra richness.
If you plan to add nuts or a crunch element, chop them coarsely and toast lightly in a dry skillet until fragrant. Toasting brings out deeper notes in pecans or walnuts and pairs beautifully with the sweet white chocolate.
Step-by-Step Directions
- Line an 8×8-inch baking dish with parchment paper, allowing extra paper to hang over the sides for easy removal. The overhanging parchment makes it easy to lift the whole slab out once the fudge has set. Smooth the paper down and press into the corners for a neat edge.
- In a medium saucepan, combine white chocolate chips and sweetened condensed milk. Stir over low heat until completely melted and smooth. Remove from heat and stir in vanilla extract. Stir constantly and use gentle heat. The mixture should be glossy and pourable. If it looks grainy, warm gently and keep stirring until smooth. Avoid boiling.
- Divide the melted mixture into three bowls. Tint one with red food coloring and another with green, leaving the third bowl plain. Add food coloring a drop at a time and stir until you reach the shade you want. Gel colorings give more vivid hues with less liquid.
- Pour the red fudge mixture into the prepared pan, spreading it evenly. Layer the plain fudge on top, followed by the green fudge. Gently swirl the layers together with a knife for a marbled effect. Work quickly so the top layer still moves a little when you swirl. Hold the knife flat and drag through the layers in a few long strokes for a pretty marble.
- Sprinkle holiday-themed sprinkles on top while the fudge is still warm, if desired. Press the sprinkles in lightly so they stick. If you wait until it is fully cold, the sprinkles will sit on top without adhering.
- Refrigerate for at least 2 hours, or until firm. Lift the fudge out using the parchment paper and cut into small squares. Use a sharp knife for slicing. Heat the blade briefly under hot water and dry it before each cut for cleaner edges. Wipe the knife between cuts.
- Serve at a cool room temperature for the best texture. Letting the pieces sit a few minutes after removing from the fridge will soften them slightly and make them creamier on the tongue. If you need to speed things up, a 10-minute rest on the counter will do. If the kitchen is warm, keep them chilled until serving.
- Store leftovers in layers separated by wax or parchment paper to preserve the glossy tops and prevent sticking. Stack gently in an airtight container and keep chilled for the longest shelf life.
A few texture and timing tips: the key is to keep the mixture warm enough to spread and glossy but not so hot that it separates. Stir until the chocolate is fully melted and the mixture pulls shiny ribbons from the spoon. The cooling period in the fridge is not optional if you want neat slices. Two hours is the minimum; overnight is ideal.
Serving The Joy of Christmas Fudge With Love
Serve the fudge in small squares, arranged on a simple white plate so the colors pop. This recipe makes a good platter piece at holiday gatherings, where one bite is enough to satisfy and invite conversation.
I like to tuck a few squares onto a saucer next to an espresso or a milky cup of tea. The contrast between warm coffee and buttery-soft fudge is a quiet pleasure. You can also place a few squares beside scoops of vanilla ice cream for a dessert that feels both rich and homey.
For a thoughtful gift, wrap a stack of four or five squares in a small box, lined with tissue. Tie it with a ribbon and add a handwritten note. The cheerful red and green marbling looks lovely through tissue.
If you are serving a crowd, arrange the fudge with contrasting textures. Place a bowl of salted roasted nuts nearby and a plate of citrus fruits. The touch of salt and the bright acidity of orange or clementine make the fudge taste even sweeter.
Presentation touches:
- Use scalloped cupcake liners to hold single squares for a tidy buffet.
- Add a light dusting of cocoa powder around the plate to frame the fudge.
- Pair with a small bowl of warm caramel sauce for dipping.
Little details matter. A clean knife, even slices, and a neat arrangement make the fudge feel like a gift rather than a leftover. Guests notice the care you give to small desserts, and that care becomes part of the occasion.
Storage & Reheat Tips
Store your fudge in an airtight container in the refrigerator. Wrapped in parchment and stored in one layer or separated with paper, it will keep for up to two weeks and still taste fresh.
To freeze, lay the squares in a single layer on a baking sheet and freeze until solid. Transfer them to a freezer-safe container with layers of parchment between rows. Frozen fudge can be kept for up to three months. Thaw in the refrigerator overnight before serving.
If you like a softer texture, remove the fudge from the fridge ten minutes before serving. Room temperature softens the fat and allows the flavors to open up. Do not leave it at room temperature for more than two hours, especially in warm weather.
Reheating is seldom needed, but if you want a softer sluice for drizzling over desserts, warm a few squares gently in a small bowl over barely simmering water. Stir until just soft and glossy. Use immediately as a sauce over cakes or ice cream.
A few practical notes on keeping texture:
- Keep the container airtight to prevent the fudge from picking up fridge odors.
- Do not place warm fudge into the refrigerator; allow it to come to near room temperature first to avoid condensation on the surface.
- If your fudge becomes too firm after chilling, let it sit at room temperature for 15 minutes before serving.
Sweet Tips & Tricks
- Use good-quality white chocolate. It melts smoother and tastes richer. Cheap baking bars can be waxy.
- Add a teaspoon of butter at the end to increase gloss. It gives a faintly richer mouthfeel and a lovely sheen.
- If your mixture looks grainy, warm it again over low heat and stir until smooth. Patient stirring beats high heat every time.
- Clean up is easier when you soak bowls and pans immediately in warm water. The sweetened condensed milk can harden if left to dry.
- For cleaner slices, dip your knife in hot water, dry it, and make long, decisive strokes.
These short notes come from years of quick batches and last-minute trays. They keep the process calm and the results reliable. I like to label a small kitchen notebook with a few of these reminders so I do not forget them when the house is busy.
Flavor Twists & Variations
There are a few lovely ways to change this fudge while keeping the same easy method.
- Chocolate ribbon: Replace one cup of white chocolate chips with dark or milk chocolate to make a two-tone effect. The richer chocolate cuts the sweetness and adds depth.
- Nutty crunch: Fold in 1/2 cup toasted pecans or walnuts to the plain layer for texture. Toasted nuts add a caramel note that pairs well with the white chocolate.
- Citrus lift: Add a teaspoon of finely grated orange zest to the plain mixture before pouring. The citrus brightens the sweetness and pairs especially well with peppermint.
- Peppermint twist: Stir in a drop or two of peppermint extract into the green or plain layer. Top with crushed candy cane for a festive crunch.
- Spiced version: Mix 1/4 teaspoon ground ginger and a pinch of cinnamon into the plain layer for a cozy, warm note that feels like winter by the fireplace.
If you enjoy exploring other ingredient ideas, I sometimes read about different pantry tricks and bring small ones into my desserts. One helpful reminder about gelatin or gelling agents appeared in a short piece on ingredient tricks. It reminded me that a little understanding of textures can help when you want a fudgier or firmer result.
You can also switch the sprinkles for edible gold leaf or chopped roasted pistachios for a more refined look. Small changes make the same recipe feel new each year.
Lessons From My Kitchen
I learned to make this fudge because I wanted something quick and beautiful at holiday time. Over the years, a few small habits make the difference between good and great.
First, measure and prepare everything before you melt the chocolate. Fudge sets quickly once it cools, and having bowls ready helps you work without rush.
Second, choose your pan thoughtfully. An 8×8 pan gives thicker squares. If you prefer thinner bites, halve the recipe or use a larger pan.
Third, keep a small towel and a container of warm water near your work area. Wiping your knife between cuts and dipping it in warm water makes each slice look professional.
Finally, trust your eyes. Look for a glossy surface when you melt the chocolate, and use the refrigerator as a patient partner in the process. Good fudge needs time to settle.
The Joy of Christmas Fudge
Ingredients
Fudge Base
- 3 cups white chocolate chips Choose high-quality white chocolate with cocoa butter as the first ingredient.
- 1 14-ounce can sweetened condensed milk This ingredient helps avoid grainy textures.
- 1/2 teaspoon vanilla extract Use pure vanilla extract for the best flavor.
Decoration
- Red and green food coloring Add until desired color is reached.
- 1/4 cup holiday sprinkles Optional, for decoration.
Instructions
Preparation
- Line an 8×8-inch baking dish with parchment paper, allowing extra paper to hang over the sides for easy removal.
- In a medium saucepan, combine white chocolate chips and sweetened condensed milk. Stir over low heat until completely melted and smooth. Remove from heat and stir in vanilla extract.
- Divide the melted mixture into three bowls. Tint one with red food coloring and another with green, leaving the third bowl plain.
Layering
- Pour the red fudge mixture into the prepared pan, spreading it evenly. Layer the plain fudge on top, followed by the green fudge.
- Gently swirl the layers together with a knife for a marbled effect.
- Sprinkle holiday-themed sprinkles on top while the fudge is still warm, if desired.
Setting
- Refrigerate for at least 2 hours, or until firm. Lift the fudge out using the parchment paper and cut into small squares.
Notes
Nutrition
FAQs About The Joy of Christmas Fudge
Can I make this ahead?
Yes. This fudge holds up well and often tastes better after resting overnight. Make it a day ahead for the cleanest slices and easiest serving.
Can I use dark or milk chocolate instead of white?
Absolutely. Swap one cup or more of the white chocolate for dark or milk chocolate to balance the sweetness. Keep the same method and watch for melting differences.
How do I avoid grainy fudge?
Stir gently over low heat and do not let the mixture boil. If graininess appears, warm the mixture again and stir until smooth. Using high-quality chocolate also reduces the risk.
Is this safe to give as a gift?
Yes. Pack the squares in a small box with parchment between layers. Keep refrigerated if you are sending to warm locations, and include a note to refrigerate upon arrival.
Can I freeze the fudge?
Yes. Freeze in a single layer on a baking sheet, then transfer to a freezer container with parchment between layers. Thaw in the refrigerator overnight.
A Final Sweet Note
I hope The Joy of Christmas Fudge brings your kitchen the same buttery joy it brings mine. This recipe is about ease and pleasure: a quick set of steps, gentle flavors, and the kind of texture that says comfort. Share it with a neighbor, bring it to a small party, or slice a few squares for a quiet night with a good cup of tea. It is both a gift and a quiet celebration.
Making something by hand, even a small tray of fudge, is a way of slowing the day and being present. The bright swirls and the glossy finish are a simple kind of beauty, and they are easy to achieve with a warm pot, a steady spoon, and a little patience. May you find the same peaceful pleasure in these squares that I do when the house is soft with light and the kitchen smells of vanilla.
Conclusion
If you would like to read a related holiday reflection, The Joy of Christmas is a lovely write-up that captures the season’s warmth. For another nutty, old-fashioned take on holiday fudge, try the rich Buttermilk Pecan Fudge which offers a different, classic texture and flavor.
What’s Cooking in Your Kitchen?
Tried this recipe your own way? I want to see it. Snap a quick pic and tag us, or drop a comment with what you tweaked. Lazy cooking works best when we swap ideas and your spin might be the next Lazy Meal Prep favorite.
Post your photo and tag @lazy_mealprep I’ll share my favorites in stories.