
The oven hums like a small promise. I remember nudging the door open on a cool morning and the warm, sweet air spilling out, soft with butter and orange zest. My mother braided dough with flour-dusted fingers and a steady smile, and we all waited for that golden loaf to come home to the table. If you like comfort from the kitchen, you might enjoy trying a little sister recipe I keep handy for quiet afternoons, my favorite anginetti Italian cookies are simple and bright here.
Why Italian Easter Bread Still Feels Like Home
This bread carries a kind of ordinary magic. It is not ornate. It is warm, lightly sweet, and braided like a promise that the table will have one more story to tell. For me, its meaning is quiet and steady. It marks doorways: family visiting, children running in, the smell that pulls everyone toward the kitchen.
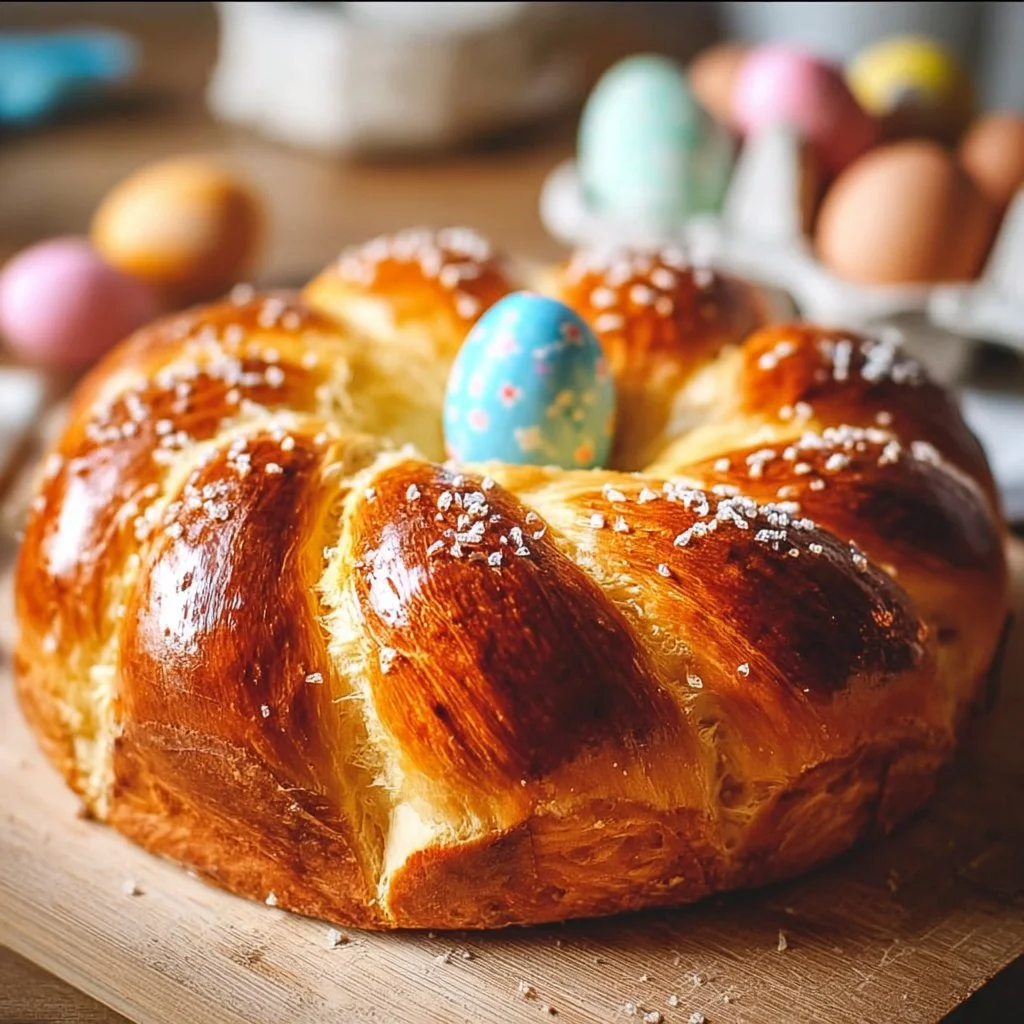
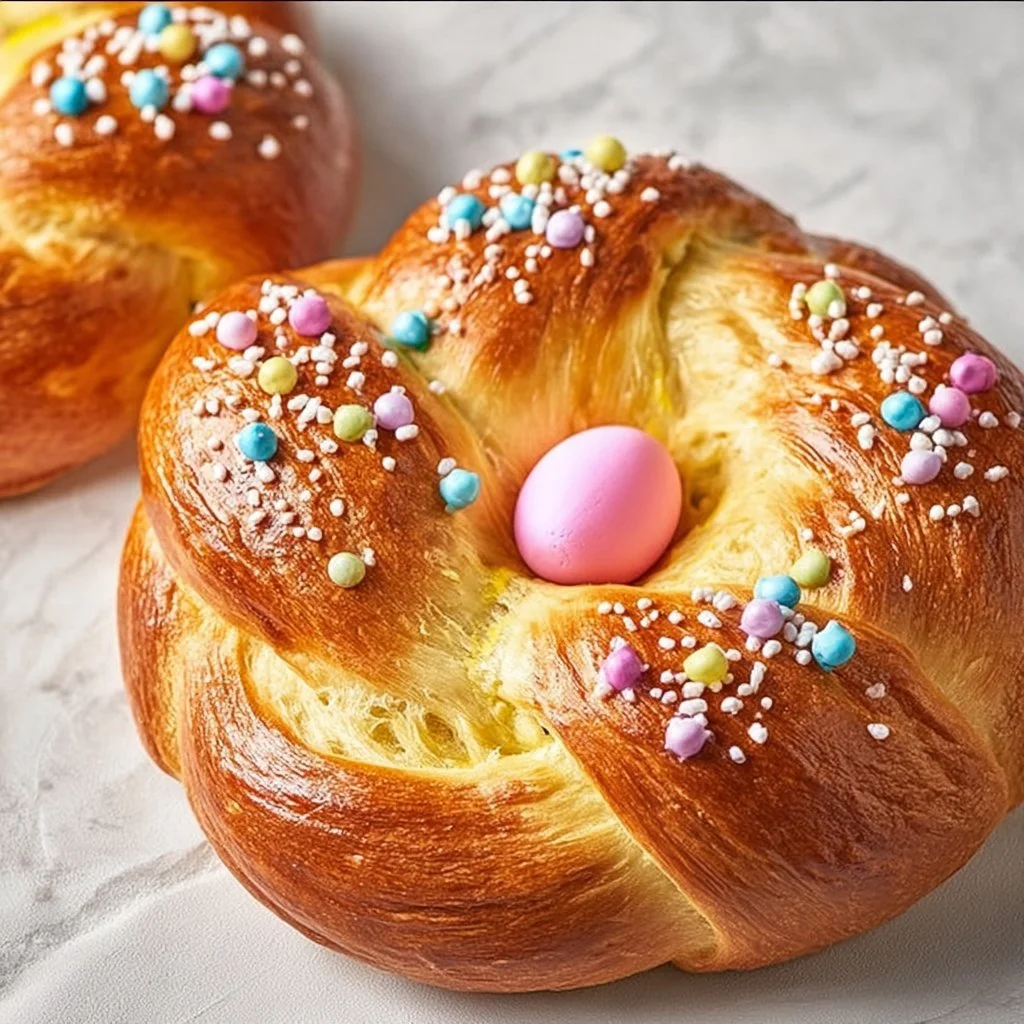
The heart of the bread is the same in every kitchen I have known: a soft, slightly sweet dough, a braid that asks to be touched, and the bright surprise of dyed eggs tucked into the curves. The colors bring a small cheer. The taste brings calm. Once baked, the crust has a gentle sheen and the crumb stays tender for days. Meanwhile, someone will always reach for the end piece first and declare it the best.
I like to say it is comfort you can pass around. It is one of those recipes that makes a house feel like a home without fuss. If you love slow mornings and simple sweets, there is a gentle connection between this bread and other beloved loaves. You can read more about a plain banana loaf that holds the same kind of quiet comfort in another simple recipe for banana bread here.
Bringing Italian Easter Bread Together
“Every time I stir this pot, it smells just like Sunday at home.”
Before the braid, there is always a small moment of rhythm. You will notice the milk warming and the yeast bubbling. You will hear the soft scrape of a wooden spoon and the bright crack of eggs as they fold into glossy dough. The dough will feel cool and then slowly become elastic and springy under your palms.
This overview is to keep your hands calm. Gather your tools: a large bowl, a wooden spoon or dough hook, a floured board, and a thermometer if you like exactness. Watch for a dough that pulls away from the bowl and stretches without tearing. At that point you will know it is ready to rest and grow.
When it bakes, the scent is the first quiet announcement. Butter notes, warm sugar, and that subtle eggy comfort. The outside will go golden, and if you brush with a little extra butter after it comes out, it will shine like a small celebration.
Ingredients You’ll Need
- 4 cups all-purpose flour
- 1/4 cup sugar
- 1 packet active dry yeast
- 1 teaspoon salt
- 1 cup milk (warm)
- 1/4 cup unsalted butter (melted)
- 2 large eggs
- 1 teaspoon vanilla extract
- Dye or food coloring (for eggs)
- Sprinkles (optional)
A warm side note: add a dash more cinnamon if you love cozy spice. Use fresh butter it makes all the difference in the scent and richness. If you like a subtle orange note, a teaspoon of grated orange zest folded into the dough is a small, lovely change. For nut lovers, you could fold in some chopped nuts after the first rise, and if you want a nuttier loaf I often refer friends to a tried banana-nut loaf recipe that shows how small additions can change a simple bread here.
Step-by-Step Directions
- In a large bowl, combine warm milk and sugar, then sprinkle yeast on top. Let it sit for about 5 minutes until foamy.
Stir gently and watch for a light foam that tells you the yeast is alive. The milk should be warm, not hot, about lukewarm to the touch. - Add melted butter, eggs, vanilla extract, and salt to the yeast mixture and stir until combined.
Mix until the surface looks glossy and smooth. The eggs will add richness and a tender crumb. - Gradually add flour, one cup at a time, mixing until a dough forms.
Fold the flour in with gentle motions at first, and then bring it together with firmer strokes. The dough should feel slightly sticky but come together. - Knead the dough on a floured surface for about 8-10 minutes until smooth and elastic.
Use the heels of your hands and push, fold, and turn. Watch for the dough to become silky and spring back when poked. If it sticks too much, sprinkle a little flour, but keep it soft. - Place the dough in a greased bowl, cover with a cloth, and let it rise in a warm place for about 1-2 hours until doubled in size.
I like to set mine near a warm oven or a sunlit window. The dough will puff and feel airy when you lightly press it. - Preheat the oven to 350°F (175°C).
Line a baking sheet with parchment. This gives the braid a gentle bottom and keeps cleanup easy. - Punch down the dough and divide it into three equal pieces. Roll each piece into ropes and braid them together.
Roll each rope until it is even in thickness. Braid loosely so the dough can rise again and keep its beautiful curves. - Place the braided dough on a lined baking sheet and tuck decorated dyed eggs into the braid.
Press the eggs gently into the braid so they stay snug. Use colors that make you smile and remember the safety of hard-boiled eggs. - Let the dough rise again for 30 minutes.
Cover it with a cloth. The second rise makes the braid pillowy and light, and you will see it soften and bloom. - Bake for 25-30 minutes or until golden brown.
Watch for a deep golden color and a hollow sound when you tap the bottom. If you like, brush with a little melted butter right after the oven. - Let cool and optionally top with sprinkles before serving.
Once cooled, the crumb settles into a gentle, tender texture. Sprinkles add a playful touch for kids and bring out warm smiles.
Serving Italian Easter Bread With Family Warmth
Bring the loaf to the table whole so everyone can admire the braid and the bright eggs tucked inside. I like to set it on a wooden board with a little bowl of softened butter and a pot of coffee. From there, we slice it gently and pass it around, each person taking a piece.
This bread works as a sweet breakfast, a late-afternoon treat, or the centerpiece of a simple holiday spread. Pair it with fresh fruit, soft cheese, or a bowl of ricotta for a richer bite. Meanwhile, someone will hum a song, someone else will tell a story, and the bread will always be part of the quiet conversation.
If you are sharing with little ones, cut small squares so they can hold it easily. For a festive touch, serve with a small dish of honey or jam. The beauty is in how it brings people close and gives everyone a reason to slow down for a moment.
Storing Italian Easter Bread for Tomorrow
Store the bread at room temperature wrapped in foil or in a bread box for up to two days. The texture will stay soft and the flavors will settle. If you want to keep it longer, slice and freeze in an airtight bag for up to three months.
To reheat, wrap a slice in a damp paper towel and microwave for 15 to 20 seconds, or warm gently in the oven at 300°F for 10 minutes. Once warmed, brush a little butter on top and the crust will reclaim that just-baked softness. Overnight, the flavors mellow and become sweeter in a gentle way, so a slice the next morning often tastes comfortingly different.
Linda’s Tried-and-True Tips
- Use warm milk, not hot. If the milk is too hot it will kill the yeast. Test it with your wrist; it should feel like a warm bath.
- Let the dough tell you when it is ready. Texture cues matter more than exact times. Look for a smooth, elastic dough that springs back.
- Brush with butter right after baking. It keeps the crust tender and adds a soft shine.
- If you are short on time, do the first rise in the oven with just the light on. It gives a cozy, even warmth and saves waiting.
- For easier cleanup, line your baking sheet with parchment. I always keep a roll ready. Also, a stand mixer with a dough hook saves elbow work if you have one.
I have used these small habits for years. They are the gentle ways to make sure the bread comes out the same loving way, even when life is busy.
Family Variations on Italian Easter Bread
Families change recipes in small ways that feel right to them. My aunt adds anise extract for a hint of licorice. My cousin folds in raisins and orange zest. One neighbor tucks almond paste into the center before braiding for a sweet, soft surprise.
If you want a richer loaf, add an extra egg yolk. If you like a bit of crunch, press chopped almonds or sugar on top before baking. For a chocolate-happy table, tuck thin chocolate chips into the braid just before the second rise. These changes keep the bread true but make it feel like yours.
Another gentle variation is to use whole milk yogurt in place of some milk for a slightly tangy crumb. If you are cooking for a crowd, make two smaller braids rather than one large loaf so you can pass them around easily.
If you are trying to cut down on sugar, reduce the amount by a tablespoon or two. The bread will still have its warm, homey charm. For egg coloring, use natural dyes from beet juice or turmeric for soft, warm tones that still feel like a family memory.
Little Kitchen Notes
- Substitutions: You can swap part of the flour for whole wheat pastry flour for heartier texture, but keep the ratio low to protect tenderness.
- Prep shortcuts: Warm the oven slightly to make a cozy rising spot. Use melted butter at room temperature so it does not shock the yeast mixture.
- Texture advice: A sticky dough is better than a dry one. Add flour sparingly when kneading. The dough should be soft and slightly tacky.
- Cleanup: Soak the mixing bowl with warm soapy water right after you knead. It saves time and makes cleanup feel small.
- Timing: If your kitchen is cold, allow more time for the rises. The clock is a guide, but dough progress is a better measure.
FAQs About Italian Easter Bread
Q: Can I bake this a day ahead?
Yes, and honestly, it tastes even better the next day when the flavors settle together. Wrap it well and keep it at room temperature or slice and warm gently before serving.
Q: Can I use instant yeast instead of active dry?
Yes. If you use instant yeast, whisk it directly with the dry ingredients and shorten the first rise slightly. Watch the dough for fullness.
Q: Are the eggs safe to eat in the bread?
Yes, as long as the eggs are hard-boiled before placing them in the braid. They are decorative and edible. If you prefer, you can use decorative wooden eggs for display.
Q: Can I make smaller rolls instead of one braid?
Absolutely. Divide the dough into small balls, tuck an egg into each, and let them rise for a smaller, pretty presentation. They make great gifts.
Q: What if my braid flattens while baking?
It may have been braided too tightly or not given enough second rise. Next time braid a little more loosely and give it the full 30 minutes to puff up before baking.
A Final Thought
I hope this Italian Easter Bread brings your kitchen the same quiet joy it brings mine. When I make it, I think of small hands reaching for a slice, of conversations that stretch lazily across a table, and of how a simple loaf can steady everything else.
Before I go, one more small recipe note: if you love a soft, plain loaf for weekday comfort, there are other no-fuss options you might enjoy, like a simple banana bread without baking soda that keeps things gentle and sweet here.
Conclusion
If you want to explore other takes on this favorite, I find two recipes that honor the tradition and show different family touches. One version shares colorful, simple steps that echo this recipe and brings that familiar braid to life in a playful way that many readers love. You can read a friendly, bright version of Italian Easter Bread at Italian Easter Bread – Sprinkle Bakes. Another well-loved, time-tested family version is shared with warm detail and clear photos at Nana’s Italian Easter Bread – Brown Eyed Baker.
May your kitchen smell like butter and home, and may this bread find a place at your next table.

Italian Easter Bread
Ingredients
Dough Ingredients
- 4 cups all-purpose flour
- 1/4 cup sugar
- 1 packet active dry yeast
- 1 teaspoon salt
- 1 cup milk (warm) Should feel like a warm bath.
- 1/4 cup unsalted butter (melted) Use fresh butter for better flavor.
- 2 large eggs
- 1 teaspoon vanilla extract
- Dye or food coloring (for eggs)
- Sprinkles (optional) For decoration.
Instructions
Preparation
- In a large bowl, combine warm milk and sugar, then sprinkle yeast on top. Let it sit for about 5 minutes until foamy.
- Stir gently and watch for a light foam that indicates the yeast is alive.
- Add melted butter, eggs, vanilla extract, and salt to the yeast mixture and stir until combined.
- Gradually add flour, one cup at a time, mixing until a dough forms.
- Knead the dough on a floured surface for about 8-10 minutes until smooth and elastic.
- Place the dough in a greased bowl, cover with a cloth, and let it rise in a warm place for about 1-2 hours until doubled in size.
- Preheat the oven to 350°F (175°C).
Baking
- Punch down the dough and divide it into three equal pieces. Roll each piece into ropes and braid them together.
- Place the braided dough on a lined baking sheet and tuck decorated dyed eggs into the braid.
- Let the dough rise again for 30 minutes.
- Bake for 25-30 minutes or until golden brown.
Finishing
- Let cool and optionally top with sprinkles before serving.