
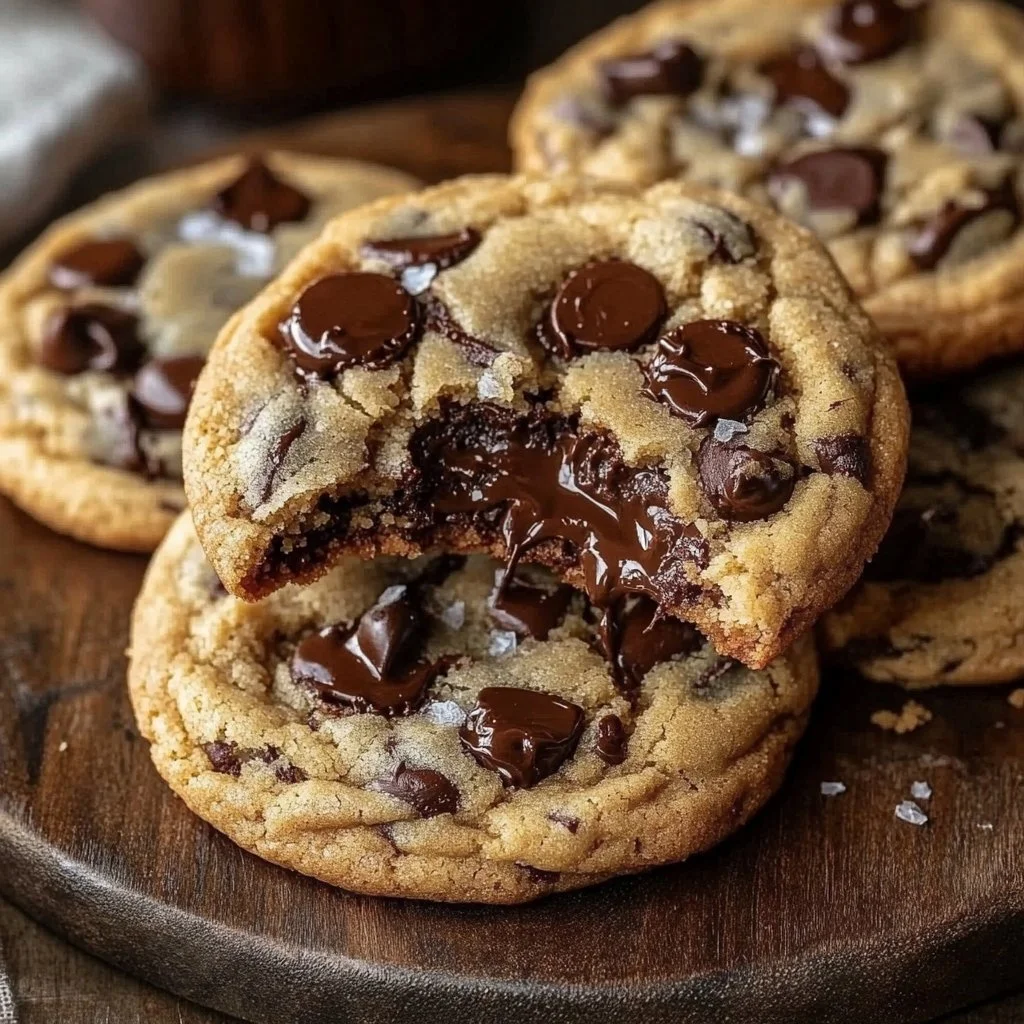
I can still remember the late afternoon light that fell through my kitchen window the first time I made these Ultra Thick Bakery Style Chocolate Chip Cookies – Crispy Edges, Gooey Centers, and Loaded with Chocolate!. The house smelled like caramel and warm vanilla, and my children sat at the table with cups of milk, watching the oven like it held a small miracle. I shared this version with friends who love a good bakery cookie and found a similar, helpful idea in a bakery-style chocolate chip cookie recipe I loved that helped shape my method, and from that day on the recipe became part of our slow afternoons and quick celebrations.
Why This Ultra Thick Bakery Style Chocolate Chip Cookies – Crispy Edges, Gooey Centers, and Loaded with Chocolate! Means So Much

This cookie has the pulse of family life. It tastes like taking a breath in a warm kitchen, like a plate slid across a table while someone tells a story. My mother baked thin, crackly cookies, but I wanted something different for our noisy house. I wanted cookies that felt like a hug.
The thick center holds warm chocolate like a little island of comfort. The edges crisp but never hard. The middle stays soft so that when you break one open, you see melted pockets of chocolate and steam rise. It has a rhythm I learned by baking too often and paying attention to what my family reached for first.
There is a simple honesty to this recipe. No tricks, just good butter, the right chill time, and a careful hand when mixing the chips in. It is a recipe that rewards patience and gentle hands. From there, it became the one I reach for when guests arrive, when a child needs a cheer, or when I simply want to fill the house with something familiar.
How to Make Ultra Thick Bakery Style Chocolate Chip Cookies – Crispy Edges, Gooey Centers, and Loaded with Chocolate!
“Every time I stir this pot, it smells just like Sunday at home.”
Before we list the ingredients, let me give you the simple picture of how this comes together. You mix the dry parts until they look pale and fluffy. You whisk the wet parts until they are glossy. You fold in the chocolate until the dough looks laced with dark jewels. Then you chill.
As the dough rests, it gathers confidence. The butter firms up, the flour relaxes, and the flavors settle. When the dough goes into the oven, it puffs, sets at the edges, and keeps its soft heart. You will hear the oven sing low and steady as they bake, and you will know by smell and sight when they are done.
I like to think of baking this as a small ritual. The sound of a wooden spoon against a mixing bowl, the scrape of the spatula at the end, and the quiet chatter while the cookies cool. If you want a little variation for dietary needs, try the gluten-free options I have used on rainy afternoons by visiting this gluten-free version I tested for ideas on swapping flours.
Ingredients You’ll Need
2 large eggs
2½ cups all-purpose flour
1 teaspoon baking soda
½ teaspoon salt (or sea salt)
1 cup granulated sugar
½ cup packed light brown sugar
1 teaspoon vanilla extract
3 cups chocolate chips (use a mix of semisweet and dark for a bakery effect)
14 tablespoons unsalted butter (melted and slightly cooled)
Optional for topping: Extra chocolate chips and flaky sea salt for that bakery-style finish
A warm side note: a dash more cinnamon if you love cozy spice. Use fresh butter it makes all the difference. If you like, swap half the chips for chunks of chocolate for bigger pockets of melting goodness.
Step-by-Step Directions
Step 1: Mix the Dry Ingredients
- In a medium bowl, whisk the flour, baking soda, and salt until combined.
- The mixture should look even and pale, without streaks of flour.
- Set the bowl aside where it is warm and quiet.
Step 2: Prepare the Wet Ingredients
- In a large bowl, whisk the granulated and brown sugars with the melted butter until glossy.
- Add the eggs one at a time, beating lightly after each one.
- Stir in the vanilla until everything is smooth and shines.
Step 3: Combine and Fold
- Add the dry ingredients to the wet in two parts, folding gently after each addition.
- Use a spatula and a gentle turn; stop once you see no dry flour.
- Fold in the chocolate chips until they are scattered through the dough.
Step 4: Chill the Dough
- Cover the bowl and chill for at least 2 hours, or overnight for the best texture.
- Chilling firms the butter and helps the cookies spread less in the oven.
- If in a hurry, you can chill for 30 minutes, but expect thinner cookies.
Step 5: Preheat and Prep
- Preheat the oven to 350°F (175°C). Line baking sheets with parchment paper.
- If you have a baking stone, place it in the oven while it heats for a stronger bottom crust.
- Measure generous scoops of dough while the oven comes to temperature.
Step 6: Scoop and Shape
- Use a large cookie scoop or two spoons to form dough mounds about 2 ½ inches wide.
- Press a few extra chips on top for a bakery look and to create those chocolatey faces.
- Leave room between mounds because they will spread a little but stay thick.
Step 7: Bake
- Bake for 12 to 15 minutes, watching for puffed centers and golden edges.
- The middle will look slightly underdone; that is what gives you gooey centers.
- Rotate the pan once halfway through if your oven bakes unevenly.
Step 8: Cool and Set
- Let the cookies cool on the pan for 5 minutes, then transfer to a rack.
- Once cooled a bit more, the center will be set but still soft.
- Serve warm, or let them come to room temperature and watch the flavors deepen.
A few small cues will tell you all you need to know. When the edges are golden and the center no longer jiggles, they are done. If you want a crisper edge, leave them an extra minute or two, and if you want more ooze, pull them a little sooner.
Serving Ultra Thick Bakery Style Chocolate Chip Cookies – Crispy Edges, Gooey Centers, and Loaded with Chocolate! With Family Warmth
Bring these cookies to the table on a worn wooden board and tuck napkins around them. I love to place them near the kettle or a cold pitcher of milk. The contrast of warm cookie and cool milk is a small joy that lives in my memory.
We serve them on quiet Sundays and at birthday parties where the kids count chips like treasures. Sometimes, I place a few on a dessert plate with a scoop of vanilla ice cream and let the house hum with small conversations. Meanwhile, for mornings when we need a pick-me-up, a single cookie beside a cup of coffee feels like a tiny breakfast treat.
When family gathers, someone always wants a second. There is no formal plan, just a shared plate passed around. If you would like a sturdier cookie for packing into lunches, chill the dough a bit longer and press a little flatter before baking. For a photo idea or extra tips about a thicker, chewier style, I sometimes look at this version I adapted from a friend for inspiration on shapes and sizes.
Storing Ultra Thick Bakery Style Chocolate Chip Cookies – Crispy Edges, Gooey Centers, and Loaded with Chocolate! for Tomorrow
Store cookies in an airtight container at room temperature for up to five days. Layer with parchment to keep them from sticking. The sugars mellow and the centers relax into a creamier texture overnight, which many of us like better.
If you want to save them longer, freeze the baked cookies in a single layer on a tray until firm, then transfer to a freezer-safe bag. Thaw on the counter, and if you like them warm, pop them in a 300°F oven for 5 minutes to regain that just-baked feel.
For dough storage, portion the dough into scoops and freeze them on a tray first. Once solid, place the dough balls in a bag and freeze up to three months. When ready to bake, add a minute or two to the bake time and bake from frozen.
Little Kitchen Notes
- Use room temperature eggs for easier mixing and a smoother batter.
- Melted butter gives a denser, chewier crumb than softened butter. If you prefer a lighter texture, use softened butter and cream it with the sugars.
- Lightly pressing extra chips on top before baking gives that bakery look that makes people smile.
- A sprinkle of flaky sea salt right out of the oven brightens the chocolate and balances sweetness.
- If cleanup is a chore, line the pan and use one bowl for mixing to save time.
These are the small lessons I learned by making this over and over. They are simple things, but they change the cookie from good to the one people ask about.
Family Variations on Ultra Thick Bakery Style Chocolate Chip Cookies – Crispy Edges, Gooey Centers, and Loaded with Chocolate!
We have a few family twists that feel like home and keep this recipe fresh. Swap a cup of flour for old-fashioned oats for a heartier texture, and try the oat ideas I tested with guests at this oat-based take I like.
Sometimes we stir in chopped toasted pecans or walnuts for a little crunch. In winter, a pinch of ground cinnamon and orange zest makes the cookie smell like the holidays. For children who love candy, fold in a cup of mini peanut butter cups for a surprise.
If someone at the table needs gluten-free, I have used a one-to-one gluten-free flour mix that keeps the dough thick and holds the chips well. My notes on variations helped when I adapted this for friends with wheat sensitivity; see a gluten-free approach I tried at this gluten-free version that worked for us.
FAQs About Ultra Thick Bakery Style Chocolate Chip Cookies – Crispy Edges, Gooey Centers, and Loaded with Chocolate!
Can I bake this a day ahead?
Yes. Baked cookies keep well for a day and often taste more blended the next morning. Store them in an airtight container.
Can I make these gluten-free?
Yes. I have made a gluten-free batch that keeps the texture close to the original by using a one-to-one gluten-free flour blend and chilling a little longer. For a tested method, try the alternate recipe I adapted at that gluten-free recipe if you need a step-by-step swap.
How do I get gooey centers without underbaking?
Watch the edges, not the middle. When edges turn golden and the center looks a touch soft, they are ready. The carryover heat on the pan will finish the center while keeping it luscious.
Can I reduce the sugar?
You can reduce the granulated sugar slightly, but remember that sugar affects texture as much as sweetness. Reducing too much will yield a drier cookie.
Why chill the dough?
Chilling solidifies the butter so dough spreads less and the cookie holds a taller profile with a chewy center. It also helps flavors come together.
A Final Thought
I hope this Ultra Thick Bakery Style Chocolate Chip Cookies – Crispy Edges, Gooey Centers, and Loaded with Chocolate! brings your kitchen the same quiet joy it brings mine. I hope it fills small moments with warmth and gives you a reason to gather around a plate and share. For one last note, if you want to compare techniques or see a version that inspired my method, you might find the classic recipe helpful: Bakery Style Chocolate Chip Cookies Recipe (Thick, Chewy & Soft).

Ultra Thick Bakery Style Chocolate Chip Cookies
Ingredients
Dry Ingredients
- 2.5 cups all-purpose flour
- 1 teaspoon baking soda
- 0.5 teaspoon salt or sea salt
Wet Ingredients
- 1 cup granulated sugar
- 0.5 cup packed light brown sugar
- 2 large eggs room temperature preferred
- 1 teaspoon vanilla extract
- 14 tablespoons unsalted butter melted and slightly cooled
Chocolate Chips
- 3 cups chocolate chips use a mix of semisweet and dark for a bakery effect
- optional extra chocolate chips for topping
Optional Ingredients
- to taste flaky sea salt for topping
- a dash cinnamon if you love cozy spice
Instructions
Mix the Dry Ingredients
- In a medium bowl, whisk the flour, baking soda, and salt until combined.
- Set the bowl aside where it is warm and quiet.
Prepare the Wet Ingredients
- In a large bowl, whisk the granulated and brown sugars with the melted butter until glossy.
- Add the eggs one at a time, beating lightly after each one.
- Stir in the vanilla until everything is smooth and shines.
Combine and Fold
- Add the dry ingredients to the wet in two parts, folding gently after each addition.
- Fold in the chocolate chips until they are scattered through the dough.
Chill the Dough
- Cover the bowl and chill for at least 2 hours, or overnight for the best texture.
Preheat and Prep
- Preheat the oven to 350°F (175°C). Line baking sheets with parchment paper.
- Measure generous scoops of dough while the oven comes to temperature.
Scoop and Shape
- Use a large cookie scoop or two spoons to form dough mounds about 2 ½ inches wide.
- Press a few extra chips on top for a bakery look.
- Leave room between mounds because they will spread a little but stay thick.
Bake
- Bake for 12 to 15 minutes, watching for puffed centers and golden edges.
- Rotate the pan once halfway through if your oven bakes unevenly.
Cool and Set
- Let the cookies cool on the pan for 5 minutes, then transfer to a rack.
- Once cooled a bit more, the center will be set but still soft.